Project update 5 of 9
Open Source Software Setup & Funding Goal Adjustment
Hello every one!
Lowering the Funding Goal
Thank you very much for backing our campaign. We have decided to lower our funding goal to $3,000 USD. This was done after discussion with Crowd Supply. We have made arrangements that will allow us to complete manufacturing with the lowered amount. We are still committed to making the easySwitchBoxes that you’ve ordered.
If any backers do not feel comfortable with this goal change, they can cancel their order before the end of the campaign and they will not be charged a thing. If you have any questions about this decision, feel free to reach out to us here. If you want to cancel your order, please contact Crowd Supply Support with your order details.
Here is our latest update.
Why we love RFM69\LoRa radios and Arduino compatible processors from Microchip:
1. Learning curve.
It is very easy to learn. The great efforts from lib authors have created easy to learn and use lightweight code from Low Power Lab, Airspyce and MySensors.
2. Programming IDE is free.
If you like to use free ZHA stack from Texas instruments you still need to buy pricey IDE to compile code into binaries. The open-source Arduino Software (IDE) does the great job and takes care of lot of things for you.
3. Useful and available libs
The libs we tested here is really working great. We used MySensors code from early years until now in our projects. They are super handy and useful for home automation.
Things worth mentioning
The switchbox is coin-cell battery-powered device. To get a longer life, we need to send the processor and radio into sleep mode. Otherwise, it will not last long - actually few hours or even less.
The air sanity is to be taken seriously. Please be carefully with retries and tests. The radiofrequency is free for all and please do not abuse by taking up to much airtime for sending packets.
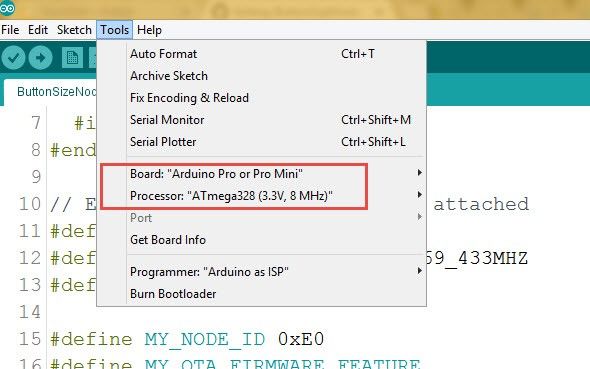
Arduino IDE Settings for EasySwitchBox
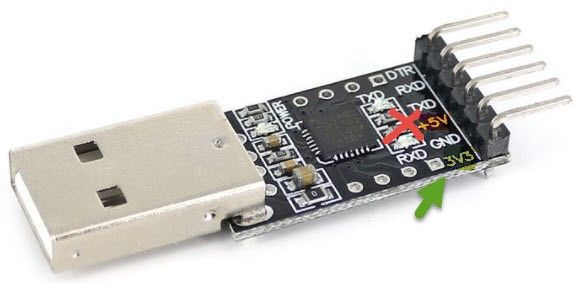
Programming FTDI adapter connection
Examples we will use in this update
- RFM95 Radiohead example (Can also be used for rfm 69 radios)
- LowPowerLab/RFM69 Lib.
- MySensors RFM95 and RFM 69 home automation lib.
Example sketches could be found it here: https://github.com/crowd-supply-projects/easyswitchbox/tree/master/updates
RadioHead
RadioHead Packet Radio library for embedded microprocessors is a very popular lib under GPLV2 or commercial licenses. Created by Australian Airspyce pte ltd, credit to Mike McCauley. The LowPower lib provides Unreliable and Reliable addressed Datagrams (retransmitted, acknowledged), broadcasts, and also Router and Mesh classes for various types of networks. It runs on Arduino and router or mesh infrastructure messaging. RadioHead consists of 2 main sets of classes: Drivers and Managers.
- Drivers provide low level access to a range of different packet radios and other packetized message transports.
- Managers provide high level message sending and receiving facilities for a range of different requirements.
Let’s see a reliable server and client example.
Modem setting to choose from presets can be done this way:
driver.setModemConfig((RH_RF95::ModemConfigChoice) 3); // where 3 is setting number to choose. Can be 0, 1, 2 or 3.
Bw125Cr45Sf128 = 0,    ///< Bw = 125 kHz, Cr = 4/5, Sf = 128chips/symbol, CRC on. Default medium range
Bw500Cr45Sf128,  ///< Bw = 500 kHz, Cr = 4/5, Sf = 128chips/symbol, CRC on. Fast+short range
Bw31_25Cr48Sf512, ///< Bw = 31.25 kHz, Cr = 4/8, Sf = 512chips/symbol, CRC on. Slow+long range
Bw125Cr48Sf4096,   ///< Bw = 125 kHz, Cr = 4/8, Sf = 4096chips/symbol, CRC on. Slow+long range
In a previous campaign update, we did some testing for longer distances and slower rates against faster and less distance presets. Check it out.
After all settings were set up, we sent the switchBox Radio and processor into sleep mode:
driver.sleep();
LowPower.powerDown(SLEEP_FOREVER, ADC_OFF, BOD_OFF);
LowPower lib is used to send the ATMEG328P processor to sleep until an interrupt occurs.
We use Arduino interrupt 1 Pin 3 to wake up and check which button fired interrupt to the server node. Other settings and code pretty much straight forward. We send to server messages like
got request from : 0x1: B 1;V 1
got request from : 0x1: B 1;V 0
which can be seen from serial output of the server: B 1 is button #; V 1 is the button state.
LowPowerLab/RFM69
LowPowerLab/RFM69 is a great library for RFM69 radios comes with set of examples and lowpower lib to send CPU into sleep mode. Both are free software under the terms of the GNU General Public License. Example sketches are based on Sample RFM69 receiver/gateway sketch and Struct Send RFM69 Examples. The only settings to note is HCW and CW radio choice
#define IS_RFM69HW_HCW - uncomment for RFM69 HCW radio.
All other settings are straightforward. Serial output are similar to the Radiohead example.
MySensors
MySensors is an open source hardware and software community focusing on do-it-yourself home automation and the Internet of Things. The library set is very Home-automation oriented. Both RFM69 and LoRa RFM95 supported.
Radio type and frequencies can be defined in this lines
#define MY_RADIO_RFM69
//#define MY_IS_RFM69HW
Or
#define MY_RADIO_RFM95
#define MY_RFM69_FREQUENCY   RFM69_915MHZ
RFM 95 Modem settings :
#define MY_RFM95_MODEM_CONFIGRUATION RFM95_BW_500KHZ | RFM95_CODING_RATE_4_5,     RFM95_SPREADING_FACTOR_2048CPS | RFM95_RX_PAYLOAD_CRC_ON, RFM95_AGC_AUTO_ON //
#define MY_RFM95_TX_POWER_DBM (20u)
#define   MY_RFM95_FREQUENCY RFM95_915MHZ
Code can send messages to respective relays or to home automation controller (address 0)
int relayNodeID[2] = {0, 0}; // Relay addressess for reach button to send switch ON\OFF states. Can be any address; 0 is SmartHome controller address.
The buttons of the switch defined as child or sensor numbers.
int relayChildID[3] = {4, 4}; //NULL value means no need to report\present it to cntroller;
The switchBox as the node on the MySensors network should be given Node ID This can be done manually
#define MY_NODE_ID 0x43
or if you connect to Home automation controller – automatically
#define MY_NODE_ID AUTO
Lets see how to connect switchBox and Nano Shield to Domoticz home automation controller. Burn EasySwitchBox.ino into EasySwitchBox and GatewaySerial.ino into the Nano Shield. To install Domoticz on Raspberry Pi open terminal and run curl -sSL install.domoticz.com | sudo bash
To let Domoticz start automatically, run the commands below
cd domoticz
sudo cp domoticz.sh /etc/init.d
sudo chmod +x /etc/init.d/domoticz.sh
sudo update-rc.d domoticz.sh defaults
Edit the startup script
sudo nano /etc/init.d/domoticz.sh
Point your browser to the IP address of your Raspberry Pi, for example: http://192.168.0.10:8080.
More details on Domoticz here.
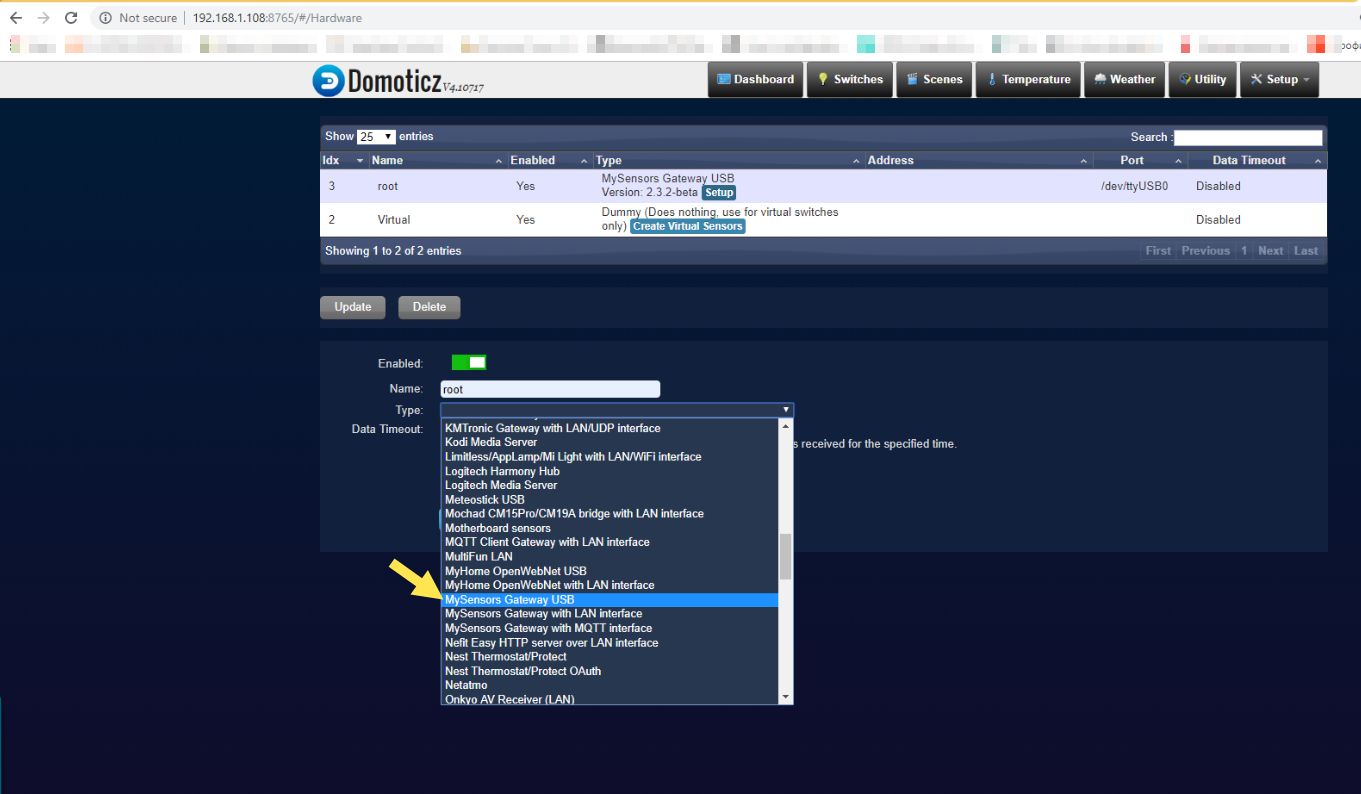
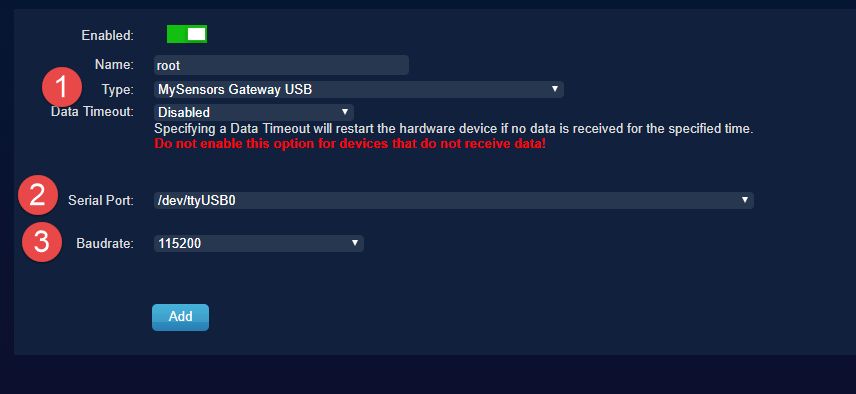
Add GatewaySerial as new Hardware here
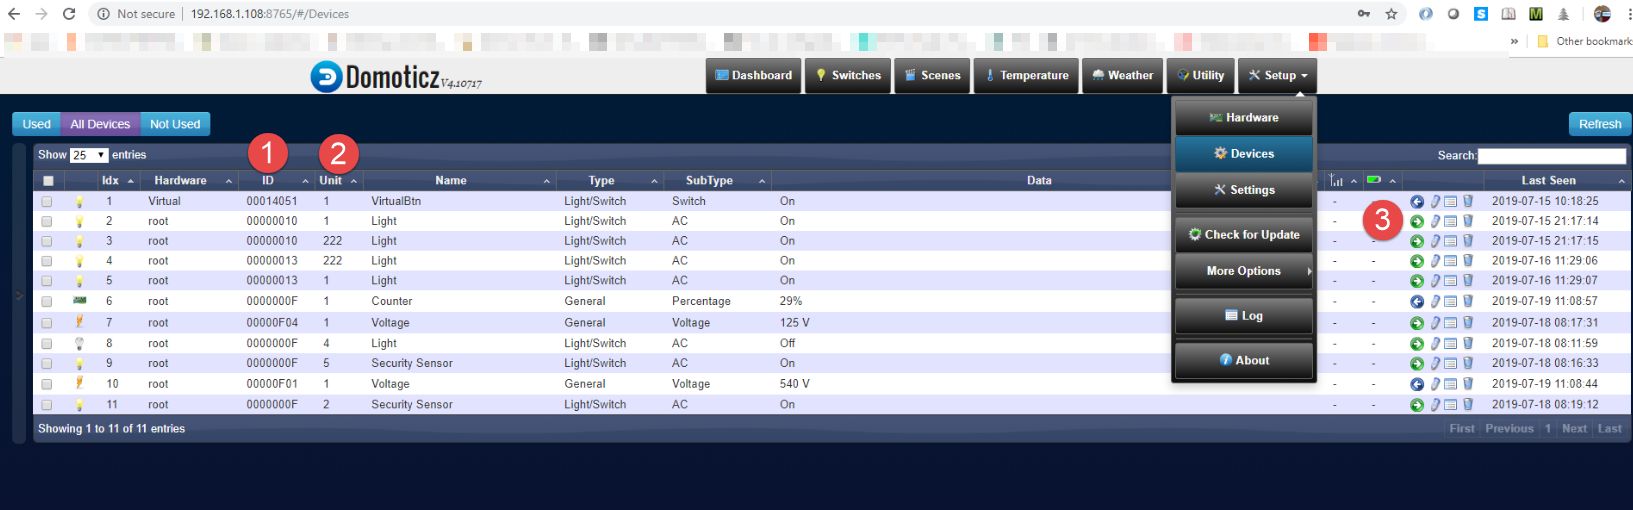
1. is switch node id
2. is button sensor\child id
3. is the link to add it into device lists
Enjoy!
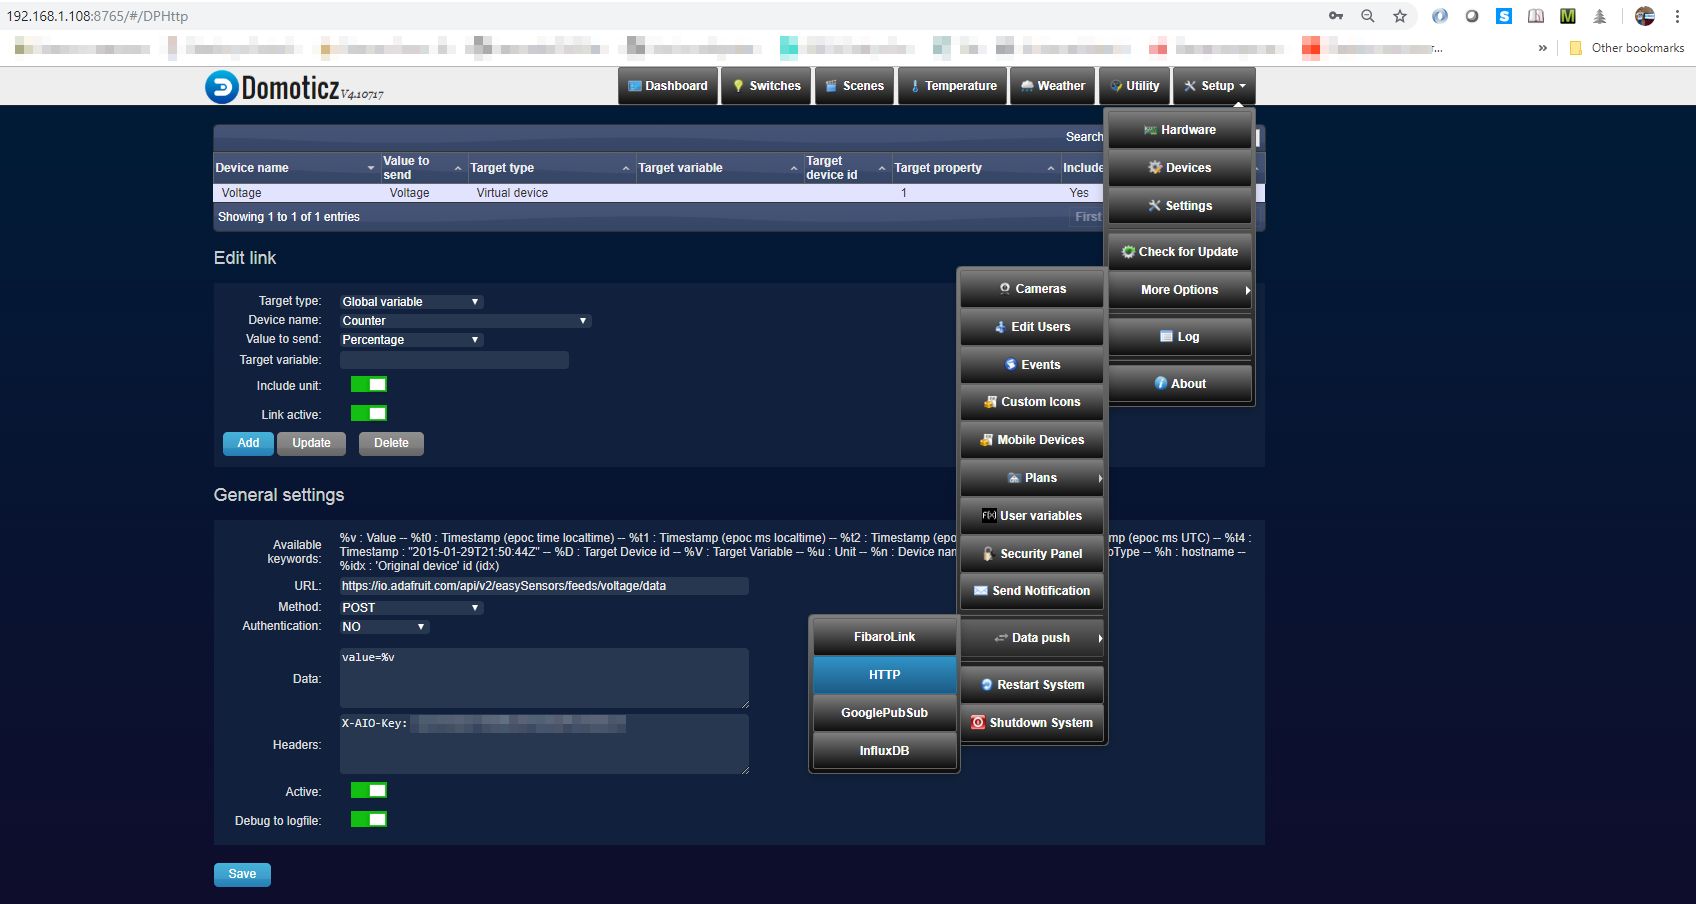
I will use Domoticz HTTP data push to publish battery life test results into io.adafruit.com reporting tool. Stay tuned.