Project update 7 of 11
Array Exploration
Array exploration is a nice feature that lets you automatically configure your Hexabitz arrays and easily generate their topology. It is particularly useful for large and complex arrays, where manually generating the topology is usually cumbersome and error-prone. All you need to do is to assemble the array and let it auto-configure itself!
Once you assemble your array and program all modules with native firmware, You can invoke the array exploration algorithm via the Explore() API or explore CLI command. The algorithm finds out the number of connected modules, the topology routing table, and which ports are swapped (since you need to swap TX and RX to connect two UART ports). All of this information is stored either in the emulated EEPROM or on a special Flash page so that you don’t have to explore again every time you reboot the array. Note that the module you’re connected to when invoking the exploration algorithm will be assigned ID #1. Other modules will be assigned sequential IDs based on their relative distance to the master (module #1).
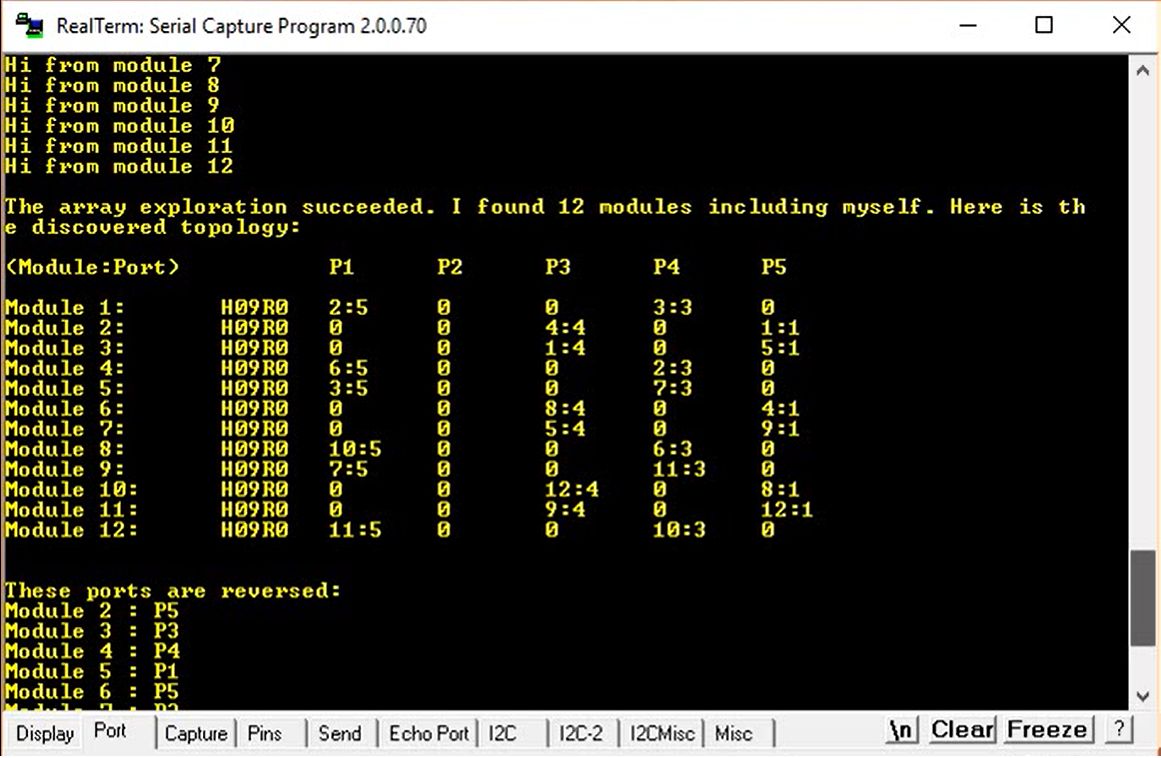
The screenshot below shows a terminal output of explore command. The routing table shows module part number (H09R0) and the connected neighbor module and its port (in the form ID:port) which connects to a particular port P1 to P6 in this module.
Exploration Algorithm
Here’s a detailed step-by-step description of what happens in the exploration algorithm:
The master module (ID #1) swaps all its ports and explores adjacent neighbors by sending them an inquiry message. Neighbors send back a response mentioning which port they heard the inquiry from.
The master then starts assigning IDs to new modules and updating its topology array:
a. Assign sequential IDs to neighboring modules (according to master ports they’re connected to).
b. Update the master topology array with IDs and ports of neighboring modules.
c. Ask neighbors to update their own topology array.
The master asks each new module to explore its neighbors, basically repeating steps 1 & 2. This continues level by level until all modules are explored:
a. Master asks a given module to swap its ports
b. Master asks the module to explore its adjacent neighbors.
c. Master assigns IDs to this module adjacent neighbors.
d. Master updates its topology array.
e. Master asks all discovered modules to update their topology array as well. Then the master repeats steps 1 to e asking next module down the list to explore.
The master ensures all connected modules have been already discovered by reissuing exploration commands to all modules and watching out for any new un-IDed modules.
If there are no un-IDed modules, the master generates and distributes appropriate port directions:
a. Virtually reset the state of master ports to Normal.
b. Update other modules ports starting from the last one and going backwards to ensure the communication chain is not broken.
c. The master asks each module to update its port direction.
d. The master officially updates its ports back to normal.
The master tests new port directions by pinging all modules and recording their responses. It’s also displayed on the terminal if the CLI explore command was invoked.
The master asks all modules to save the topology and port directions in specific Flash page (for topology) and emulated EEPROM (for number of modules and port directions).
The following video shows exploration of different arrays with various shapes and complexities. There are generous delays currently in the algorithm making it a bit lengthy (2 minutes for the sphere) but they can be optimized later.