Project update 7 of 13
Programming Your Board & Next Steps
by Andy WilsonDear Backers & Subscribers!
We hope everyone is keeping well. For this update, we’ll first have a look at some of the different options for programming PICO DSP, then we’ll talk a bit about what comes next. We’re still looking for a few more backers to reach our funding goal and put these boards into production, so if you’ve been waiting to make up your mind—or if you still have a question about the project that hasn’t been answered yet—now’s the time. Please don’t hesitate to get in touch!
So, without further delay, let’s have a look at how you can flash this device! PICO DSP can be programmed using several different languages, including C, C++, and MicroPython. And, to make use of all its ESP32 features, you can also use the Espressif IoT Development Framework, or ESP-IDF, the official framework provided by Espressif.
Arduino IDE
To get started using Arduino IDE, add a link to the ESP32 package ("https://dl.espressif.com/dl/package_esp32_index.json") in the Additional Boards Manager URLS section of the boards manager. You should now find a list of various ESP32 boards appearing in the Arduino IDE. PICO DSP is in the process of being added to this list, but you can also just choose any board that has 4 MB of Flash, a 4 MB Partition Scheme, and the option to enable the PSRAM, such as the ESP32 Dev Module.
The setup sketch for Arduino IDE, which you can find here, is a "hello world" type example for PICO DSP. This example initializes the audio codec, configures and installs the I²S driver on the ESP32, creates a 16-bit sine wave, and writes it to the I²S driver for output. This provides a basic framework for writing other C++ code in place of the sine-wave function, where the output buffer can be written to the I²S output using:
// call the write function and pass the data buffer address and data length to it, write the data to the I²S DMA TX buffer

  size_t i2s_bytes_write = 0;
  i2s_write(I²S_NUM_0, samples_sine, buf_size, &i2s_bytes_write, portMAX_DELAY);
In the same repository, you’ll also find C++ sample code for an Internet radio application. It is adapted from a project by Buddy Casino and makes use of the RTC timer and the deep-sleep functionality of the ESP32 to allow for switching radio stations using the on board button (IO36). Programmed stations include Europe’s best online station Dublin Digital Radio and Worldwide FM, but you can add your own favorite streams as well!
There is another example in this folder that will help you set up the Strawberry Edition board with 16 MB Flash and no PSRAM. It mounts a SPIFFS filesystem, with PSRAM disabled, when a board with a 16 MB Flash and 16 MB Partition Scheme with SPIFFS is selected.
Arduino IDE & Faust
The other sample code in this folder is for DSP examples programmed initially in the higher-level Faust (Functional Audio Stream) language and compiled using the Faust compiler architecture for ESP32. Each example includes a .dsp file that you can open in the Faust online IDE…
import("stdfaust.lib");
A = pm.djembe(freq,strikePosition,strikeSharpness,gain,trigger);

freq = hslider("[0]freq", 130, 50, 800, 0.1) ;
strikePosition = hslider("[2]stPos", 0.5, 0.1, 1, 0.01) ;
strikeSharpness = hslider("[3]Sharp", 0.5, 0.1, 1, 0.01) ;
gain = 0.7;
trigger = (ba.pulsen (1,8000));

process = A <:_ , _;
…as well as compiled C++ code and additional code depending on the project. That additional code might provide the ability to create other FreeRTOS tasks related to the audio or DSP task, such as reading the ADC on the ESP32 or mapping the readings to DSP parameters:
void read_adc( void * pvParameters )     // read adc and map values
{
   xSemaphore = xSemaphoreCreateBinary();
   ySemaphore = xSemaphoreCreateBinary();
   zSemaphore = xSemaphoreCreateBinary();

   for (;;) {

     for (uint32_t i = 0; i < NO_OF_SAMPLES; i++) {
         adc_read_1 = adc1_get_raw(ADC1_CHANNEL_4); //IO32
         adc_read_2 = adc1_get_raw(ADC1_CHANNEL_5); //IO33
         adc_read_3 = adc1_get_raw(ADC1_CHANNEL_6); //IO34
         vTaskDelay(pdMS_TO_TICKS(30));
         stPos = map_adc(adc_read_2, 0, 1);
         Sharp = map_adc(adc_read_3, 0, 1);
         freq = map_adc(adc_read_1, 50, 800);

     }
   }

    TIMERG0.wdt_wprotect=TIMG_WDT_WKEY_VALUE;
    TIMERG0.wdt_feed=1;
    TIMERG0.wdt_wprotect=0;
    //if( xSemaphore != NULL && ySemaphore != NULL)
    if( xSemaphore != NULL && ySemaphore != NULL && zSemaphore != NULL)
   {
   }
}
If you are planning on using Faust DSP with PICO DSP, you should know that—following discussions after our previous project update—an ESP32 architecture update is currently being tested whereby, once the sample rate of the codec is set during initialization, the Faust DSP object will be created with the same sample rate.
Accessing menuconfig in ESP32
Programming in Arduino IDE, or using VSCode/PlatformIO with the Arduino Framework, is also not without it’s limitations. The main one here is not being able to access the ESP32 menuconfig, which can only be accessed using ESP-IDF, and which contains various options for how to integrate external memory.
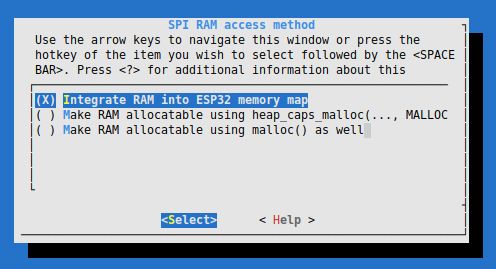
Using these options, it’s possible to configure how you would like to use external memory for your application. In the SNES reverb example in the repository, the PSRAM is integrated into the memory map, and the memory for the DSP object can be dynamically allocated using "new". In Arduino-ESP32, extra memory cannot be allocated using "new" and needs to be allocated via ps_malloc(size) or ps_calloc(n, size) only, which is worth bearing in mind if you are working in this framework. It’s also possible to include Arduino as a component in an ESP-IDF project, which allows access to menuconfig and to the Arduino framework. The project repository includes an Arduino as an ESP-IDF component example if you want to explore this option.
What’s Next for PICO DSP?
After the campaign ends, we’ll be busy carefully checking all our design files again and then putting PICO DSP into production! Our GitHub repository is always under development and open for collaboration. More examples will be added over the next few months, before PICO DSP is shipping, and we’re excited to see what code from contributors is added to the repository once everyone receives their boards! Once again, go raibh míle maith agat to everyone who has read, backed, shared, or supported this open source project over the last six weeks! <3 We really appreciate it, and we can’t wait to get this project out of our workshop and into your hands!!