Project update 6 of 17
Programming SKUDO Kryptor With Our Custom JTAG Adapter
by Piret UustalFirst of all, a big thank you to all of you who’ve already backed our campaign! We are very excited to see more and more people sharing our passion for strong and uncompromising hardware encryption!
This week, we are sharing more in-depth information about our unique JTAG adapter, which you can purchase during our campaign.
As mentioned in our previous posts, we decided to design and develop a completely new JTAG mechanism for programming the FPGA on SKUDO Kryptor boards. The new JTAG physical interface now ensures the smallest PCB footprint of the Kryptor PCB and allows more flexibility and a better user experience for programming the FPGA.
At this point, we’ve been using the new JTAG connector regularly in all our projects and we are confident it works as planned. We are very happy with the results!
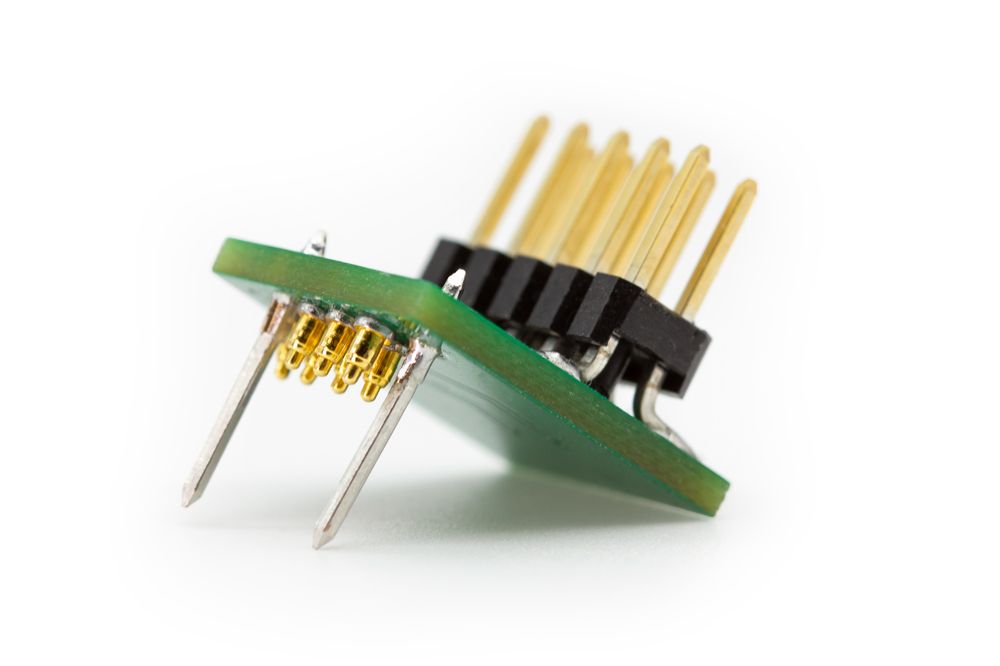
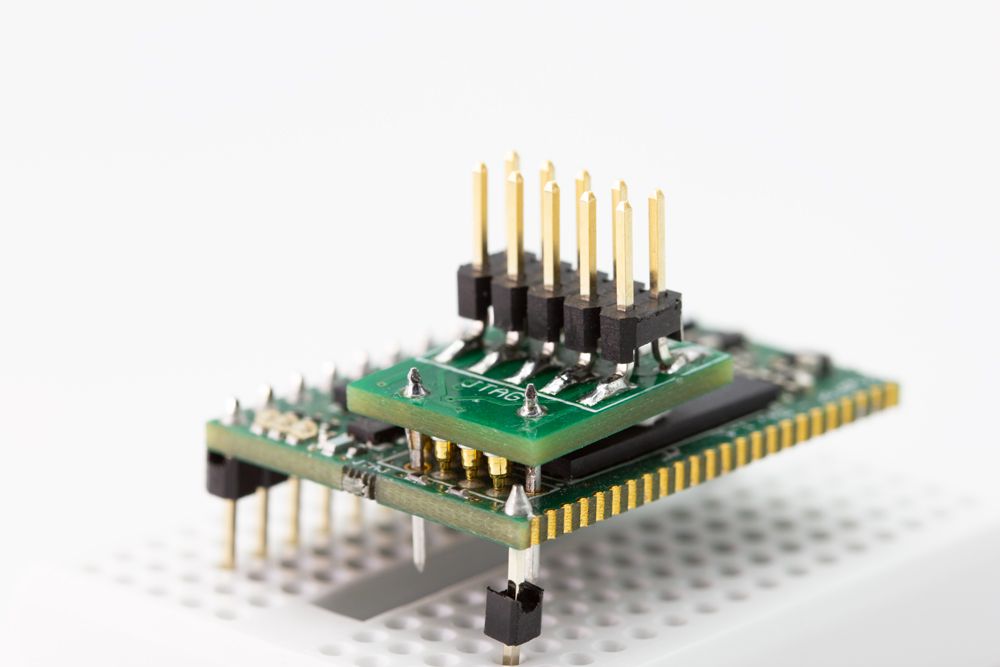
In the new connector design, we adopted a custom-built adapter using tiny pogo pins (facing the Kryptor PCB), which terminate the JTAG to a standard IDC 2x5 pin, full-size connector that connects to a standard USB JTAG Blaster FPGA programmer device. The mechanism of the new JTAG is very simple; it’s extremely easy to plug in the adapter and program the FPGA chip. It can be inserted in the PCB following the two guiding pin headers and kept under pressure (loading the pogo pin springs) with just a couple of fingers on one hand.
Importantly, note that when you purchase your Kryptor board, it is pre-configured with a simple boot-loader so you don’t actually need a JTAG connection at that point. The pre-configured setup will let you add the HSM functionality by uploading its configuration file (available separately from Skudo web server) using the SPI port, hence you don’t need the JTAG port or the JTAG programmer for this.
The JTAG programmer and our JTAG custom connector will be needed when you decide to reprogram your Kryptor (erasing the HSM functionality) in order to use the FPGA board for your own custom applications (i.e., uploading your own Verilog/VHDL design). For this purpose, you can use the default Intel tool chain (e.g., Quartus Prime). After that, if you want to revert to our HSM softcore, you will need to upload the configuration file using the JTAG connector and JTAG programmer.
Programming the Kryptor FPGA board with the JTAG connector requires a few simple steps:
- Connect the JTAG USB Blaster (FPGA programmer device) to the Kryptor JTAG custom connector via the IDC socket
- Connect the Kryptor connector to the Kryptor PCB board using the two dedicated pins as guides, inserting until the pogo pins start retracting (you need a very light push)
- Launch the Quartus Prime software, connect it to the programmer, and select the configuration file you want to upload
- Press start and wait for completion (about 10-20 seconds)
- Remove the connector and your board is functional and ready to go
For more details, please see our in-depth tutorial on How to program SKUDO Kryptor.
If you have not yet joined our Telegram group or followed us on Twitter (@SkudoTech), we welcome you to come and engage with us directly. Your feedback and suggestions for our project are very important to us, so, please be sure to share them.