Project update 3 of 9
Crowdfunding News and a Look Behind the Polysynth
by Sebastian HolzapfelHi Everyone,
First of all, thank you so much! It was super hard to guess how much interest there was out there for a niche FPGA platform like Tiliqua. I’m blown away by your support; it was a massive relief getting past our funding goal already in the first week! I get warm fuzzies knowing there will be Tiliquas being shipped to every corner of the globe. Insane!
In this update, I’ll cover more about how Tiliqua’s gateware works under the hood.
Types of Examples
In Tiliqua’s SDK, you’ll find many different kinds of examples, building up from audio-only DSP chains all the way up to complete SoC (System-on-Chip) examples which include a soft CPU, menu system, video visualization, USB support, and so on.
Audio-only DSP chains are the simplest to understand and fastest to synthesize, so they are a good place to get started. Today, however, we’ll be diving into the deep end with polysyn (polysynth), which has everything!
The polysyn Project
As of now, polysyn is one of Tiliqua’s more complex examples, as it includes audio DSP logic, video synthesis logic, USB host logic, a soft CPU with peripherals, and more. Taking a look at the the DSP chain, here’s a simplified diagram of how the parts fit together:
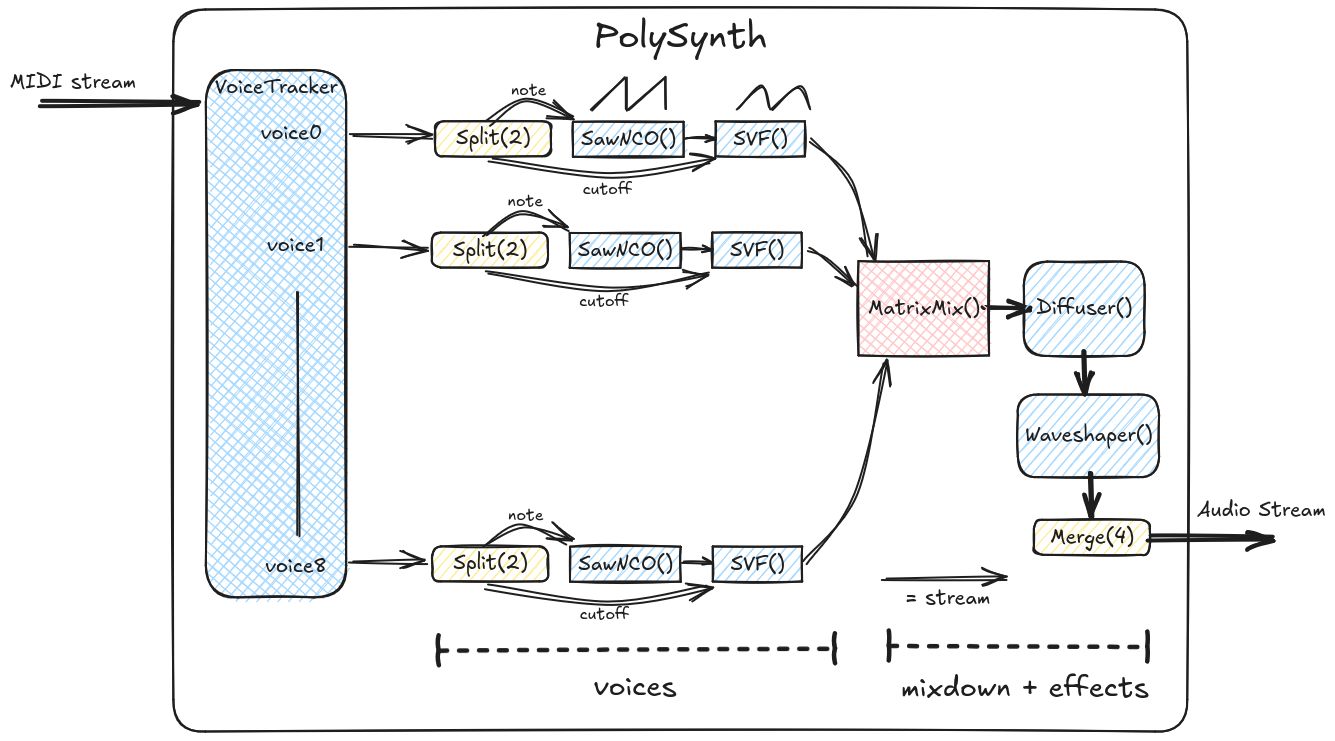
For the lowest-possible latency, MIDI processing and the entire audio path are implemented in gateware. Above you’ll notice:
- A
VoiceTrackerthat takes a stream of MIDI messages and decodes note on0 off events into an array of individual voices (in hardware!) - Eight oscillators (
NCO, one for each voice), each followed by anSVF(tunable filter) - A
MatrixMixthat pans each voice across the stereo field and mixes down to two channels - A
Diffuserthat adds an optional delay/reverb effect, followed by aWaveshaperfor optional distortion.
Building an SoC (System-on-Chip)
The DSP chain itself is only half of the story. We also need to provide a user interface and (in Tiliqua’s case) some nice video visualizations. To accomplish this orchestration, a whole bunch of scaffolding around the DSP logic is added, forming a System-on-Chip:
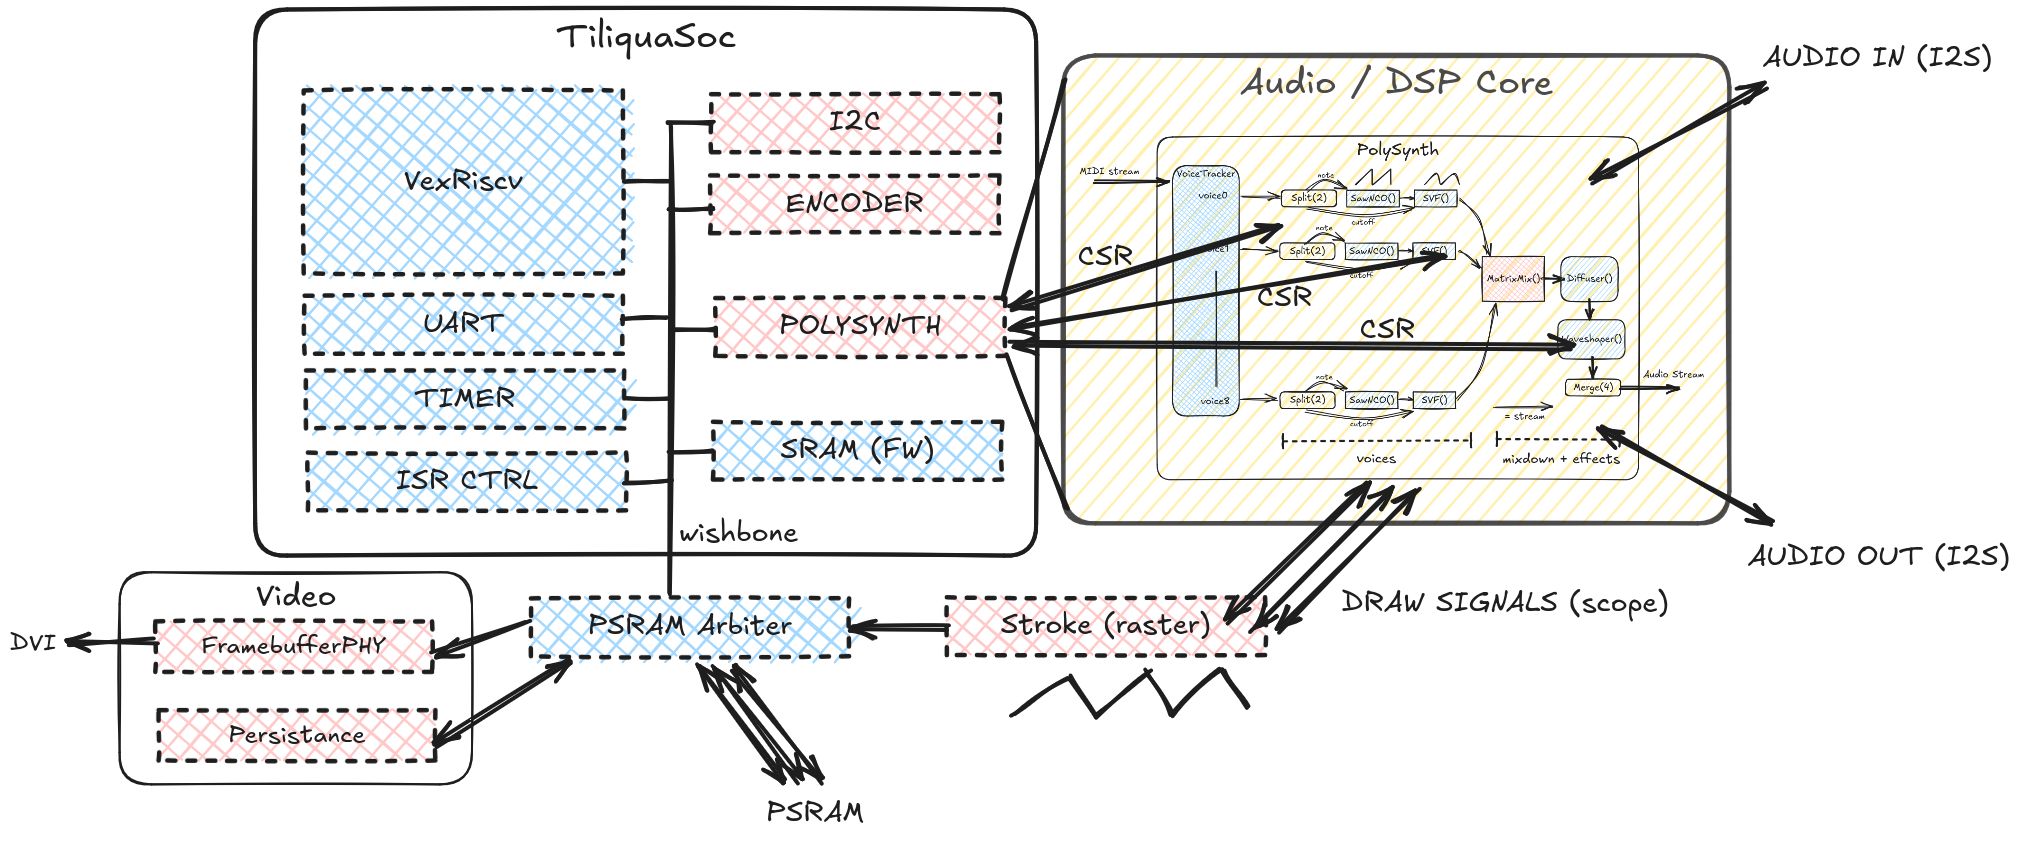
Above you can see a soft VexRiscv CPU running firmware, which has its own peripherals (UART, I2C, timer and so on). The entire DSP chain has now also become a ‘Peripheral’, with registers that the CPU can tweak at runtime. This kind of arrangement is quite powerful as we can very quickly update the firmware and tweak the DSP settings without having to resynthesize the whole design.
At the bottom of the diagram, you’ll notice the CPU can access its own peripherals as well as external PSRAM, which is used as a framebuffer. The framebuffer is shared between the CPU (which wants to draw the menu system), the DSP stroke-raster component (which wants to draw oscilloscope traces), and the video PHY (which wants to send the framebuffer to the screen).
Touch Sensing, MIDI, and USB with Zero Latency
Tiliqua’s touch sensing, TRS MIDI, and USB MIDI implementations are all implemented in pure gateware. To select between these without incurring the latency penalty of going through the RISCV CPU, the MIDI streams are all combined together in hardware, before they are sent to the polysynth MIDI stream for decoding into individual voices. The CPU, however, may switch off any of these streams, for example if we want to switch between TRS and USB MIDI.
Demo: Audio-Rate Phase Modulation
An interesting artifact of this architecture is that we can easily inject audio-rate modulation anywhere in the DSP pipeline. Below is a short video where I inject an audio-rate distorted oscillator into the phase modulation input of every VCO in the polysynth. As you’ll see, it can create quite some wierd pitch shifting and distortion sounds:
That’s It!
I hope you now have a better overview of how Tiliqua’s gateware is structured! Once Tiliqua’s tutorials are complete, they will be the best place to start, but for now I just wanted to provide a taste of how things fit together. If you have questions of any kind about Tiliqua, feel free to contact us by email, using the "Ask a question" link on our campaign page, or on Matrix.
Remember, there’s still time for you to get your own Tiliqua by backing our campaign.
Until next week!