Project update 4 of 8
Programming GGtag with Python
by Radoslav GerganovGreetings, everyone!
In this week’s update we will show you how to create and program tags using Python.
Installation
The ggtag Python module provides a clean and simple API for creating tags. We suggest you first create a virtual environment and then install the API with pip like this:
$ python3 -m venv venv
$ source venv/bin/activate
$ pip install ggtag
Using the Python APIs
Using the ggtag module is pretty straightforward. Import the module and create a GGTag object:
import ggtag
tag = ggtag.GGTag()
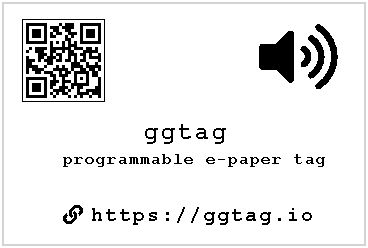
The object methods have the same parameters as the drawing primitives in the web UI. For example, the following code:
tag.rect(18, 15, 82, 82)
tag.qrcode(22, 19, 3, "https://ggtag.io")
tag.icon(255, 19, 70, "volume-up")
tag.text(139, 118, 5, "ggtag")
tag.text(58, 149, 3, "programmable e-paper tag")
tag.icon(58, 200, 20, "link")
tag.text(86, 203, 4, "https://ggtag.io")
creates this tag:
If you call the browse() method on the created object:
tag.browse()
it will open a web browser showing the tag in our web interface.
Programming the device
Once you have the tag object ready, there are several ways to program the device:
- Use the
browse()method to open the tag in the web UI and program the device from there - Program with sound using the
ggwaveandpyaudiomodules (example) - Program over USB using the
pyserialmodule (example)
You can find the complete examples in our GitHub project repo .
Should you have any questions, please feel free to reach out to us using the "Ask a technical question" link on our campaign page or participate in our GitHub discussions! And, if you haven’t claimed your own GGtag yet, there’s still time while our campaign is live!
Until next time!
- GGtag team