Project update 4 of 12
Tips on Electrode Placement
by Nikunj BhagatTips on Electrode Placement
Today, I will share a few tips on placing hydrogel electrodes on the surface of the skin in order to stimulate underlying muscles. These tips will be useful not just for NeuroStimDuino, but for any neurostimulator. But first, let’s review some important safety guidelines:
- NeuroStimDuino is not FDA-approved for clinical use and is intended for RESEARCH PURPOSES ONLY.
- NeuroStimDuino is not intended for use on humans or animals without receiving prior approval from a local ethics committee such as the Institutional Review Boards and Institutional Animal Care and Use Committees
- Under no circumstances should the stimulation electrodes be placed across the chest or close to the heart
- NeuroStimDuino requires an external DC input voltage from 6-20V to operate. We strongly recommend using an external battery for this and avoiding the use of an AC adapter or anything plugged into AC mains.
If you’re wondering how exactly you can learn to apply neurostimulation if you can’t use it without getting official approval, you are not alone. One solution is to use a frog or a cockroach for your experiments. BackyardBrains has provided a great article on how to do this in a humane way. (Scroll all the way to the video at the bottom to see how a cockroach’s leg twitches under electrical stimulus.)
However, if you don’t want to mess with a cockroach or you want a completely animal-free way to do your experiments, we recommend zucchinis!

Why the Zucchini?
Scientists have shown the skin of a zucchini has an electrical impedance that closely resembles our skin. The zucchini behaves as if you were stimulating a muscle underneath human skin. And if you look underneath the zucchini’s skin, its pulp is kind of like muscle tissue. Underneath the muscles are nerves, which we will represent here with an LED (shown below). Making the LED blink simulates neurostimulation causing an action potential to fire in the nerve! And that’s how the zucchini’s muscle contracts (figuratively speaking, that is).
Sourcing and Sinking Current through a "Zucchini Muscle"
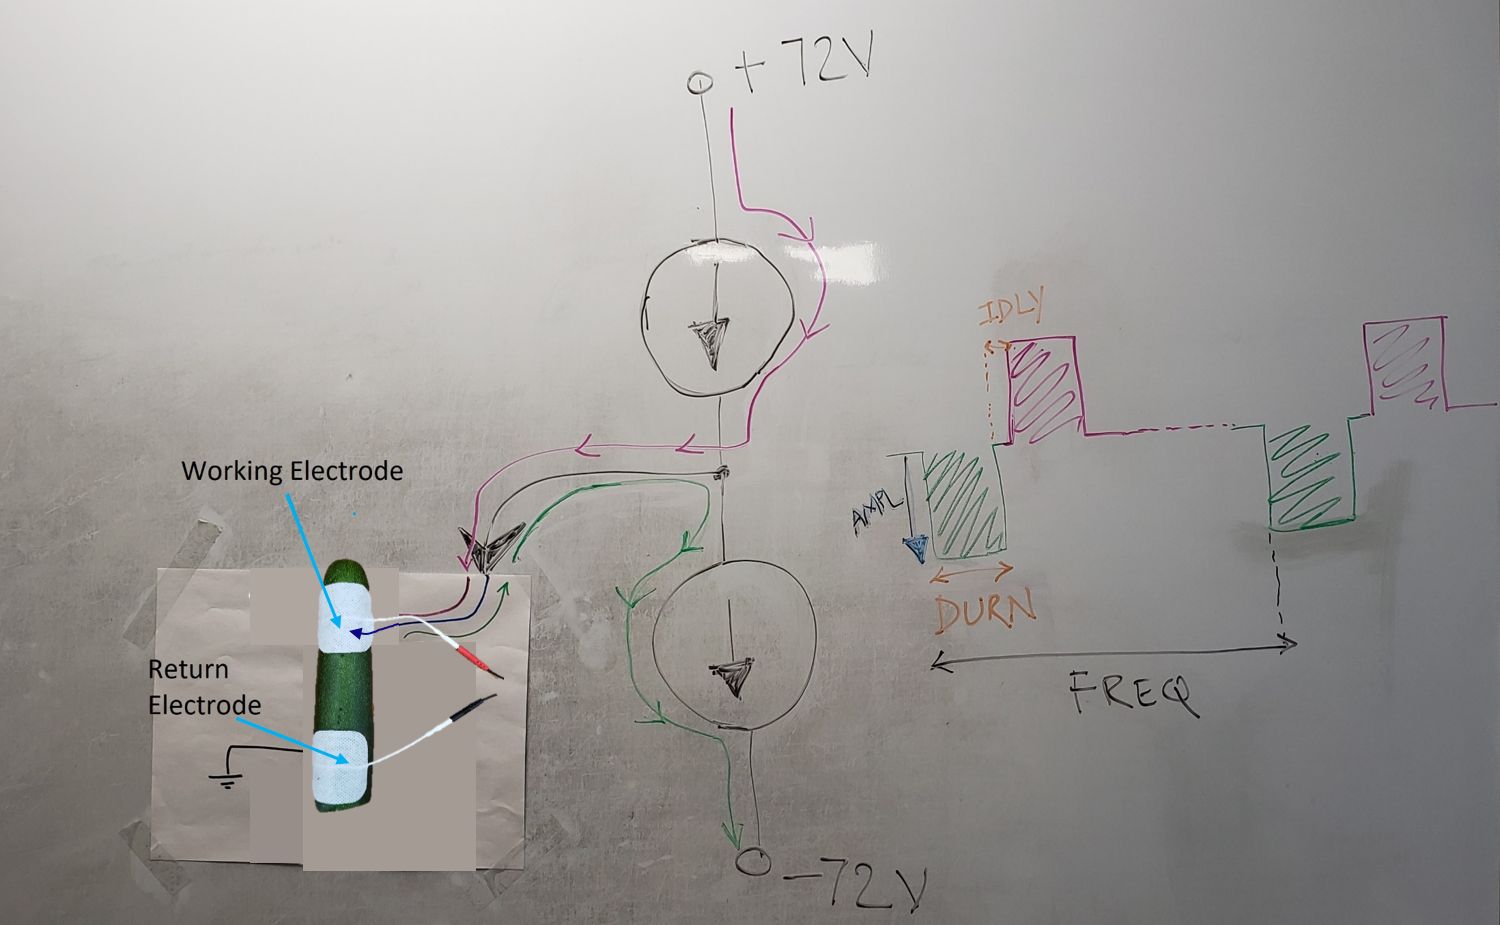
The above is a rough diagram of how neurostimulation works. You can imagine the stimulator (e.g., NeuroStimDuino) as two constant current sources connected in series. Each current source is powered by a high voltage source (e.g., +/-72V) so it can drive several milliamps of current through the skin surface (a.k.a. compliance voltage). The top current source is active during the positive or anodic phase of the stimulation pulse (shown in pink). The bottom current sink is active during the negative or cathodic phase of the stimulation pulse (shown in green).
The current is sourced or sunk from the zucchini "muscle" using hydrogel electrodes placed on its surface. One electrode is placed over the muscle mass (a.k.a., the Working Electrode) where it acts as the main entry or exit point for current. A second electrode is placed at the tail end of the muscle (a.k.a., the Return Electrode), where it connects to the stimulator ground, completing the return path for the current.
Waveform parameters
In the above white-board figure, the waveform is defined by specifying parameters such as amplitude (AMPL), pulse duration (DURN), pulse frequency (FREQ), and inter-phase delay (IDLY). For the zucchini muscle experiment, we set these values as AMPL = 100 counts, DURN = 2ms, FREQ = 10Hz, IDLY = 200 usec.
Use a single "Return" electrode when stimulating with multiple channels
The ground connection is common for all the stimulation channels. So, if you are using multiple stimulation channels, you only need to connect one return electrode. In the setup shown below, we placed the return electrode in the middle of the zucchini. This limits the electric field to either the top or bottom half and is equivalent to stimulating two independent muscles. Using different activation frequencies for channels one and two, you can clearly see the action potentials in each half of the zucchini are being fired at a different rate.
Safety Tip
Remember, if you touch the zucchini’s surface with bare hands while it’s being stimulated, some of the current can leak enter your skin. Therefore, we strongly recommend wearing rubber gloves when you perform this experiment.
Additional Resources
If you are interested in further instructions and video tutorials on the placement of stimulation electrodes to contract various small and large muscles, please refer to Electrode Placement & Functional Movement, courtesy of Dr. Lucinda Baker, Associate Professor (retired) at the University of Southern California and Axelgaard Manufacturing Co., Ltd.