Project update 12 of 14
Keyboard Design
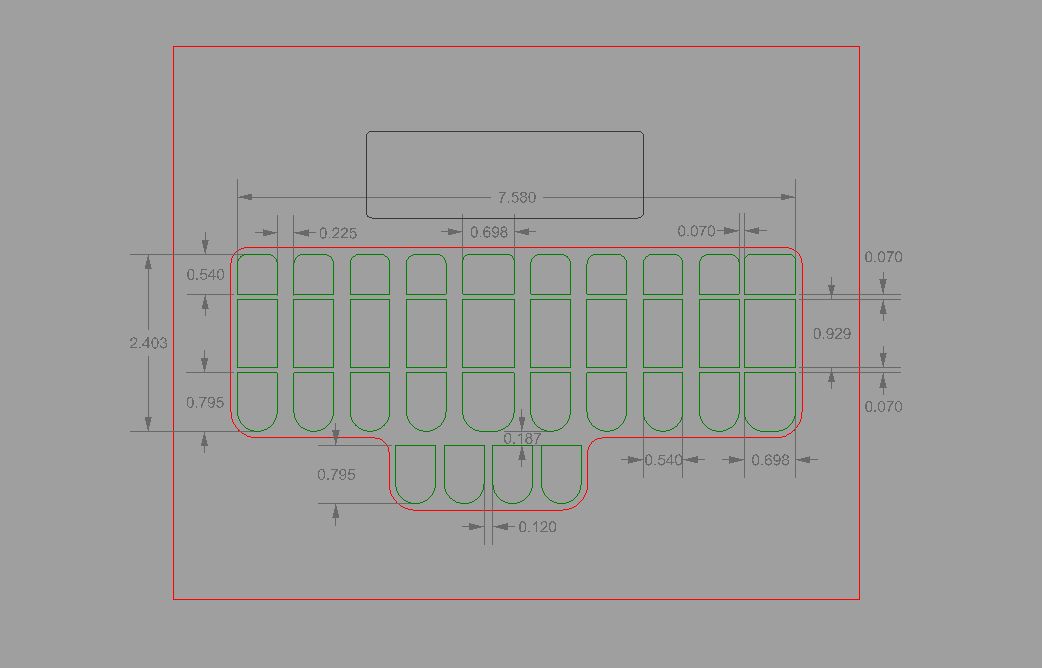
The details of the Stenosaurus are taking shape. Above is a recent iteration of the keyboard layout. All dimensions are in inches. The blocks outlined in green are the shapes of the key caps - the part of the key with which your fingers directly interact. The key caps sit on top of and are connected securely to key switches - the part of the key that depresses, registers a key press, and passes the key press on to the microprocessor that runs the whole show.
The layout pictured above is not the finalized design, but it’s getting closer. The major changes from the layout we started with are:
- Rounded top corners for the top row of key caps.
- Wide center column keys to accommodate using those key caps with either hand.
- Wide rightmost column key caps to accommodate simultaneously depressing the two rightmost columns. Those wide key caps have offset attachment points to the underlying key switches, so those key caps can be replaced with regular key caps and the spacing will be correct.
- The overall width and spacing of keys has been expanded in an attempt to find a sweet spot that accommodates the largest array of hand sizes.
In order to reduce cost and complexity, we decided early on to use the same Cherry brand MX line of key switches found in many computer keyboards. This type of switch has a different look and feel and is typically less adjustable than the lever-style keys found on many stenographs.
The downside of using Cherry MX key switches is the difficulty in finding key caps of the right size and shape. Most key caps for the Cherry MX key switches are slanted, curved, tapered, and have a roughly square footprint. We did find one level, flat, and untapered key cap, but it only comes in one square shape.
The two options we considered were:
- Create our own injection molds for key caps of exactly the size and shape we want. We would need a different mold for each of the distinct types of keys. In the layout pictured above, there are nine distinct types of keys (despite appearances, the wide keys on the rightmost column are different than the wide keys in the center column). At \$3,500 a pop, that would mean \$31,500 just for the molds, before a single key cap has been produced. We came up with an alternative keyboard layout that required only one or two new injection molds, but even a single mold is expensive and the unit cost for producing the key caps from the mold would be high due to low volume. Furthermore, we thought the alternative layout was functionally and aesthetically inferior.
- Fabricate our own key caps without using injection molding. With the right tools (e.g. waterjet cutter or CNC mill) fabricating the key caps is quite easy except for the post that attaches the key cap to the key switch. The key cap post must conform to high tolerances in order to mate with the key switch properly. We quickly ruled out the possibility of machining our own posts. The solution we're currently running with is to cut out the posts from commodity injection molded key caps and then precisely aligning and adhering them to aluminum plates of the right shape and size. We're in the process of creating a jig to test this.
So, now that you’ve seen the layout, what do you think? Do the key spacings seem like they will be comfortable? How do they compare to other machines you’ve used? If you have a stenotype machine, we’d appreciate you posting the dimensions and layout of its keys. Now is the time to give feedback on the layout! Thanks in advance.
Also, if you haven’t already, please sign up for the Stenosaurus announcement mailing list.