Project update 5 of 15
8 EEG Channels at 16,000 Samples Per Second!
One of HackEEG’s super-powers is speed. Because it has a wired USB connection to a host computer like a laptop or a Raspberry Pi, it can read and transfer data much faster than many other EEG devices – its top speed for 8 24-bit channels is almost 16,000 samples per second, and it can send this data over the network using Lab Streaming Layer at that speed. Because of the wired connection, this also means you need to use care while using it– it’s not a device for consumers, since you need to make sure you’re only using HackEEG while on battery power, or build your own wireless battery-powered unit.
HackEEG can read data from the ADS1299 at up to 16,000 samples per second. That should make it useful for people who want to experiment with neurofeedback and qEEG – quantative EEG that processes the input from many electrodes. While there’s not a lot of open source software that can do that right now, if you’re interested in this, it’s possible with HackEEG.
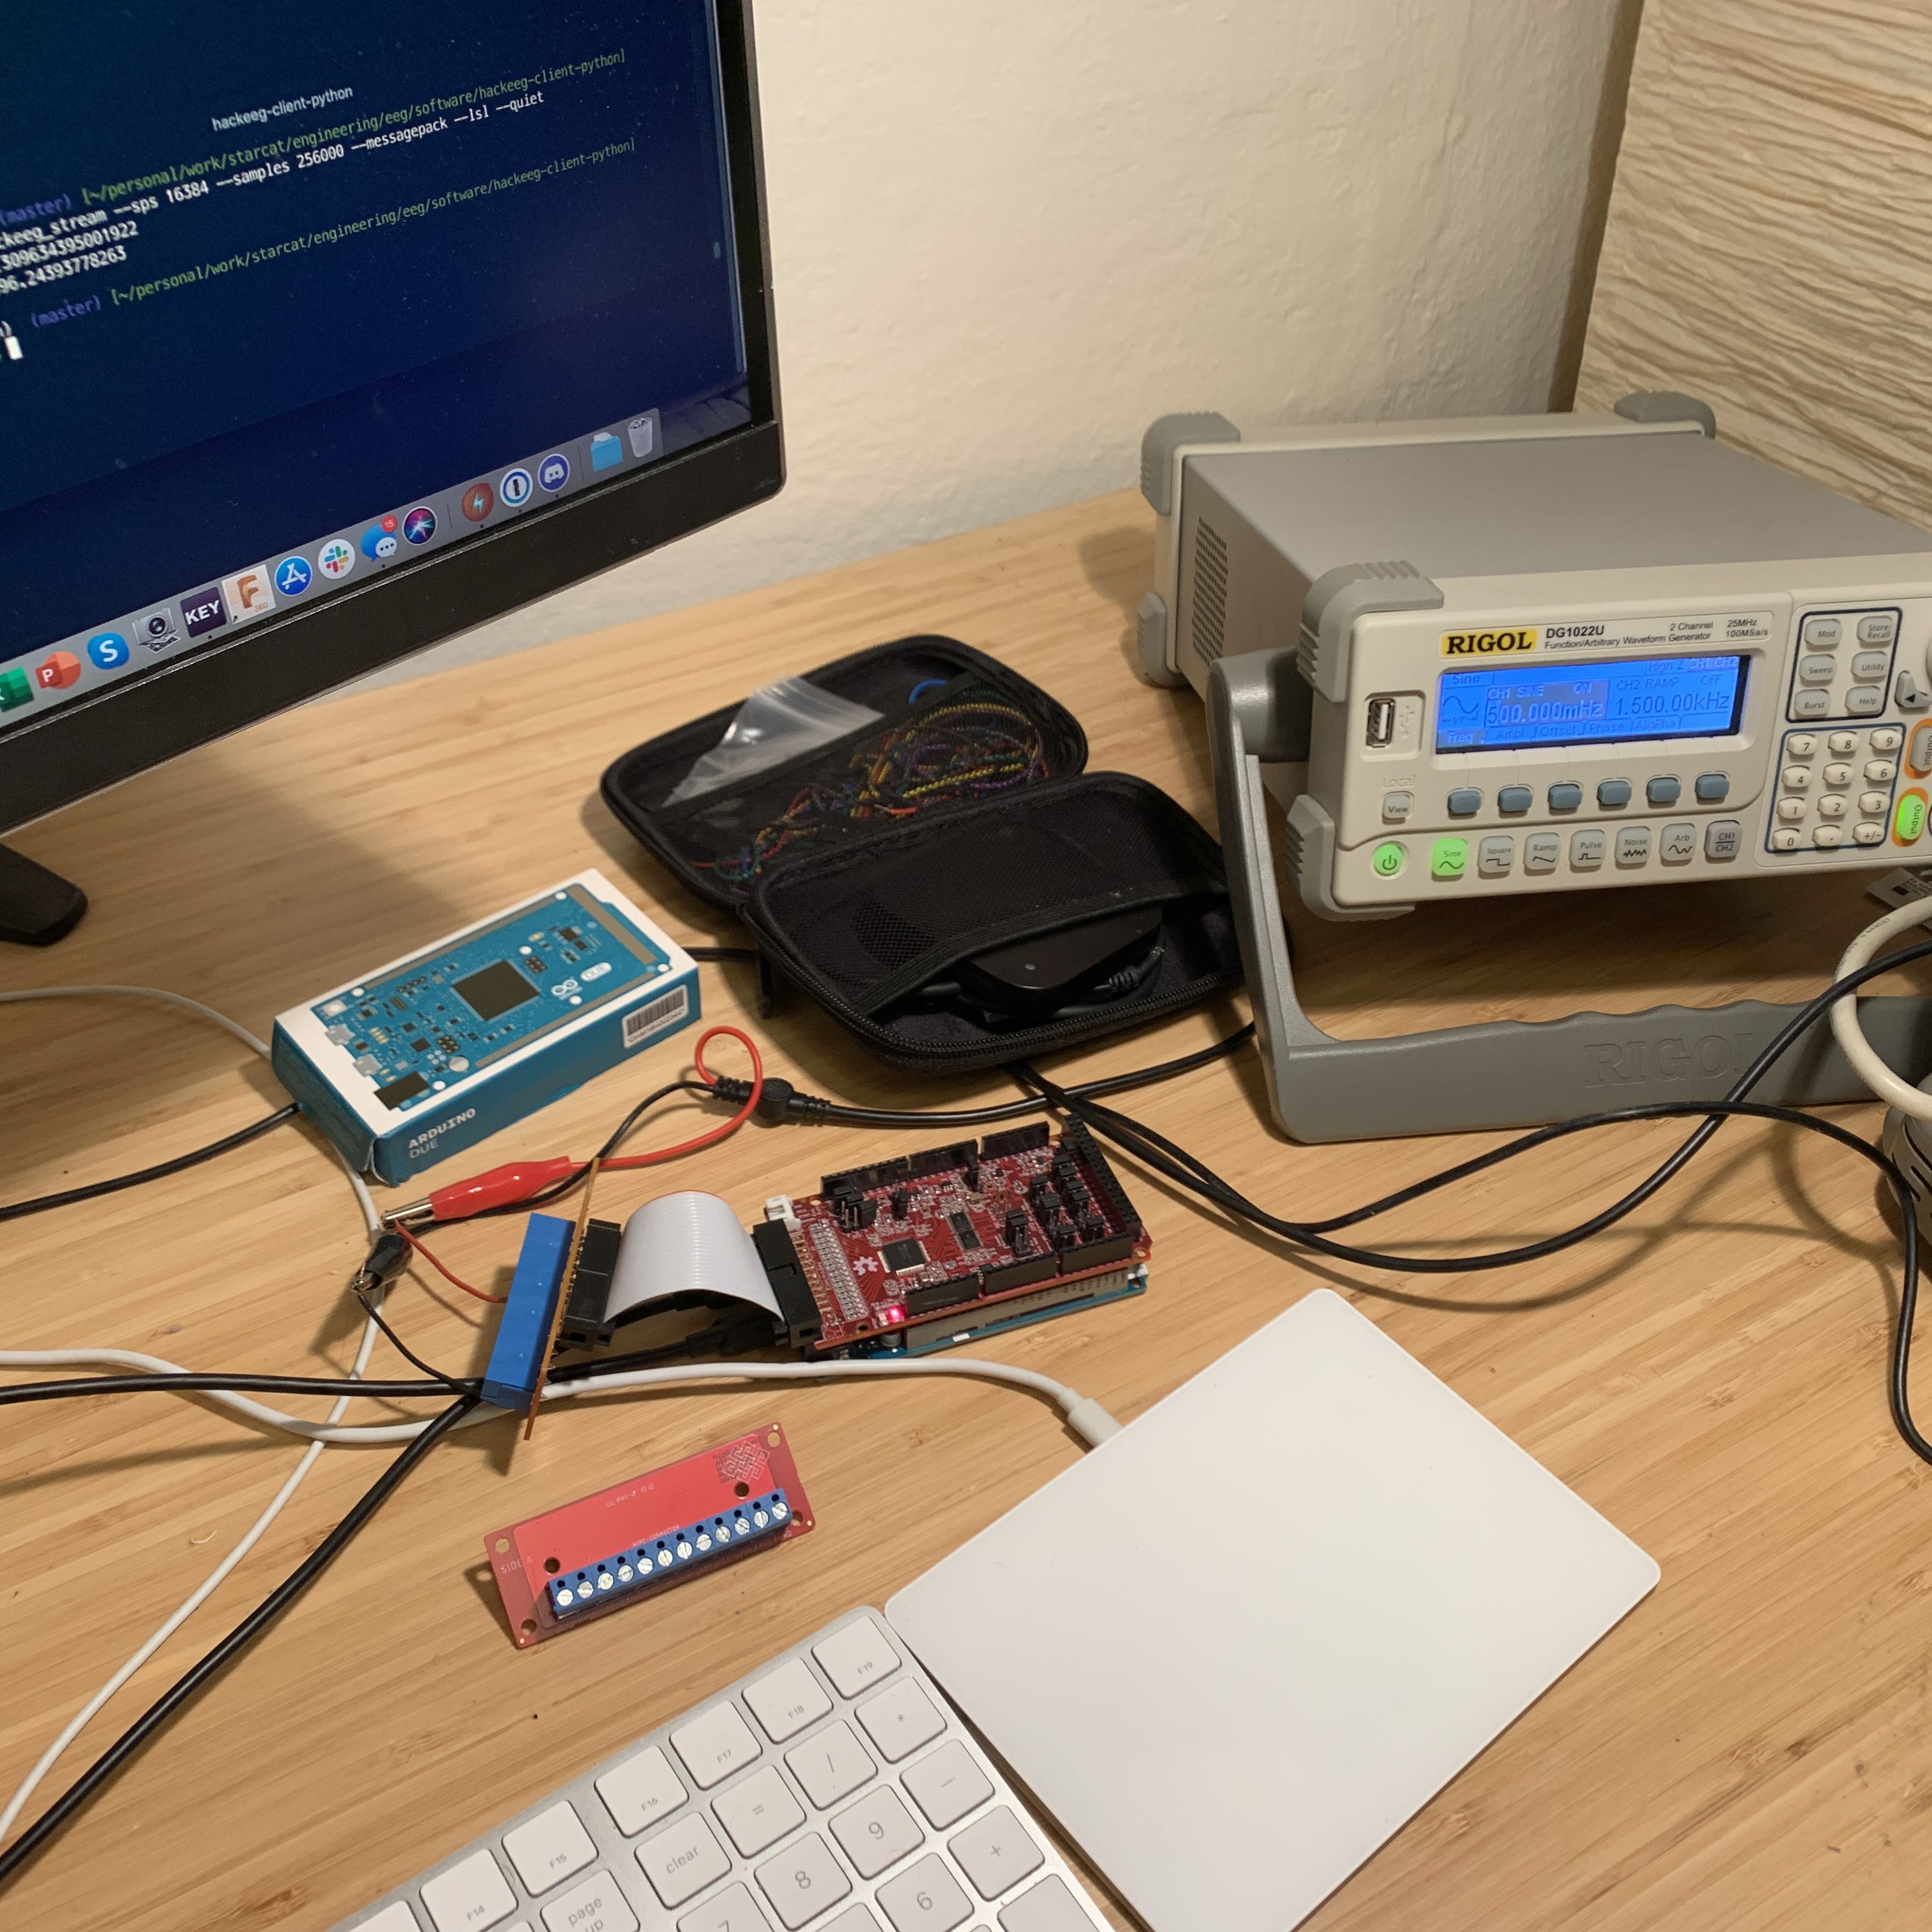
This is a testing set-up, HackEEG and an Arduino Due hooked up to a Rigol signal generator.
Testing
We’re going to use the HackEEG command line streaming program for this, hackeeg_stream - this program allows you to connect to the HackEEG hardware, configure it, and stream data.
Installing
You’ll need Python 3.6 or greater. Do the following:
$ pipenv install
$ pipenv install hackeeg
$ pipenv shell
For more info, including how to install pipenv if you don’t already have it, see the HackEEG documentation.
The Speed Test
We can use the hackeeg_stream command, here we’re capturing 4 samples, each with 8 channels of data from the HackEEG and printing it to the terminal:
$ hackeeg_stream --sps 4096 --samples 4 --messagepack
timestamp:1433350329 sample_number: 0| gpio:0 loff_statp:0 loff_statn:0   1:72438 2:146040 3:170609 4:92838 5:77357 6:156113 7:67798 8:78702
timestamp:1433350458 sample_number: 1| gpio:0 loff_statp:0 loff_statn:0   1:72349 2:145966 3:170553 4:92768 5:77314 6:156067 7:67764 8:78674
timestamp:1433350706 sample_number: 2| gpio:0 loff_statp:0 loff_statn:0   1:72245 2:145898 3:170477 4:92694 5:77284 6:156006 7:67721 8:78644
timestamp:1433350957 sample_number: 3| gpio:0 loff_statp:0 loff_statn:0   1:72154 2:145824 3:170408 4:92741 5:77256 6:155959 7:67682 8:78625
duration in seconds: 0.10050171200418845
samples per second: 39.800317031746665
dropped samples: 0
You can see the driver timestamps each sample, and also numbers each sample. That’s how we can tell if the client is dropping samples. Python is a bit of a resource hog, so to really do this test you need to quit most of the other applications on your laptop, to make sure all the CPU power is available to the streaming program. Later in the campaign I’ll be releasing a rust streaming client that will use many fewer CPU resources.
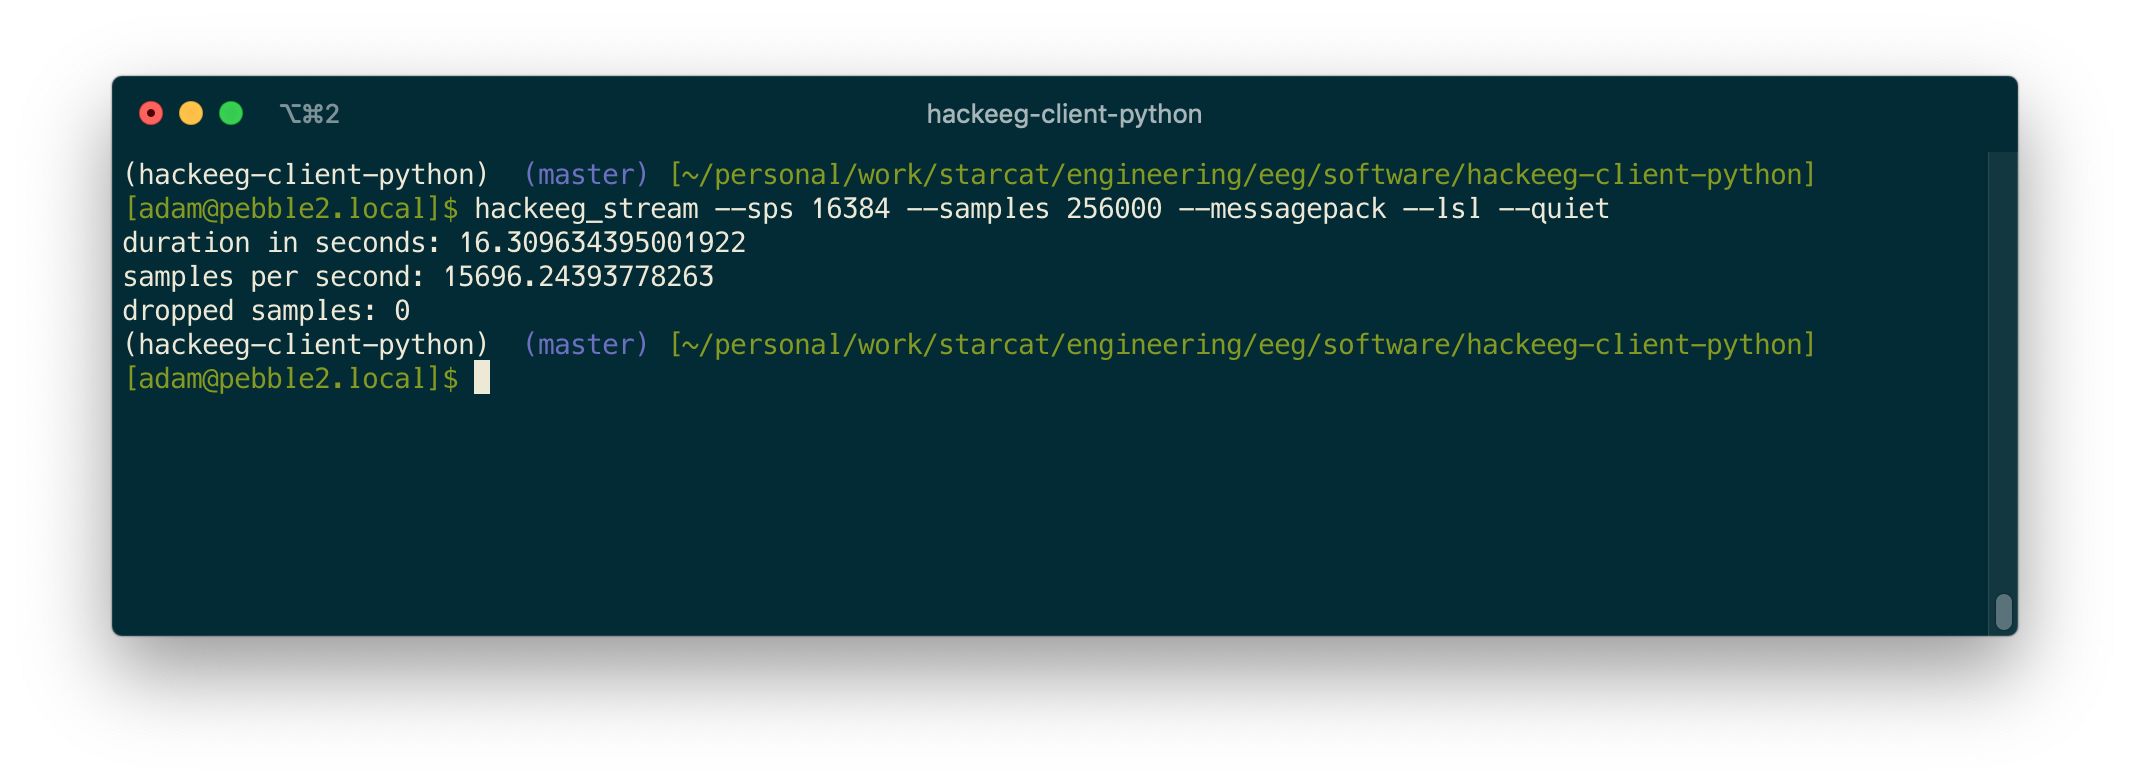
Now for the speed test. 256,000 samples at 16,384 sps is going to be about 16 seconds long:
$ hackeeg_stream --sps 16384 --samples 256000 --messagepack --lsl --quiet
duration in seconds: 16.26041491201613
samples per second: 15743.755702741691
dropped samples: 0
Pretty close to 16,000 samples per second!
How does it work? SPI DMA!
How does this work? It doesn’t seem possible at first glance. Arduinos aren’t very powerful. But it is possible. First of all, you need a powerful laptop to run Python at high speed to read the data via USB 2.0. The test was done on a 2017 MacBook Pro with a 2.9 GHz Intel Core i7 with 16GB RAM. The data streaming uses Message Pack data format which is extremely compact and has highly-optimized software, both on the Arduino Due driver side and the Python side. And for this purpose, the Arduino Due has some special powers– we are using SPI DMA.
What does that mean? DMA means Direct Memory Acccess – the TI ADS1299 EEG-on-a-chip is attached to the Arduino Due by something called SPI - Serial Peripheral Interface. It’s a fairly fast, simple serial connection between computers and peripherals. Normally the Arduino has to use its CPU to read the data, which is both slow and also uses up CPU time that could be used for doing other things, like formatting data and communicating with the laptop or other client. But the Arduino Due is special – unlike a some other Arduinos, it has a DMA controller. This is a special-purpose on-chip unit, part of its Microchip ARM-powered SAM3X8E system-on-a-chip, that can read SPI data and put it in the Arduino Due’s memory without the CPU having to do anything. This doubles our speed, and is what allows us to go so fast on the Arduino Due.
SPI DMA is not part of the stock Arduino Due software. But since I needed it, I found some SAM3X8E SPI DMA code, and updated and debugged it to work wth the Arduino Due especially for the HackEEG driver. It’s in the HackEEG driver software repository, see the link below for the code. I’ll release it as an Arduino Due library for general use later in the campaign.
HackEEG Documentation
- HackEEG documentation on Read The Docs
- HackEEG Python client library on Github
- HackEEG shield hardware information on Github
- HackEEG driver software
- HackEEG SPI DMA driver code
hackeeg_stream Usage Information
$ hackeeg_stream -h
usage: hackeeg_stream.py [-h] [--debug] [--samples SAMPLES] [--continuous]
                         [--sps SPS] [--gain GAIN] [--lsl]
                         [--lsl-stream-name LSL_STREAM_NAME] [--messagepack]
                         [--hex] [--quiet]
                         serial_port

positional arguments:
  serial_port           serial port device path

optional arguments:
  -h, --help            show this help message and exit
  --debug, -d           enable debugging output
  --samples SAMPLES, -S SAMPLES
                        how many samples to capture
  --continuous, -C      read data continuously (until <return> key is pressed)
  --sps SPS, -s SPS     ADS1299 samples per second setting- must be one of
                        [250, 500, 1024, 2048, 4096, 8192, 16384], default is
                        500
  --gain GAIN, -g GAIN  ADS1299 gain setting for all channels– must be one of
                        [1, 2, 4, 6, 8, 12, 24], default is 1
  --lsl, -L             Send samples to an LSL stream instead of terminal
  --lsl-stream-name LSL_STREAM_NAME, -N LSL_STREAM_NAME
                        Name of LSL stream to create
  --messagepack, -M     MessagePack mode– use MessagePack format to send
                        sample data to the host, rather than JSON Lines
  --hex, -H             hex mode– output sample data in hexidecimal format for
                        debugging
  --quiet, -q           quiet mode– do not print sample data (used for
                        performance testing)