Project update 6 of 13
Pinout and More
Only a few days left in the campaign, and everything is on track for when the campaign concludes. Manufacturing is finalized and we are ready to begin production in the coming weeks. Parts are on order and the boards will be assembled as soon as they arrive.
Pinout for µduino
A lot of you have reached out to me asking for the pinout of the µduino so you can get prepared, and now that it is finalized I can share it with you all! Below is a render of the final µduino with references to the pin numbers, and detailed further in the table below:
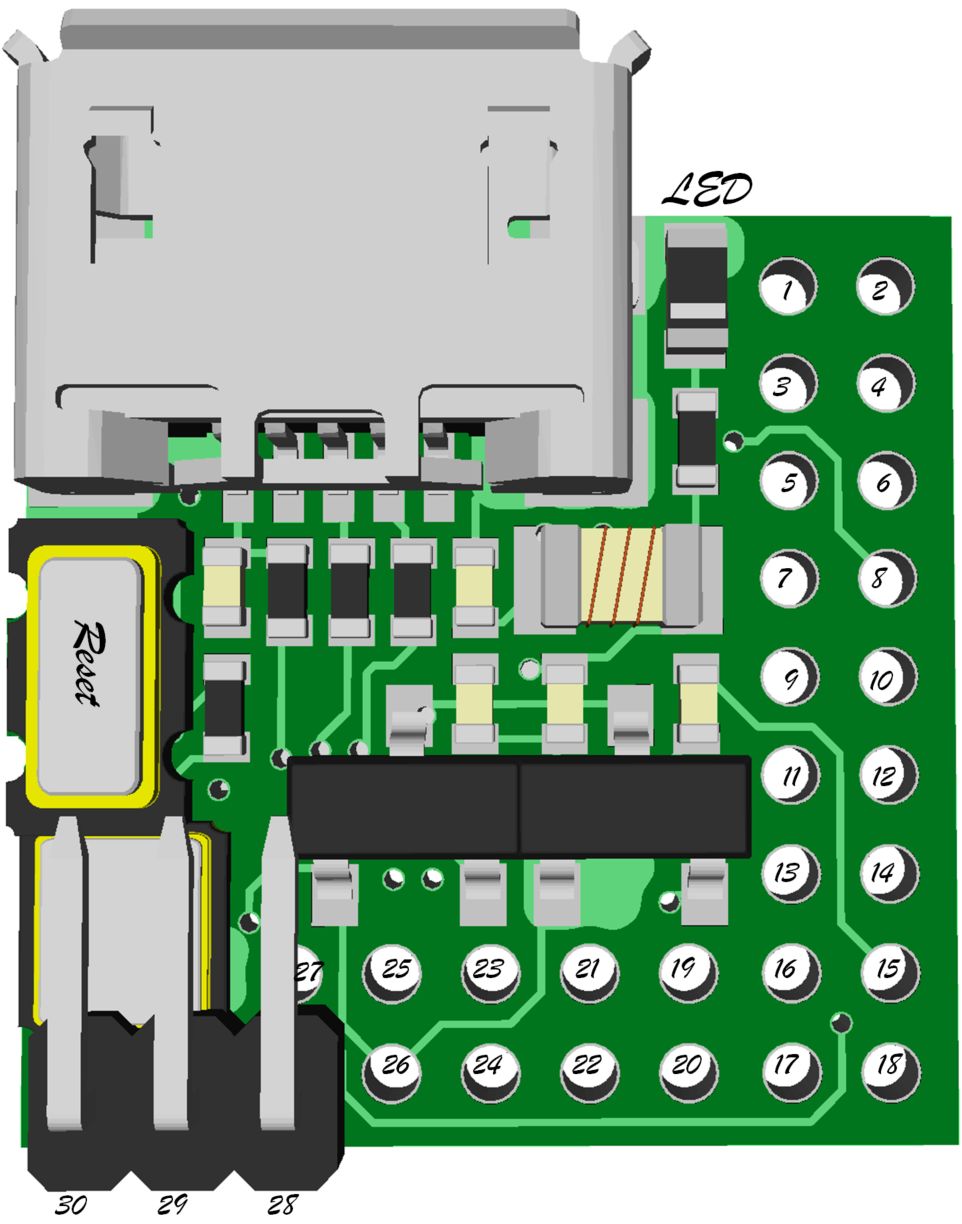
| Pin # | Ref | Function | Pin # | Ref | Function | |
|---|---|---|---|---|---|---|
| 1 | D0 | Digital I/O 0 & Rx | 2 | D1 | Digital I/O 1 & Tx | |
| 3 | D2 | Digital I/O 2 | 4 | D3 | Digital I/O 3 | |
| 5 | D4 | Digital I/O 4 | 6 | D5 | Digital I/O 5 | |
| 7 | D6 | Digital I/O 6 | 8 | D7 | Digital I/O 7 | |
| 9 | D8 | Digital I/O 8 | 10 | D9 | Digital I/O 9 | |
| 11 | D10 | Digital I/O 10 | 12 | D11 | Digital I/O 11 | |
| 13 | D12 | Digital I/O 12 | 14 | D13 | Digital I/O 13 | |
| 15 | Aref | Analog Reference | 16 | GND | Ground | |
| 17 | GND | Ground | 18 | GND | Ground | |
| 19 | A0 | Analog I/O 0 | 20 | A1 | Analog I/O 1 | |
| 21 | A2 | Analog I/O 2 | 22 | A3 | Analog I/O 3 | |
| 23 | A4 | Analog I/O 4 | 24 | A5 | Analog I/O 5 | |
| 25 | Vin | Voltage Input | 26 | GND | Ground | |
| 27 | Vout | Output Voltage (3.3V or 5V) | 28 | 5V | 5V Selector | |
| 29 | Vs | Voltage Selector | 30 | 3.3V | 3.3V Selector | |
| Reset | Button | Push to reset the µduino | LED | LED | Status LED |
Voltage Level Selection
The µduino will come with a jumper installed in the 5V configuration. There are three pins at a right angle across the board, referenced above as pins 28, 29, and 30. The jumper selects the voltage by shorting either of the selector pins (outside pins) to the Voltage Selector pin (center pin). This will switch the output voltage to the selected level.
I can’t thank you all enough for making the µduino a reality! More updates to follow once production begins, so stay tuned!
Dave
µduino