Project update 5 of 10
Build a Brain-Controlled Robotic Car
by Upside Down Labs, Aman Maheshwari, Anuranan Kakati, Ritika Mishra, Rup Jyoti Bharadwaj, Krishnanshu MittalIn this update, we will show you how to build a DIY robotic toy car that you can drive using your brainwaves and muscle signals!
NeuroCarX is an open-source project that combines EEG and EMG biopotential signals to create an intuitive brain-computer interface for robotic control.
Overview
This project uses two types of bio-potential signals to control a robotic car wirelessly:
- EEG (Electroencephalography) When you focus, the car moves forward.
- EMG (Electromyography) Flex your left/right arms to steer left and right or flex both arms to reverse.
All this is powered by NPG Lite, an open-source BioPotential signal acquisition device with:
- Built-in 3-channel BioAmp
- Bluetooth Low Energy (BLE) support
- Completely wireless control
How It Works
The system interprets your biopotential signals and translates them into car movements:
| Signal Type | Action | Car Response |
|---|---|---|
| EEG Focus | Concentrate/Focus | Forward |
| Left EMG | Flex Left Arm | Turn Left |
| Right EMG | Flex Right Arm | Turn Right |
| Right EMG & Left EMG together | Flex both together | Reverse |
| No Signal | Relax | Stop/Idle |
What You’ll Need
Hardware Components
- NPG Lite (Neuro PlayGround Lite)
- Robotic car chassis
- Seeed Studio XIAO ESP32C6 board
- MX1508/MX1616 motor driver
- LiPo battery
- 7 pcs. BioAmp Snap/Alligator Cables
- 7 pcs. gel electrodes
- Nuprep skin preparation gel (optional)
- Alcohol swabs
- Slide switch
Tools Required
- Soldering iron
- Solder
- Laptop
- Connecting wires
- Wire cutters
- Wire strippers
- Screwdriver
- USB-C cable(s)
Software Requirements
About the Components
NPG Lite
A compact, wireless amplifier for recording EMG, ECG, EOG, and EEG signals.
- Adafruit Feather form factor
- Wi-fi, Bluetooth, Zigbee, and Thread connectivity
- User safety and ESD protection
- LEDs, buttons, LiPo charging, USB-C
- Ideal for research, education, and BCI projects
XIAO ESP32C6
Acts as the receiver on the robotic car, listening for wireless commands from NPG Lite and controlling the motors accordingly.
Assembly Guide
Step 1: Build the Robotic Base
- Watch this video for step-by-step guidance, you only need motor and wheel assembled to the chassis:
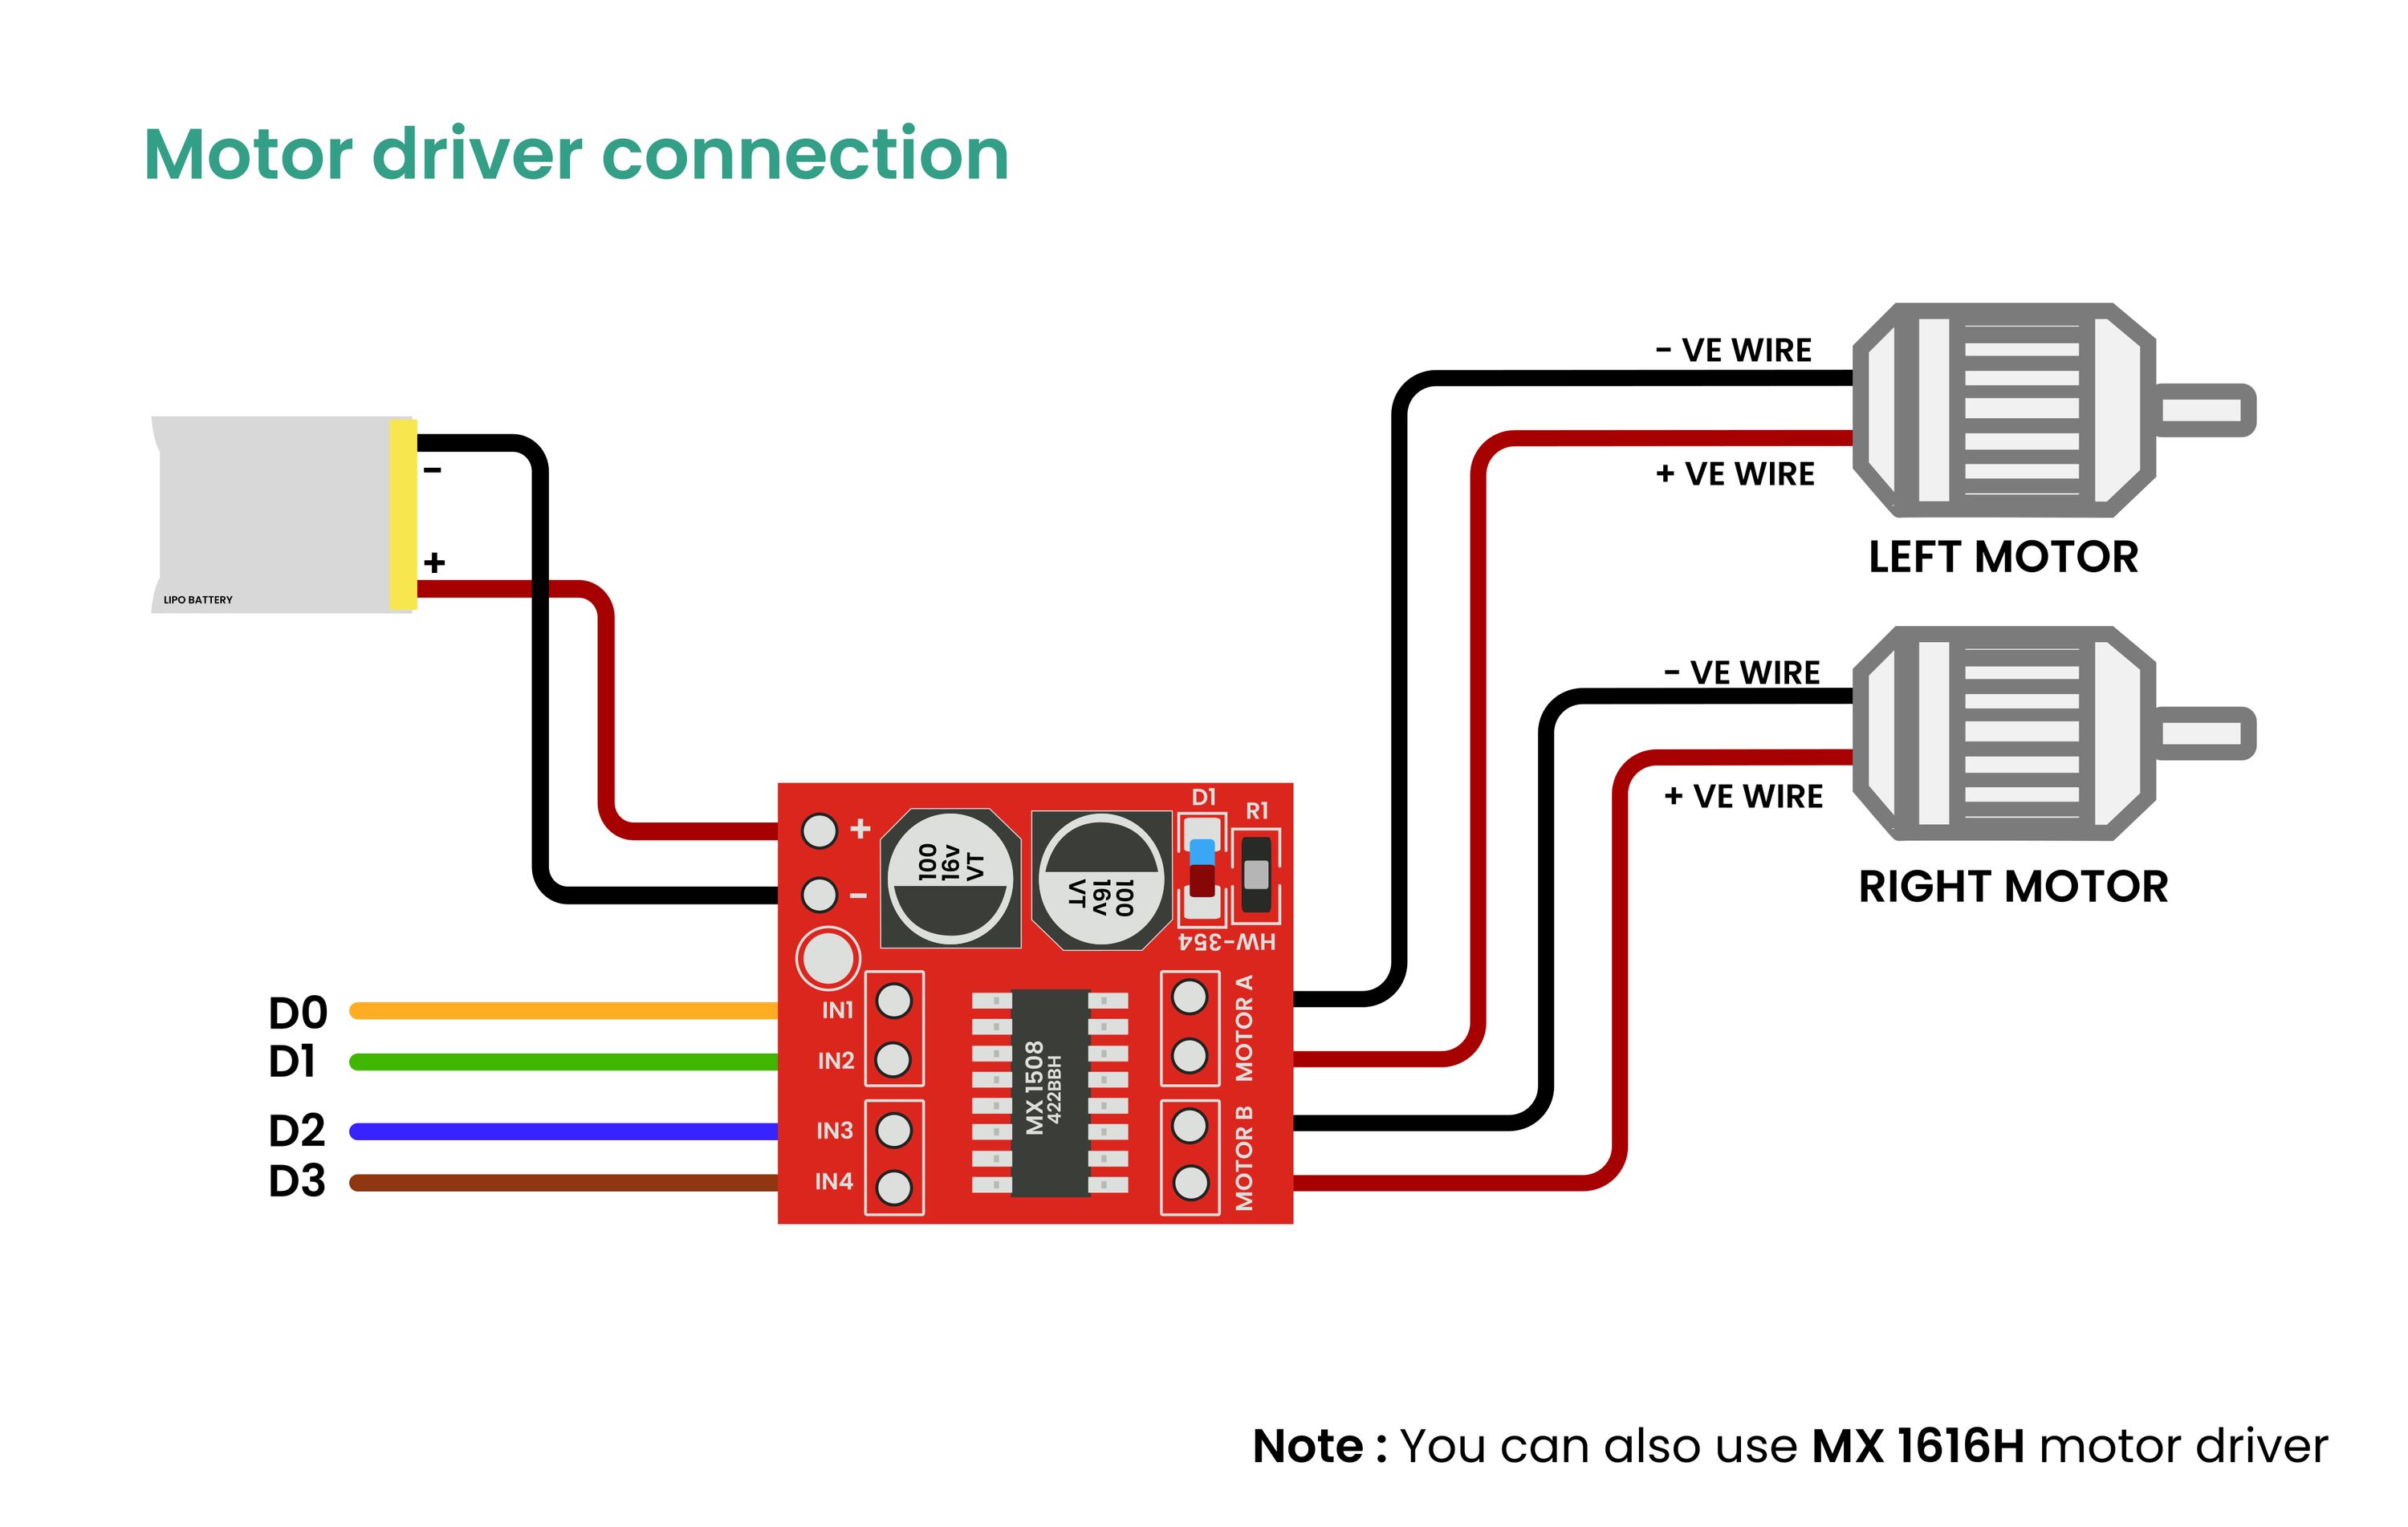
- After the basic car build, follow the circuit diagram below for wiring and connections.
- Once you have assembled the robotic car chassis and mounted the motors to the chassis.
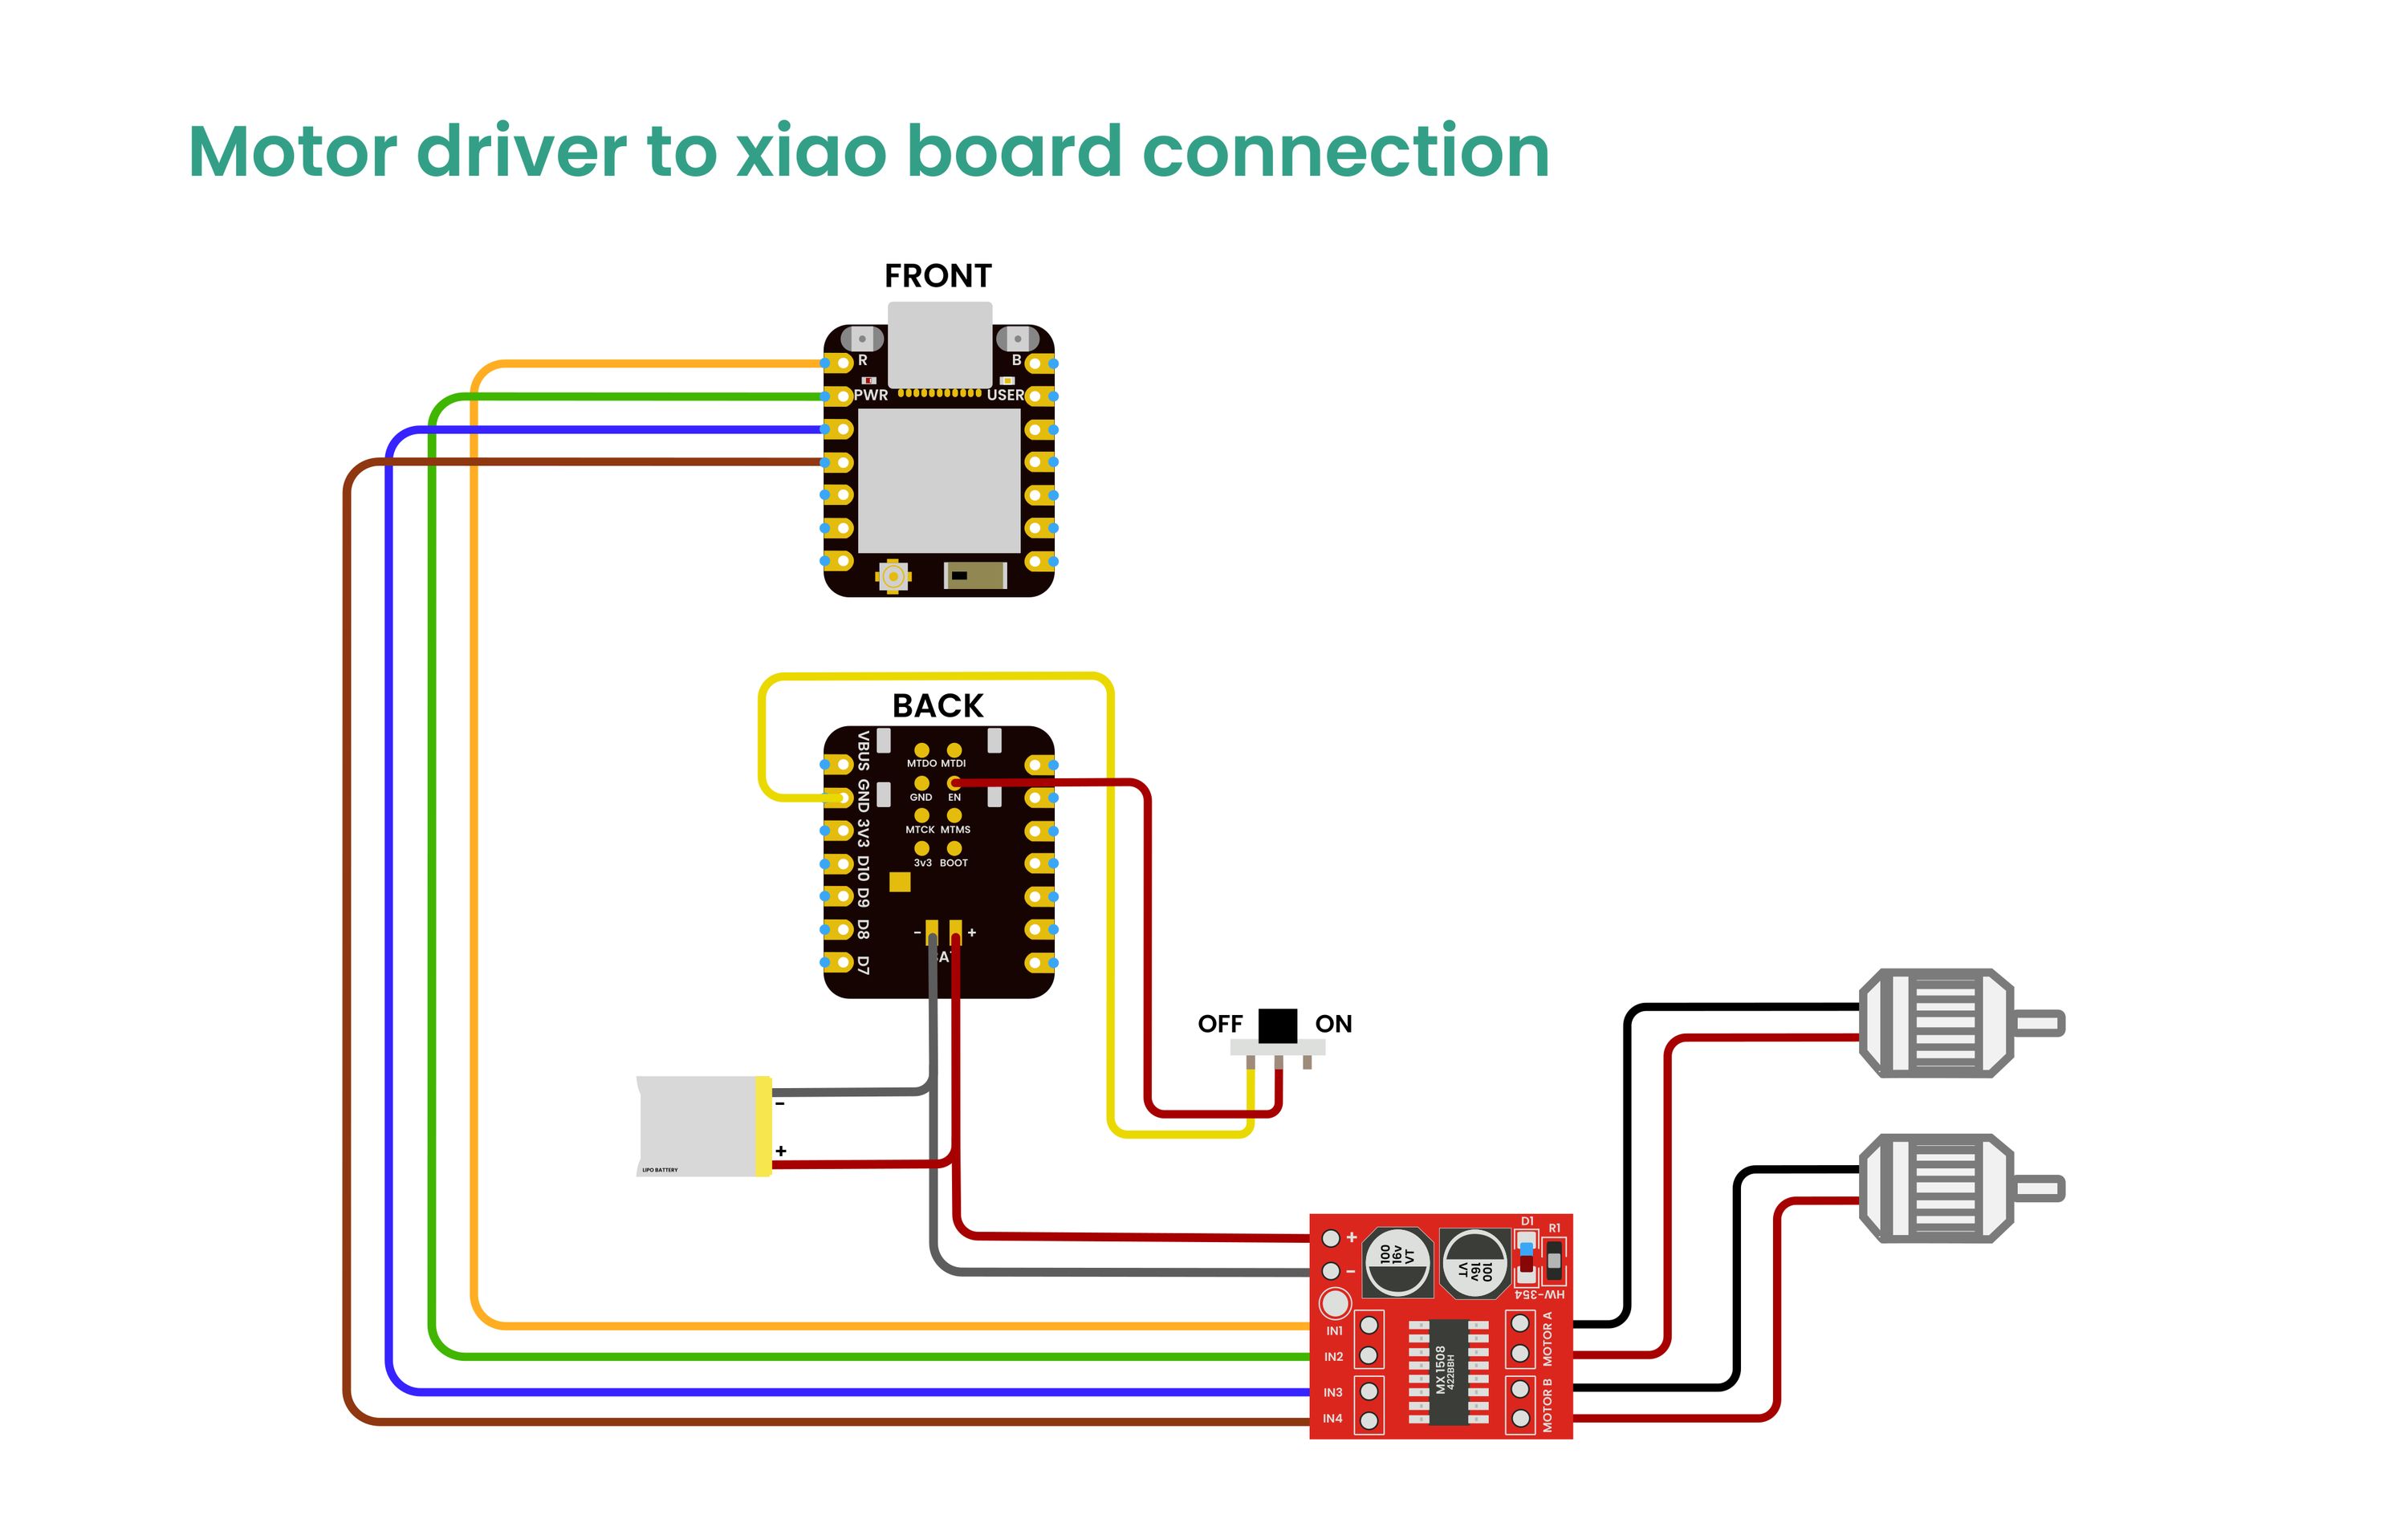
- Connect motors to the MX1508/MX1616 motor driver
- Mount the XIAO ESP32C6 board on the chassis
- Connect the LiPo battery
- Wire everything according to the circuit diagram
Skin Preparation
For optimal signal quality:
- Apply Nuprep Gel to each electrode placement site
- Gently rub to remove dead skin cells and oils
- Clean with alcohol swabs
This preparation significantly improves signal acquisition quality.
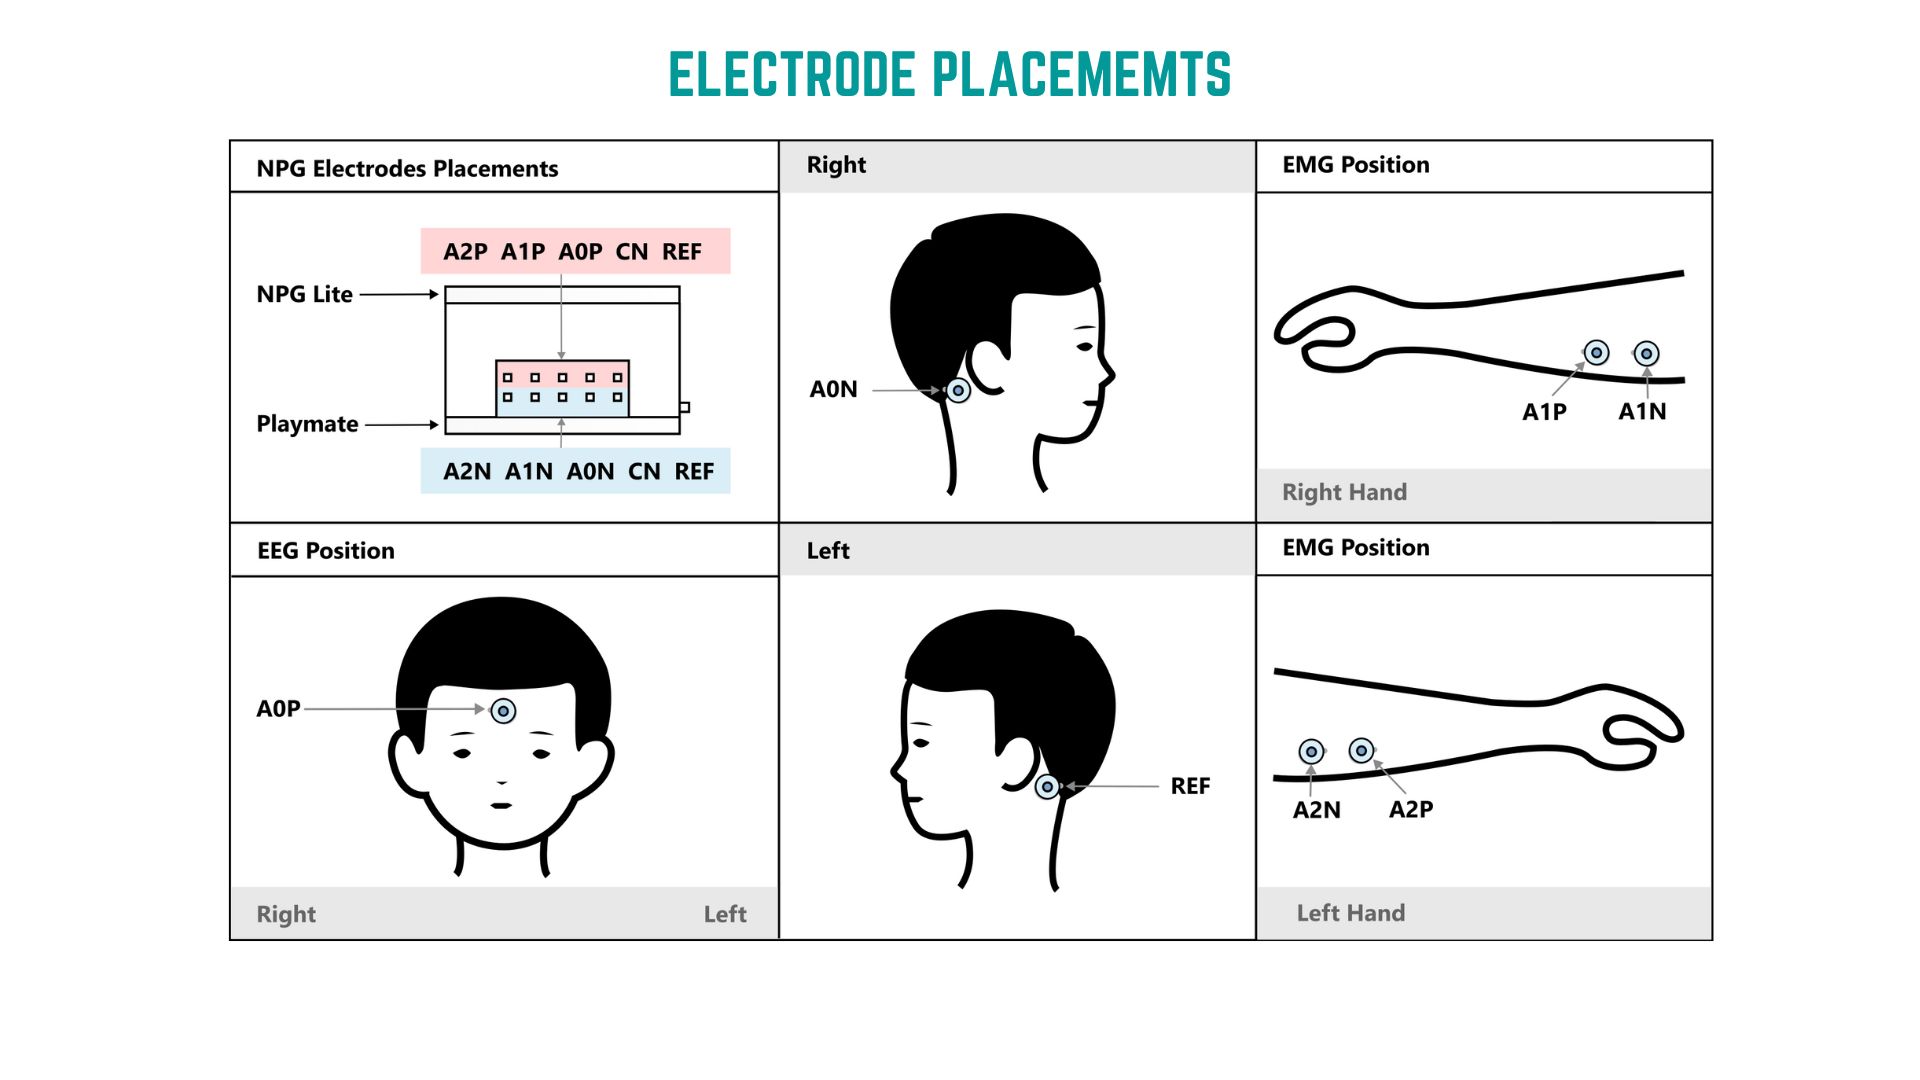
Electrode Placement Guide
| Signal | Channel | Placement Location |
|---|---|---|
| EEG | A0P | Forehead (center) |
| EEG | A0N | Behind right ear |
| Left EMG | A1P | Left forearm (top) |
| Left EMG | A1N | Left forearm (bottom) |
| Right EMG | A2P | Right forearm (top) |
| Right EMG | A2N | Right forearm (bottom) |
| Reference | REF | Behind left ear |
Placement Tips
- EEG: Place
A0Pon forehead for optimal focus detection - EMG: Position on forearms where muscle contractions are felt
- Reference: Place
REFbehind left ear for stability - Press firmly for good gel contact
- Stay still during calibration
Step 2: Arduino IDE Configuration
Install ESP32 Package
- Go to Tools → Board → Board Manager
- Search for:
esp32 by Espressif Systems - Select version
3.2.0(important) - Click Install
Note: Do not install the Arduino ESP32 boards package from Arduino.
Install Required Library
- Go to Sketch → Include Library → Manage Libraries
- Search for:
Adafruit NeoPixel by Adafruit - Click Install
Select Board for NPG Lite
- Go to Tools → Board → esp32
- Select:
ESP32C6 Dev Module
Enable CDC on Boot
- Go to Tools
- Set CDC On Boot → Enabled
Firmware Setup
Step 1: Flash NPG Lite
- Connect NPG Lite via USB-C
- Open Arduino IDE
- Select ESP32C6 Dev Module board
- Flash the BLE-BCI-Car-Remote firmware
- Open Serial Monitor (disconnect charger and avoid AC appliances)
- Observe beta-wave % while focusing
- Note your relaxed state %
- Set threshold slightly above relaxed (default: 2%)
- Reflash firmware with new threshold
- Disconnect USB-C (runs wirelessly from here)
Step 2: Flash Car Receiver
- Connect XIAO ESP32C6 via USB-C
- Select XIAO ESP32C6 board
- Flash the BLE-BCI-Car firmware
- Disconnect USB
Control Commands
| Command | Value | Action |
|---|---|---|
| Idle | 0 | Do nothing |
| Left Turn | 1 | Turn Left |
| Right Turn | 2 | Turn Right |
| Forward | 3 | Forward |
| Reverse | 4 | Reverse |
Operation Guide
Getting Started
- Power on NPG Lite (ensure electrodes placed)
- Power on the robotic car
- Wait for Bluetooth connection
Controls
- Focus/Concentrate → Forward
- Flex left arm → Turn Left
- Flex right arm → Turn Right
- Flex right and left arm together → Reverse
- Relax → Stop/Idle
Performance Tips
- Stay 5m away from AC appliances
- Maintain good electrode contact
- Practice focusing for better control
- Use deliberate muscle contractions
Troubleshooting
Poor Signal Quality
- Clean & reapply electrodes
- Check all connections
- Minimize movement
- Ensure skin prep
- Move away from interference
Connection Issues
- Verify Bluetooth enabled
- Check batteries
- Ensure correct firmware
- Reset and reconnect
- Stay within 10m range
Car Not Responding
- Check motor wiring & battery
- Verify XIAO ESP32C6 receiving commands
- Test motors individually
- Adjust threshold calibration
Calibration Problems
- Disconnect laptop charger
- Avoid AC appliances
- Practice consistent focus states
- Adjust threshold as needed
Technical Details
Signal Processing
- EEG Focus Detection → Beta-wave thresholding
- EMG Detection → Amplitude-based contractions
- Wireless → BLE communication
- Response → Sub-second latency
Hardware Specs
- NPG Lite → 3-channel BioAmp, wireless
- XIAO ESP32C6 → Dual-core, BLE
- Motor Control → PWM speed + direction
- Power → Rechargeable LiPo
Applications & Use Cases
- Neurotechnology Research (BCI interface development)
- Accessibility Technology (assistive devices)
- STEM Education (learning + demos)
- Human-Computer Interaction (novel interfaces)
- Rehabilitation (motor skill training)
Future Enhancements
- Speed modulation (signal strength)
- Obstacle avoidance (sensors)
- Multi-user collaboration
- Machine learning adaptive recognition
Learn More
Resources
Documentation
Community
Support
Need help?
- Contact Us
- Report bugs on GitHub
- Contribute PRs