Project update 6 of 10
Neuro PlayGround Lite: Single-Channel EEG/EOG/EMG Demo
by Deepak Khatri, Anuranan Kakati, Rup Jyoti Bharadwaj, Krishnanshu Mittal, Ritika Mishra, Upside Down Labs🚨 Final Hours - Campaign Ending Soon!
This is your last chance to get Neuro PlayGround Lite at campaign pricing! Once the campaign ends, prices will increase. Don’t miss out—secure your kit now on Crowd Supply at its best price!
Introduction
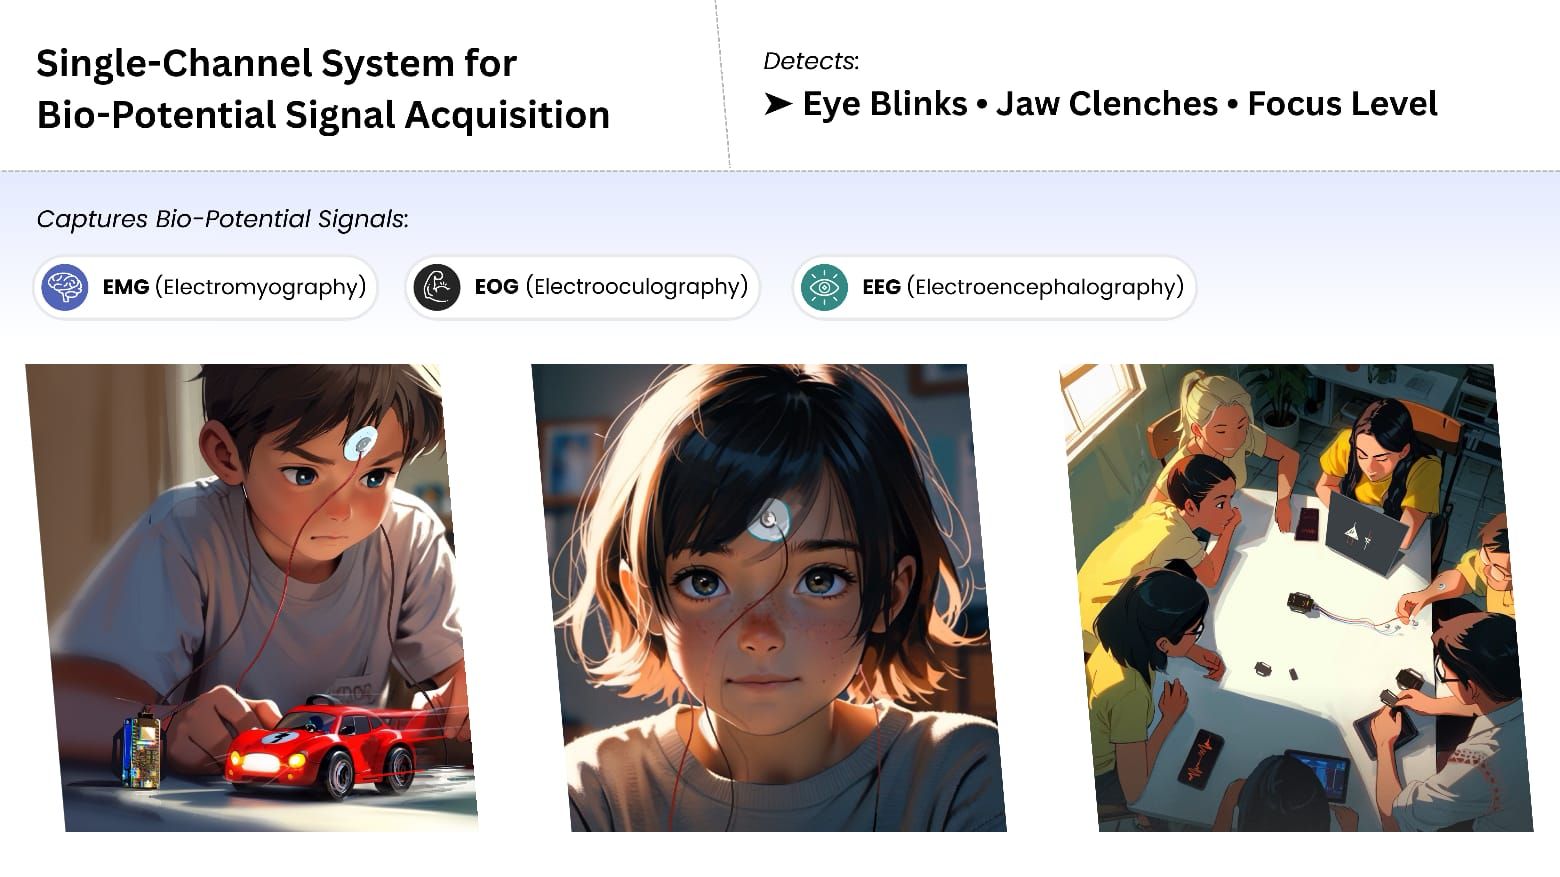
This tutorial demonstrates how to use a single-channel bio-potential signal acquisition system with Neuro PlayGround Lite to detect three types of neural and muscular activity from a front cortex EEG setup:
- EEG (Electroencephalography): Detects focus (beta thresholding from EEG FFT data).
- EOG (Electrooculography): Detects double/triple eye blinks (EOG artifact).
- EMG (Electromyography): Detects jaw clench (EMG artifact).
The output is displayed on the Serial Monitor, showing events such as Focused, Double blink, Triple blink, and Jaw Clench. You can enable DEBUG mode to calibrate and adjust threshold values for your signals.
Note: This demo uses the Neuro PlayGround Lite Ninja pack, but you can use any NPG Lite Playmate for similar results.
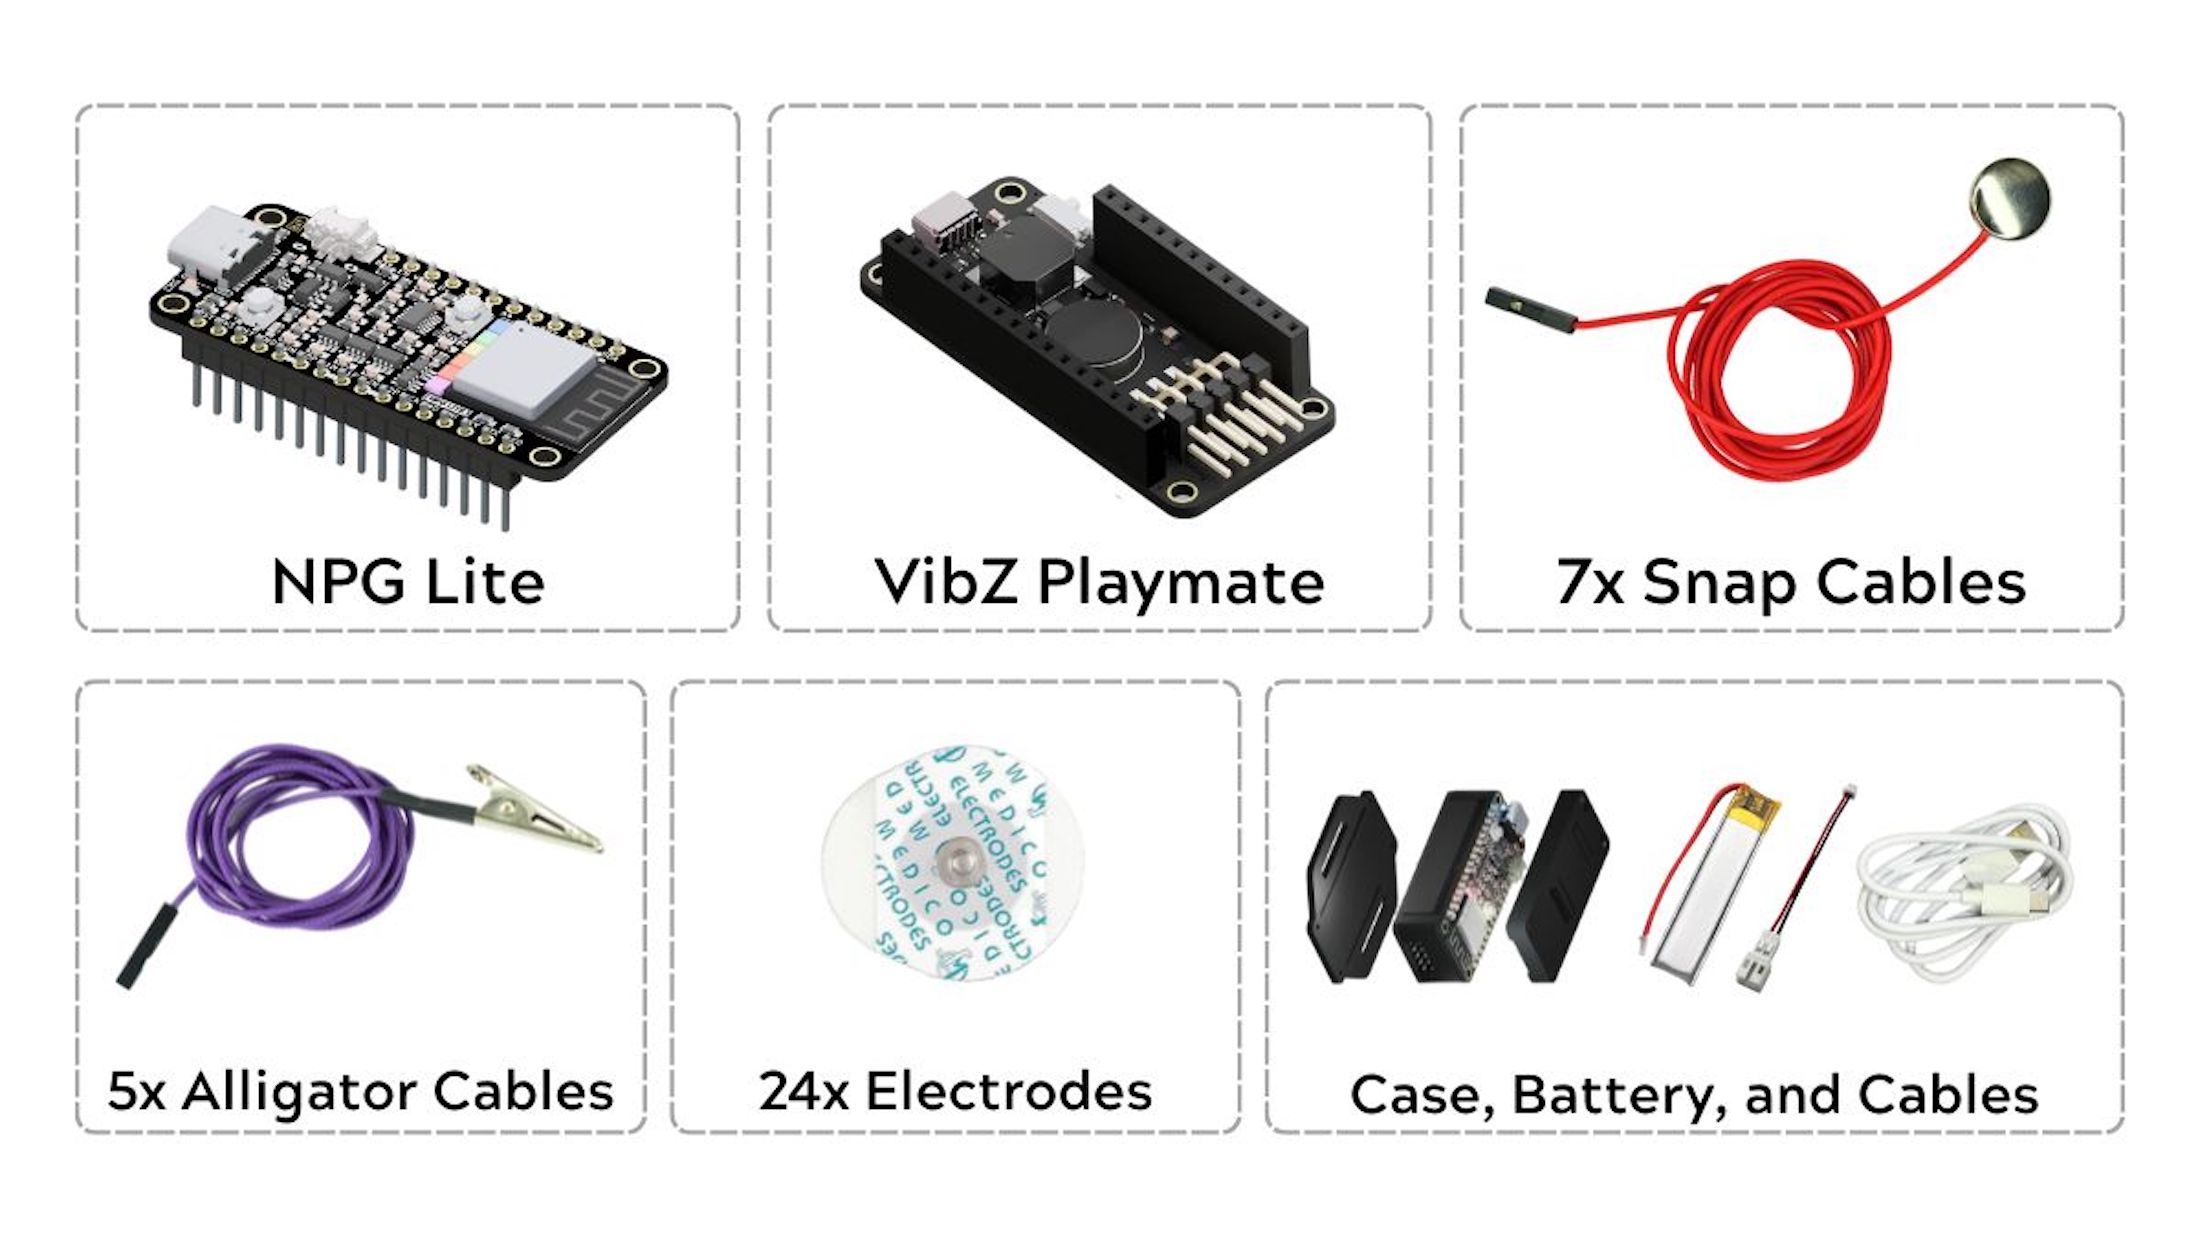
Hardware Required
For this demo, you’ll need:
- NPG Lite main board (ESP32-C6 BioAmp)
- VibZ Playmate (or any Playmate)
- Gel electrodes (3 pcs minimum)
- BioAmp snap cables (3 cables minimum for single channel setup)
- LiPo battery (included in Ninja/Beast packs)
- A laptop
- Alcohol swabs (for skin cleaning)
- NuPrep skin-prep gel (optional, for better signal quality)
- USB-C cable (for connecting NPG Lite to your laptop)
Skin Preparation
Proper skin preparation is essential for clean EEG signals.For detailed information Follow this guide for Skin Preparation
- Apply NuPrep Skin Preparation Gel to the forehead and behind both ears (Optional, for better signal quality).
- Clean with alcohol swabs at the electrode placement areas after gel application.
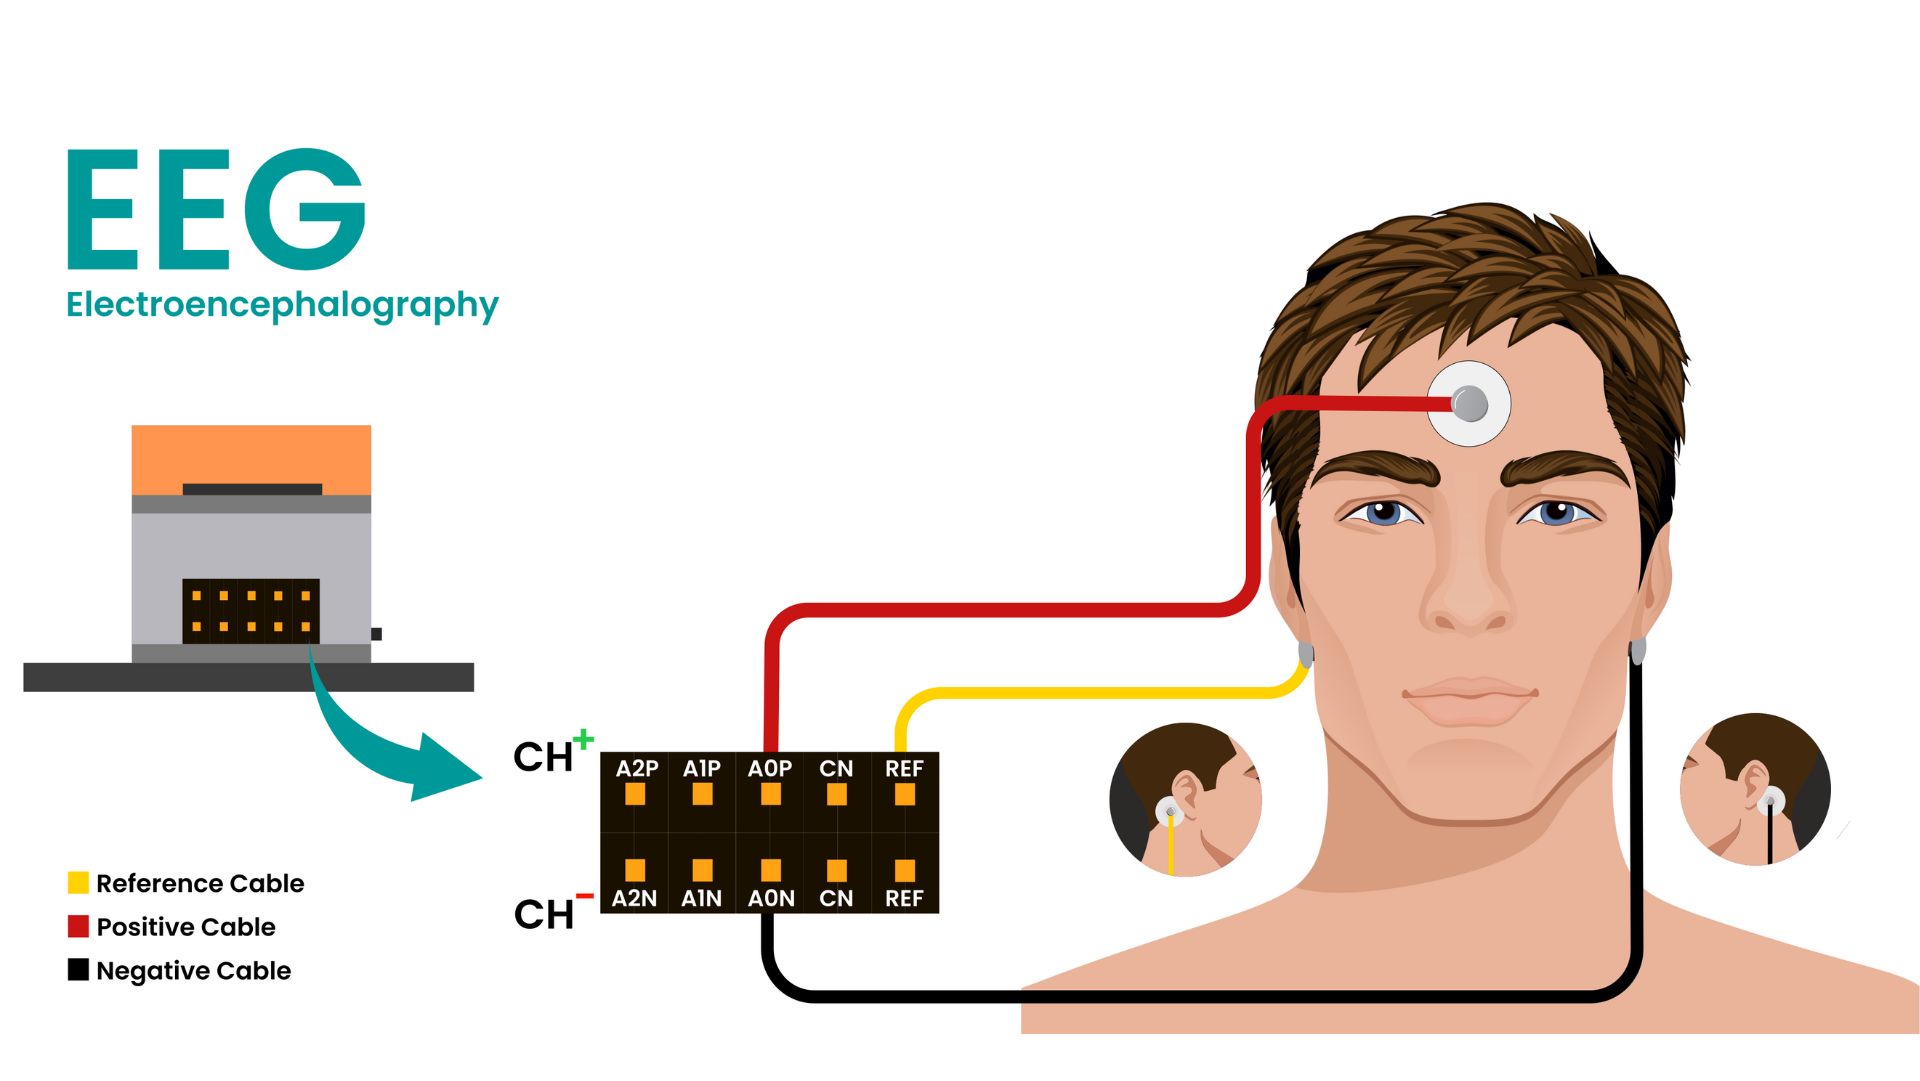
Electrode Placement (EEG Setup)
Once your skin is prepared, it’s time to connect BioAmp Snap Cables to NPG Lite.
- Connect two snap cables to A0P and A0N (these are your signal channels), and one snap cable to REF (reference).
- P means positive, N means negative, and REF means reference.
Now, snap all the cables to the gel electrodes and place them as follows:
- Positive (A0P): Place the electrode on your forehead, between FP1 and FP2.
- Negative (A0N): Place the electrode behind one ear on the bony part.
- Reference (REF): Place the electrode behind the other ear.
Take a moment to double-check your connections before moving on.
Setup Steps
Follow these steps to get started:
- Turn ON your NPG Lite using the switch on the Playmate.
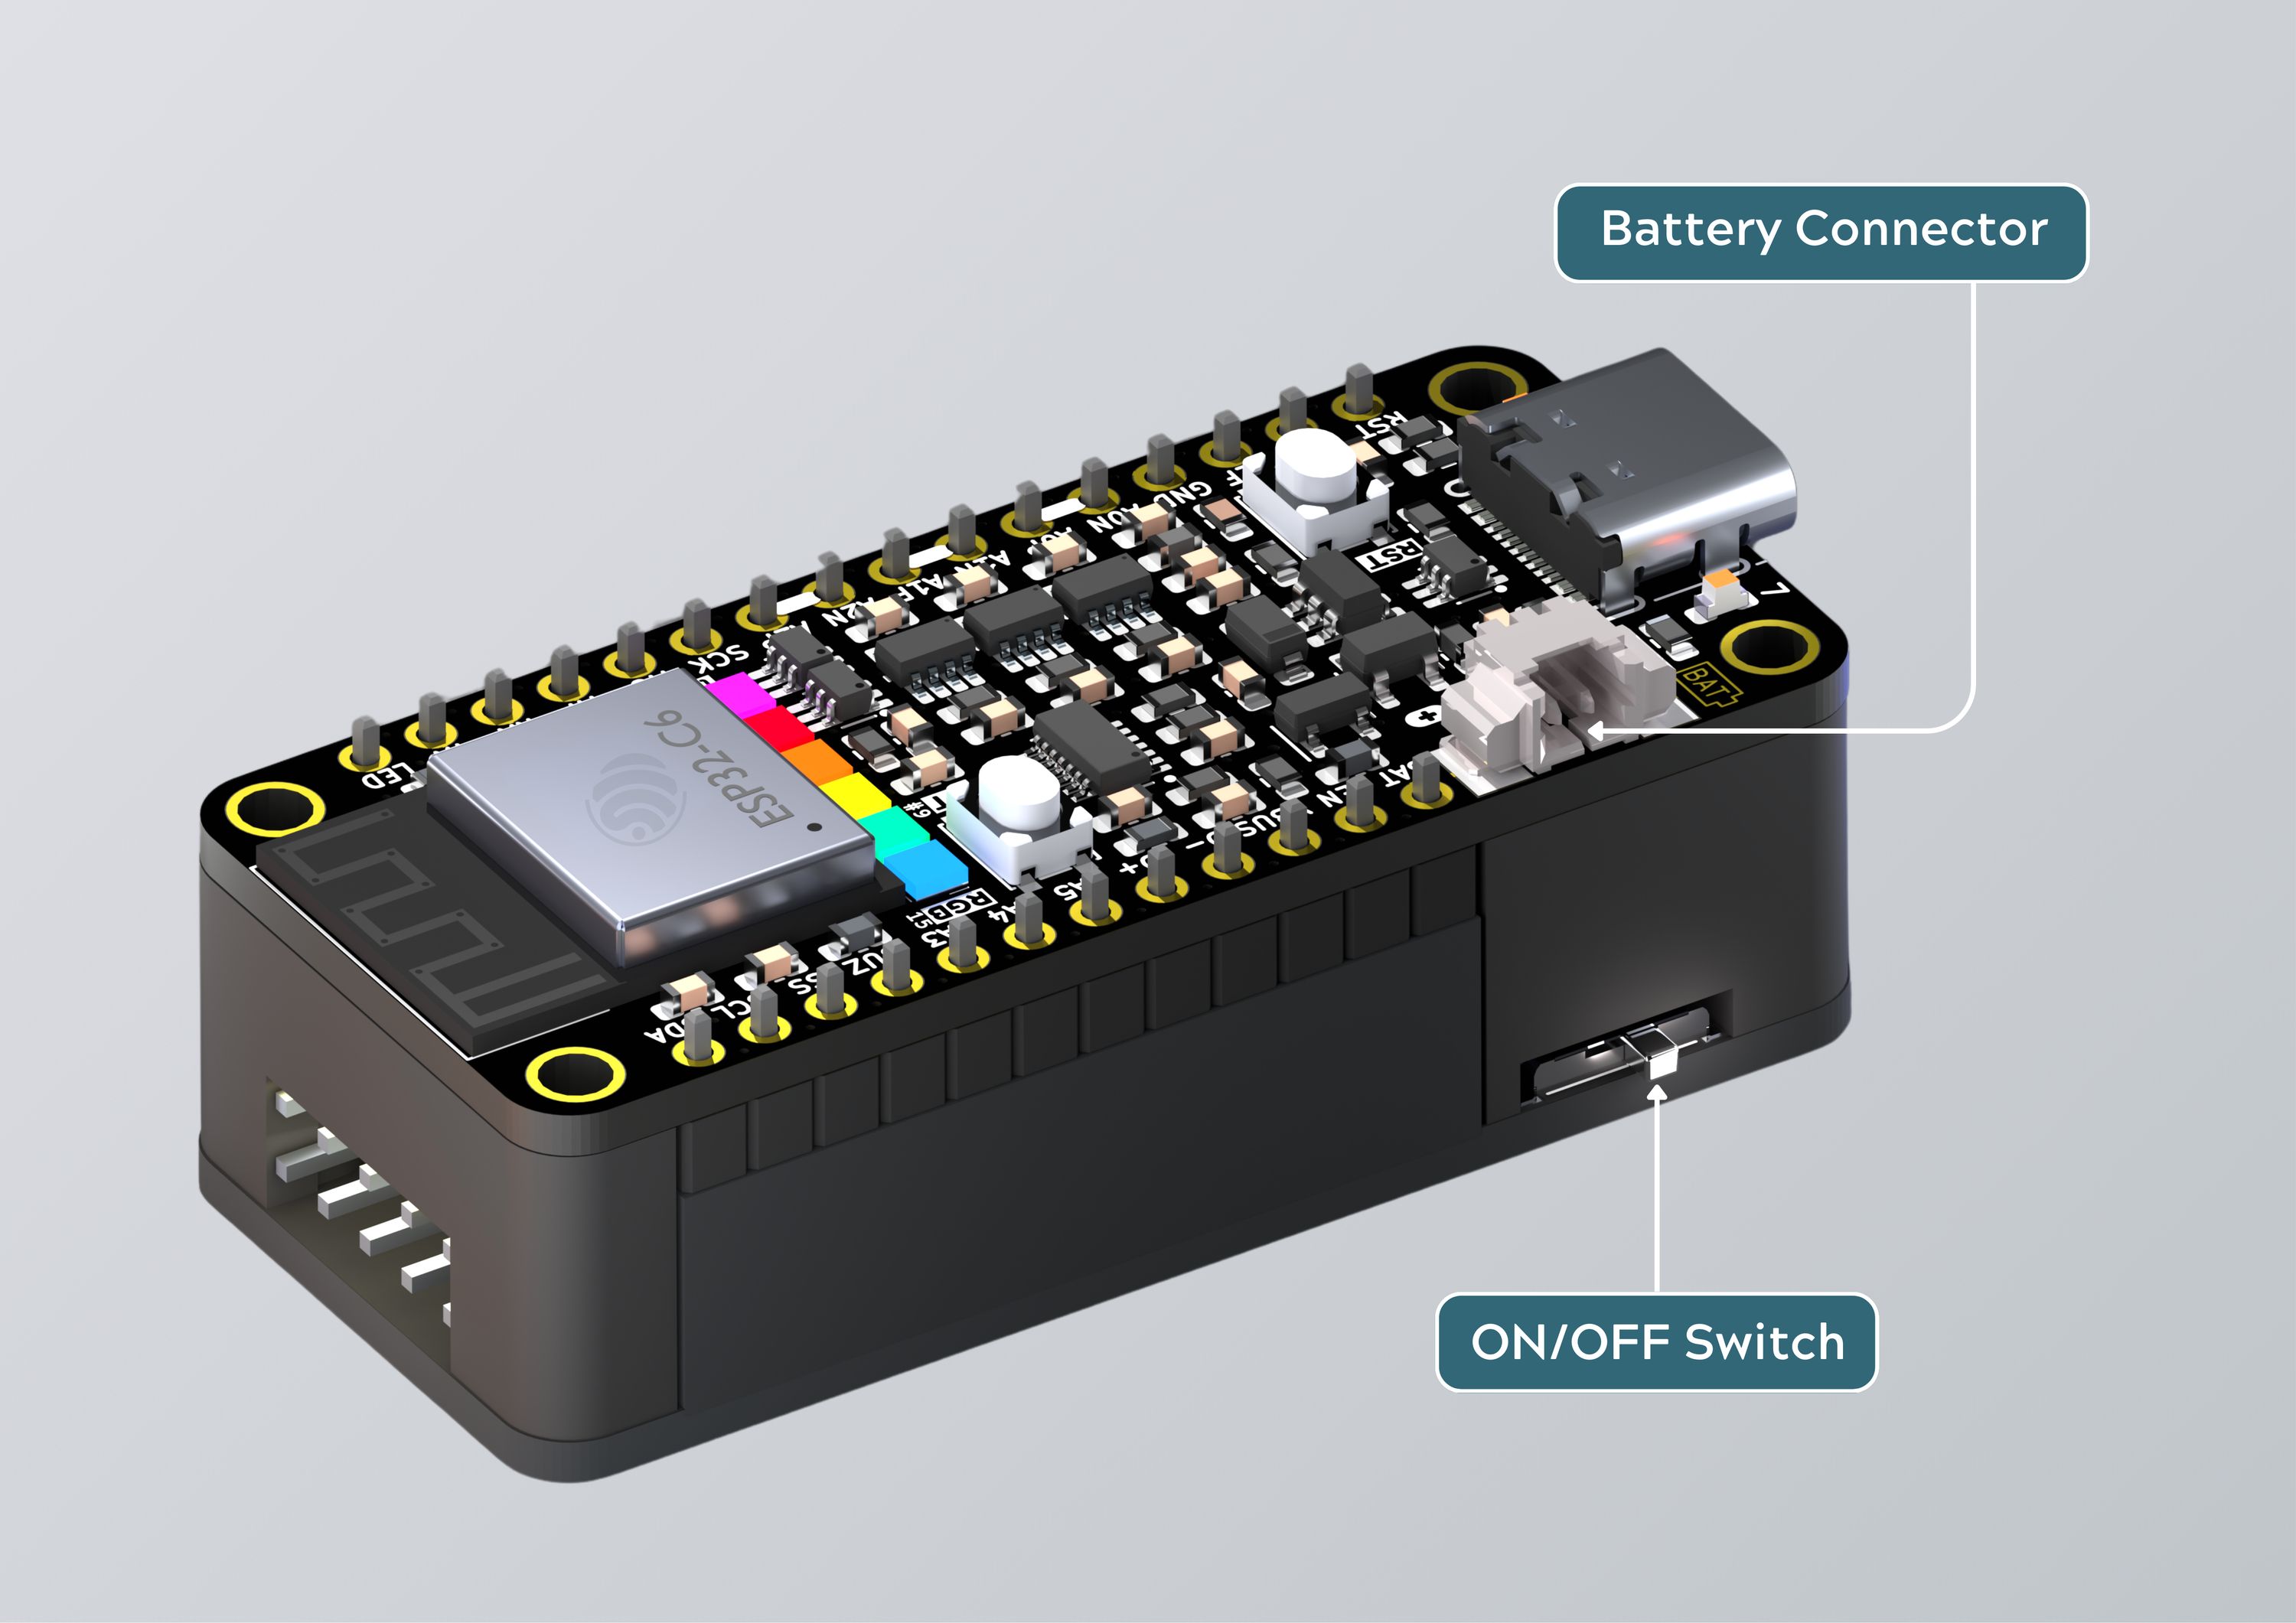
Connect NPG Lite to your laptop using a USB-C cable.
Go to the GitHub repository for the single-channel firmware sketch.
Copy the firmware sketch from GitHub.
Open Arduino IDE and create a new sketch (
File → New Sketch).Delete the existing code (
Ctrl+Ato select all, then paste the copied sketch withCtrl+V).
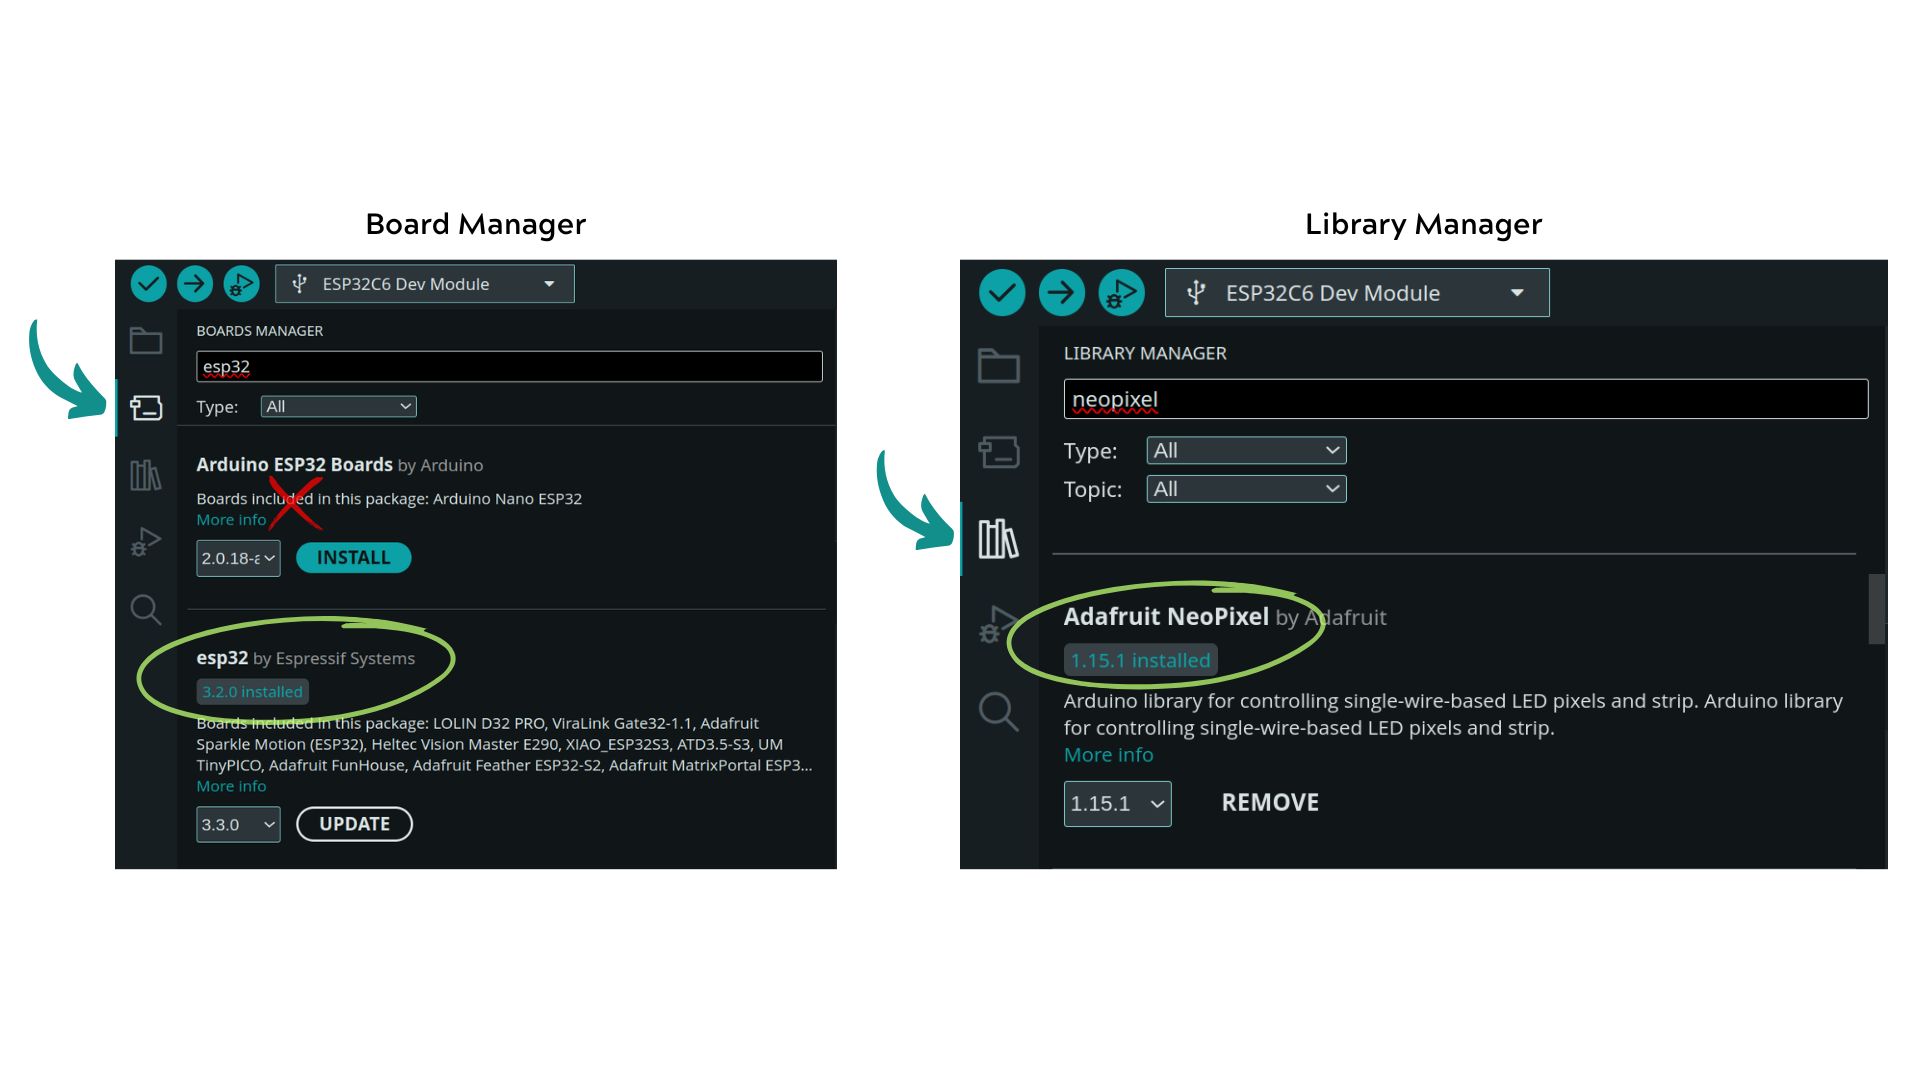
- Install ESP32 boards and Adafruit NeoPixel Library:
You’ll need both the ESP32 board support and the Adafruit NeoPixel library.
- Open Board Manager (
Tools → Board → Board Manager) - Search for "ESP32" and install ESP32 by Espressif Systems (do not install Arduino ESP32 boards).
- Next, open Library Manager (
Tools → Manage Libraries) and search for Adafruit NeoPixel. Install the official Adafruit NeoPixel library.
Select the board:
- Go to
Tools → Board → esp32 → ESP32C6 Dev Module
- Go to
Enable CDC mode:
- Go to
Tools → CDC Mode → Enabled
- Go to
Upload the firmware:
- Hit the upload button (→ on the top left).
After uploading, open the Serial Monitor in Arduino IDE to view real-time feedback.
How It Works
Signal Acquisition:
- The raw signal is read from the EEG electrode placement described above.
Filtering:
- A notch filter removes powerline noise.
- Dedicated filters extract EEG, EOG, and EMG features from the signal.
Feature Extraction:
- EEG: Filtered and processed using FFT to calculate brain bandpowers. Beta waves (13Hz–30Hz) are monitored for focus.
- EOG: Filtered to detect significant eye blinks. Envelope algorithm smooths the signal for blink detection.
- EMG: Filtered to detect jaw clench. Envelope algorithm smooths the signal for muscle activity detection.
Event Detection:
- Thresholds are set for each feature to detect specific events:
- Focus: When beta bandpower exceeds the set threshold.
- Blink: When EOG envelope crosses defined thresholds.
- Jaw Clench: When EMG envelope exceeds the set threshold.
- Thresholds are set for each feature to detect specific events:
Debugging & Customization
Bio-potential signals vary from person to person, so the program is designed to be customizable:
Enable Debug Mode
- Uncomment the line
#define DEBUGat the top of the code. - Compile and flash to NPG Lite to enable debugging mode.
- The Serial Monitor will display:
- Beta power values
- EOG envelope values
- EMG envelope values
Signal Analysis & Threshold Tuning
Safety Note:
- Do not connect your laptop to a charger while testing.
- Maintain distance from AC appliances to reduce noise.
- Make sure NPG Lite is charged.
EEG (Focus Detection):
- Focus at one point for several seconds without blinking or moving your eyes.
- On the Serial Monitor, observe the maximum beta power value reached.
- Set
BETA_THRESHOLDto about half of the maximum value you noted.
EOG (Blink Detection):
- Try blinking and observe the maximum EOG value reached.
- Set
BlinkLowerThresholdslightly above your maximum value. - Set
BlinkUpperThresholdbelow your maximum value for reliable detection.
EMG (Jaw Clench Detection):
- Clench your jaw and observe the maximum EMG value reached.
- Set
JAW_ON_THRESHOLDa bit lower than your maximum value. - Set
JAW_OFF_THRESHOLDslightly below theJAW_ON_THRESHOLD.
Adjust these thresholds based on your own signal readings for safe and accurate detection.
Real-Time Monitoring
- Ask a friend to help monitor the values while you test.
- Adjust thresholds as needed for reliable detection.
Once you’re satisfied with your threshold settings, disable debugging mode by commenting out #define DEBUG and uploading the code again.
With the newly updated code, your Serial Monitor will now accurately display detected events for focus, eye blinks, and jaw clench in real time.
If detection accuracy still isn’t satisfactory, repeat the debugging steps and adjust your thresholds as needed.
Summary
This project provides a simple, customizable way to explore EEG, EOG, and EMG detection using a single channel on NPG Lite. With real-time feedback and easy threshold adjustment, it’s ideal for experimentation and learning in neuroscience playgrounds.
Contact & Credits:
- Developed by Upside Down Labs
- For support and open-source contributions, visit Upside Down Labs
You can grab your kit from CrowdSupply.
If you have questions or want to share your results, reach out to us at contact@upsidedownlabs.tech!