Project update 8 of 9
Arduino IDE Library Manager Support
by EsmacatHello everyone,
We have some exciting news for all EASE users! The Arduino library we developed for simple interfacing between EASE and an Arduino board can now be found on the Arduino IDE Library Manager. If you haven’t already added our library to your list of libraries, click Tools->Manage Libraries on the IDE toolbar. Search for EASE_ArduinoCode and install it. Once installed, you will have access to our library which includes some example sketches.
For those of you unfamiliar with using our Arduino library, we listed below the simple steps to get your EASE project started on the Arduino IDE. Our Mbed library is similar to our Arduino library except it can only be found on our website. More information on our libraries can be found on our website tutorials or on our Hackster.io page. Anyone who would like to use EASE with a non-Arduino or non-Mbed board can use our EASE libraries as reference to develop their own library/application to communicate between EASE and the base board through SPI.
Include <Esmacatshield.h>
Putting this line at the top of your Arduino sketch will include the library we devolped for EASE. You may also click Sketch->Include Library->EASE_ArduinoCode to include the library. Make sure you have the library installed if you don’t already.
Esmacatshield crowdsupply(10);
After including the library, instantiate and EASE object by writing this line. We used crowdsupply for this example but you are free to name your EASE object anything you like. The value inside the parenthesis corresponds to the jumper pin on EASE for the Chip Select pin used for SPI communication. This value may only be 9 or 10 correspoing to digital pin 9 and 10.
int registers[8];
After creating your EASE object, declare an array with any name you like (registers is a placeholder) that will be filled with the values sent/recieved through EtherCAT. The array size will always be eight since EASE only has eight 16-bit registers to send/recieve data.
crowdsupply.start_spi();
This line of code should be included in the
setup()function to start the SPI communication between the base board and EASE. The SPI communication has already been coded for you so you do not need to worry about it!
The next two functions are for sending/recieving data to the EtherCAT master. They can be used in the setup() function, loop() function, or any other function you create to aid your project.
crowdsupply.get_ecat_registers(registers);
This line will fill your array data recieved by the EtherCAT master. Include the array name inside the parenthesis so it can be filled.
crowdsupply.write_reg_value(reg,value,true);
This line will write a value (value) to a specific register (reg) and turn the user LED on/off. This line does not need to use the created array. Setting the LED status is optional as you do not need to include true or false. For example,
crowdsupply.write_reg_value(2,100);will send the value 100 through register 2 to the EtherCAT master. The EtherCAT master can then do whatever it wants with that value whether it is using it for its own purposes or sending that value to another EtherCAT slave.
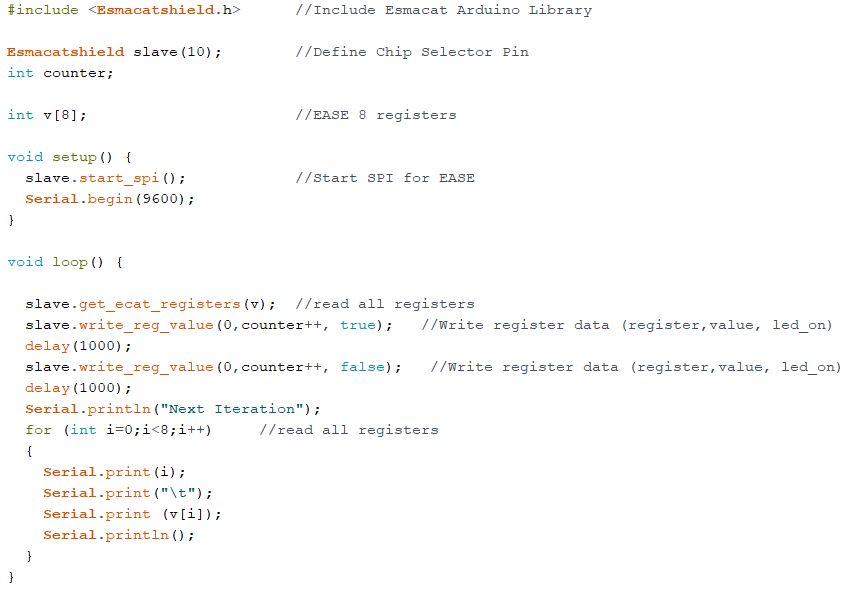
Here is an example of our library in action. This is one of the sketches included in our library that will print out all values of the EASE registers on both the EtherCAT master and Arduino IDE.
That is all you need to run an EtherCAT application with EASE! Whether you would like to automate something around your house or add EtherCAT to an existing project, EASE makes it simpler than ever to do so!
Please let us know if you have any questions or would like to show off your projects. Best of luck!
The Esmacat Team at Harmonic Bionics