Project update 7 of 8
Introducing the BlueIOTerm Mobile App
by Jonathan Albrecht, Hoan, Tran Duy Thinh, Manh Tai HoHello backers,
It has been a while since the last update and we are really grateful for your patience. Today, we would like to introduce you to the free BlueIOTerm mobile app, which can function as a UART serial port terminal when pairing with a BlueIO832Mini board.
BlueIOTerm + BlueIO832Mini = UART-BLE Bridge
Overview
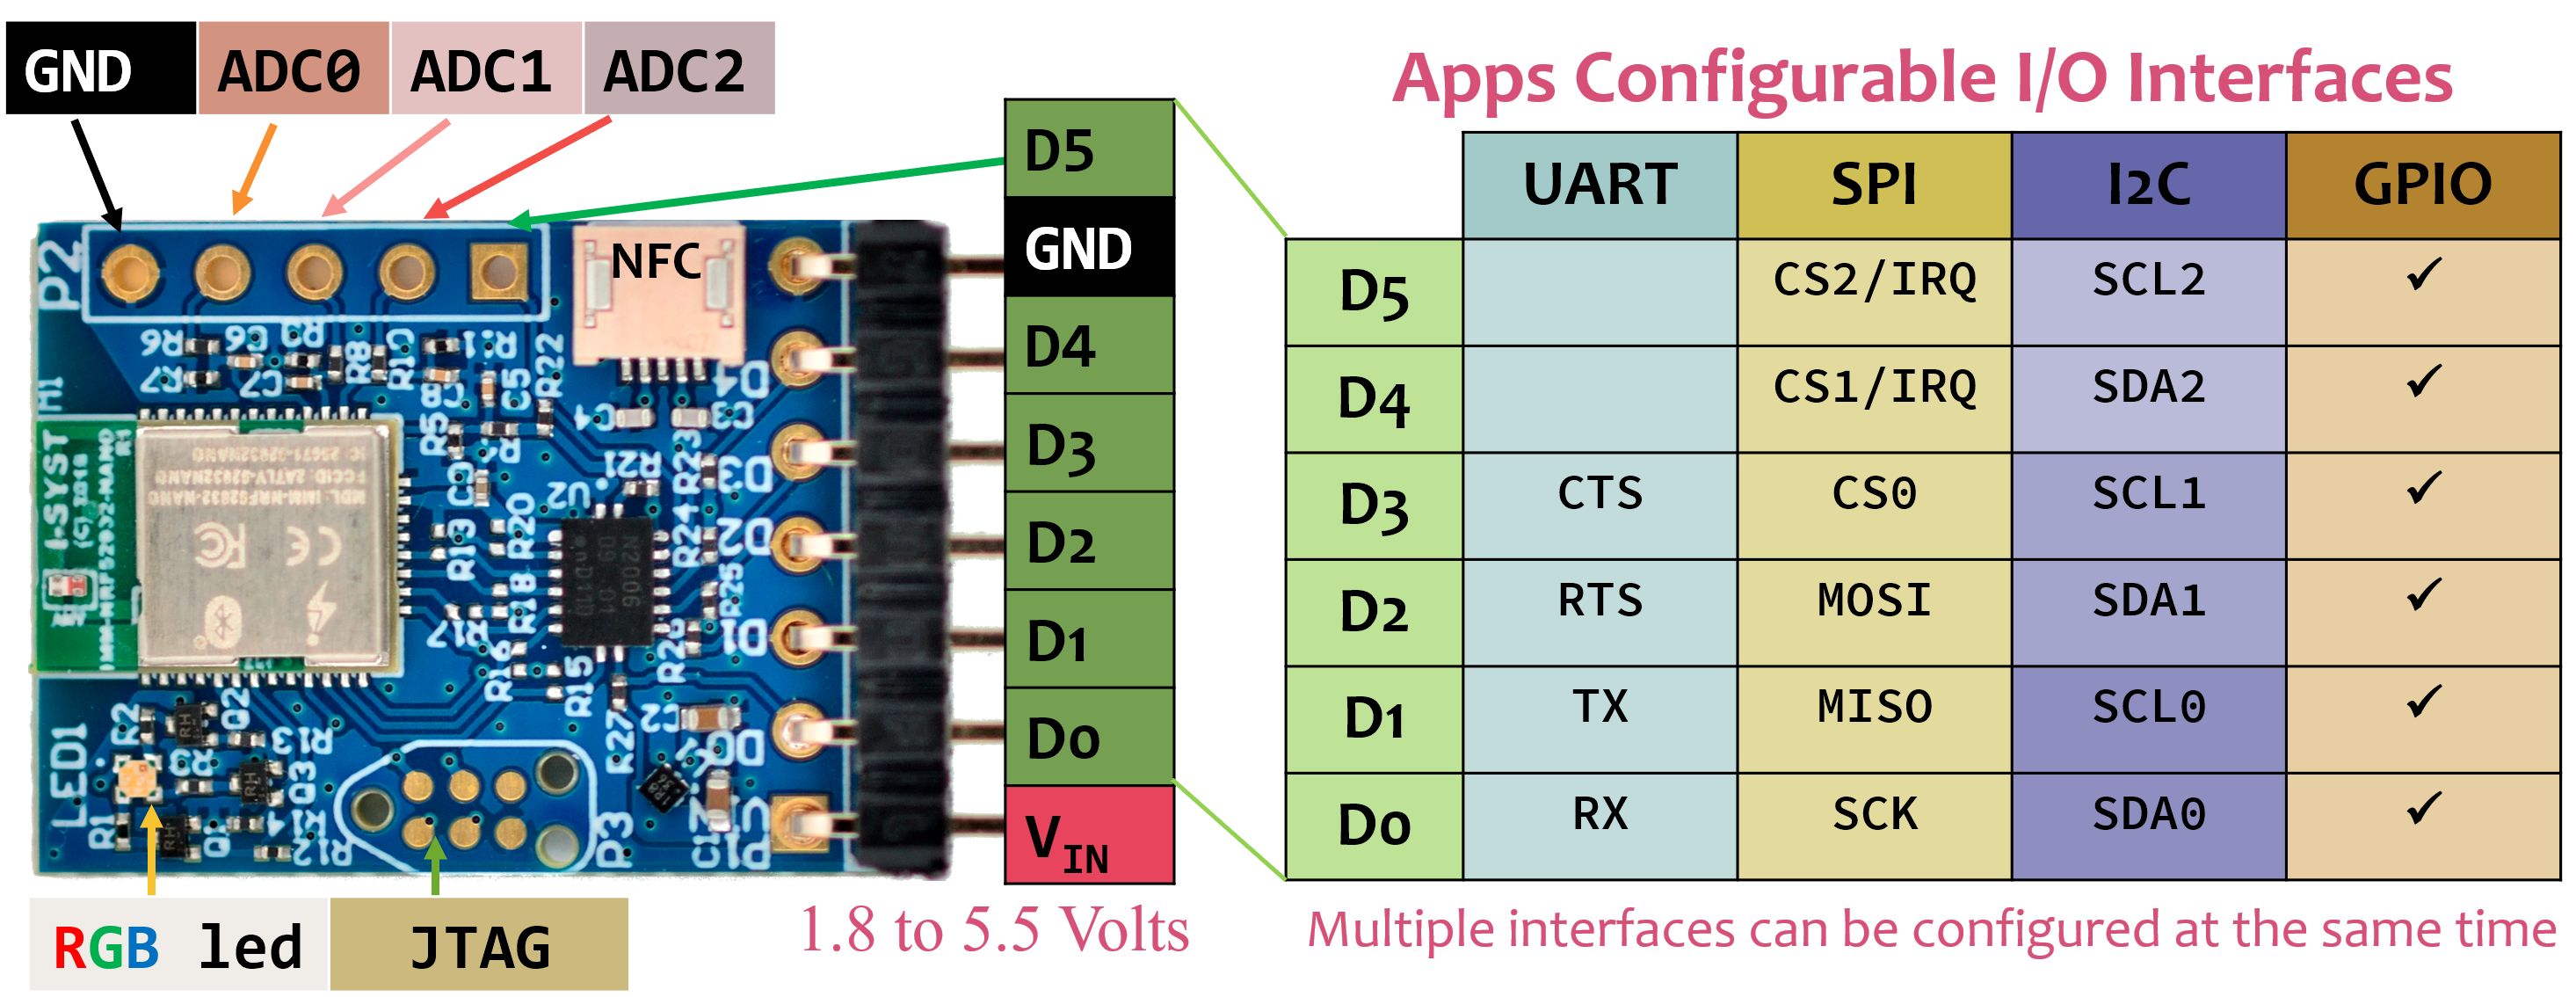
One of the highlights of the BlueIO832Mini board is that the pins are configurable using our free mobile apps (Fig. 1). These pins can be configured as UART, SPI, or I2C interfaces depending on your use cases. Accordingly, serial interface-over-Bluetooth LE (BLE) is an important application of BlueIO832Mini, allowing UART/SPI/I2C data streaming between the users’ mobile device and the target device connected to the BlueIO832Mini.
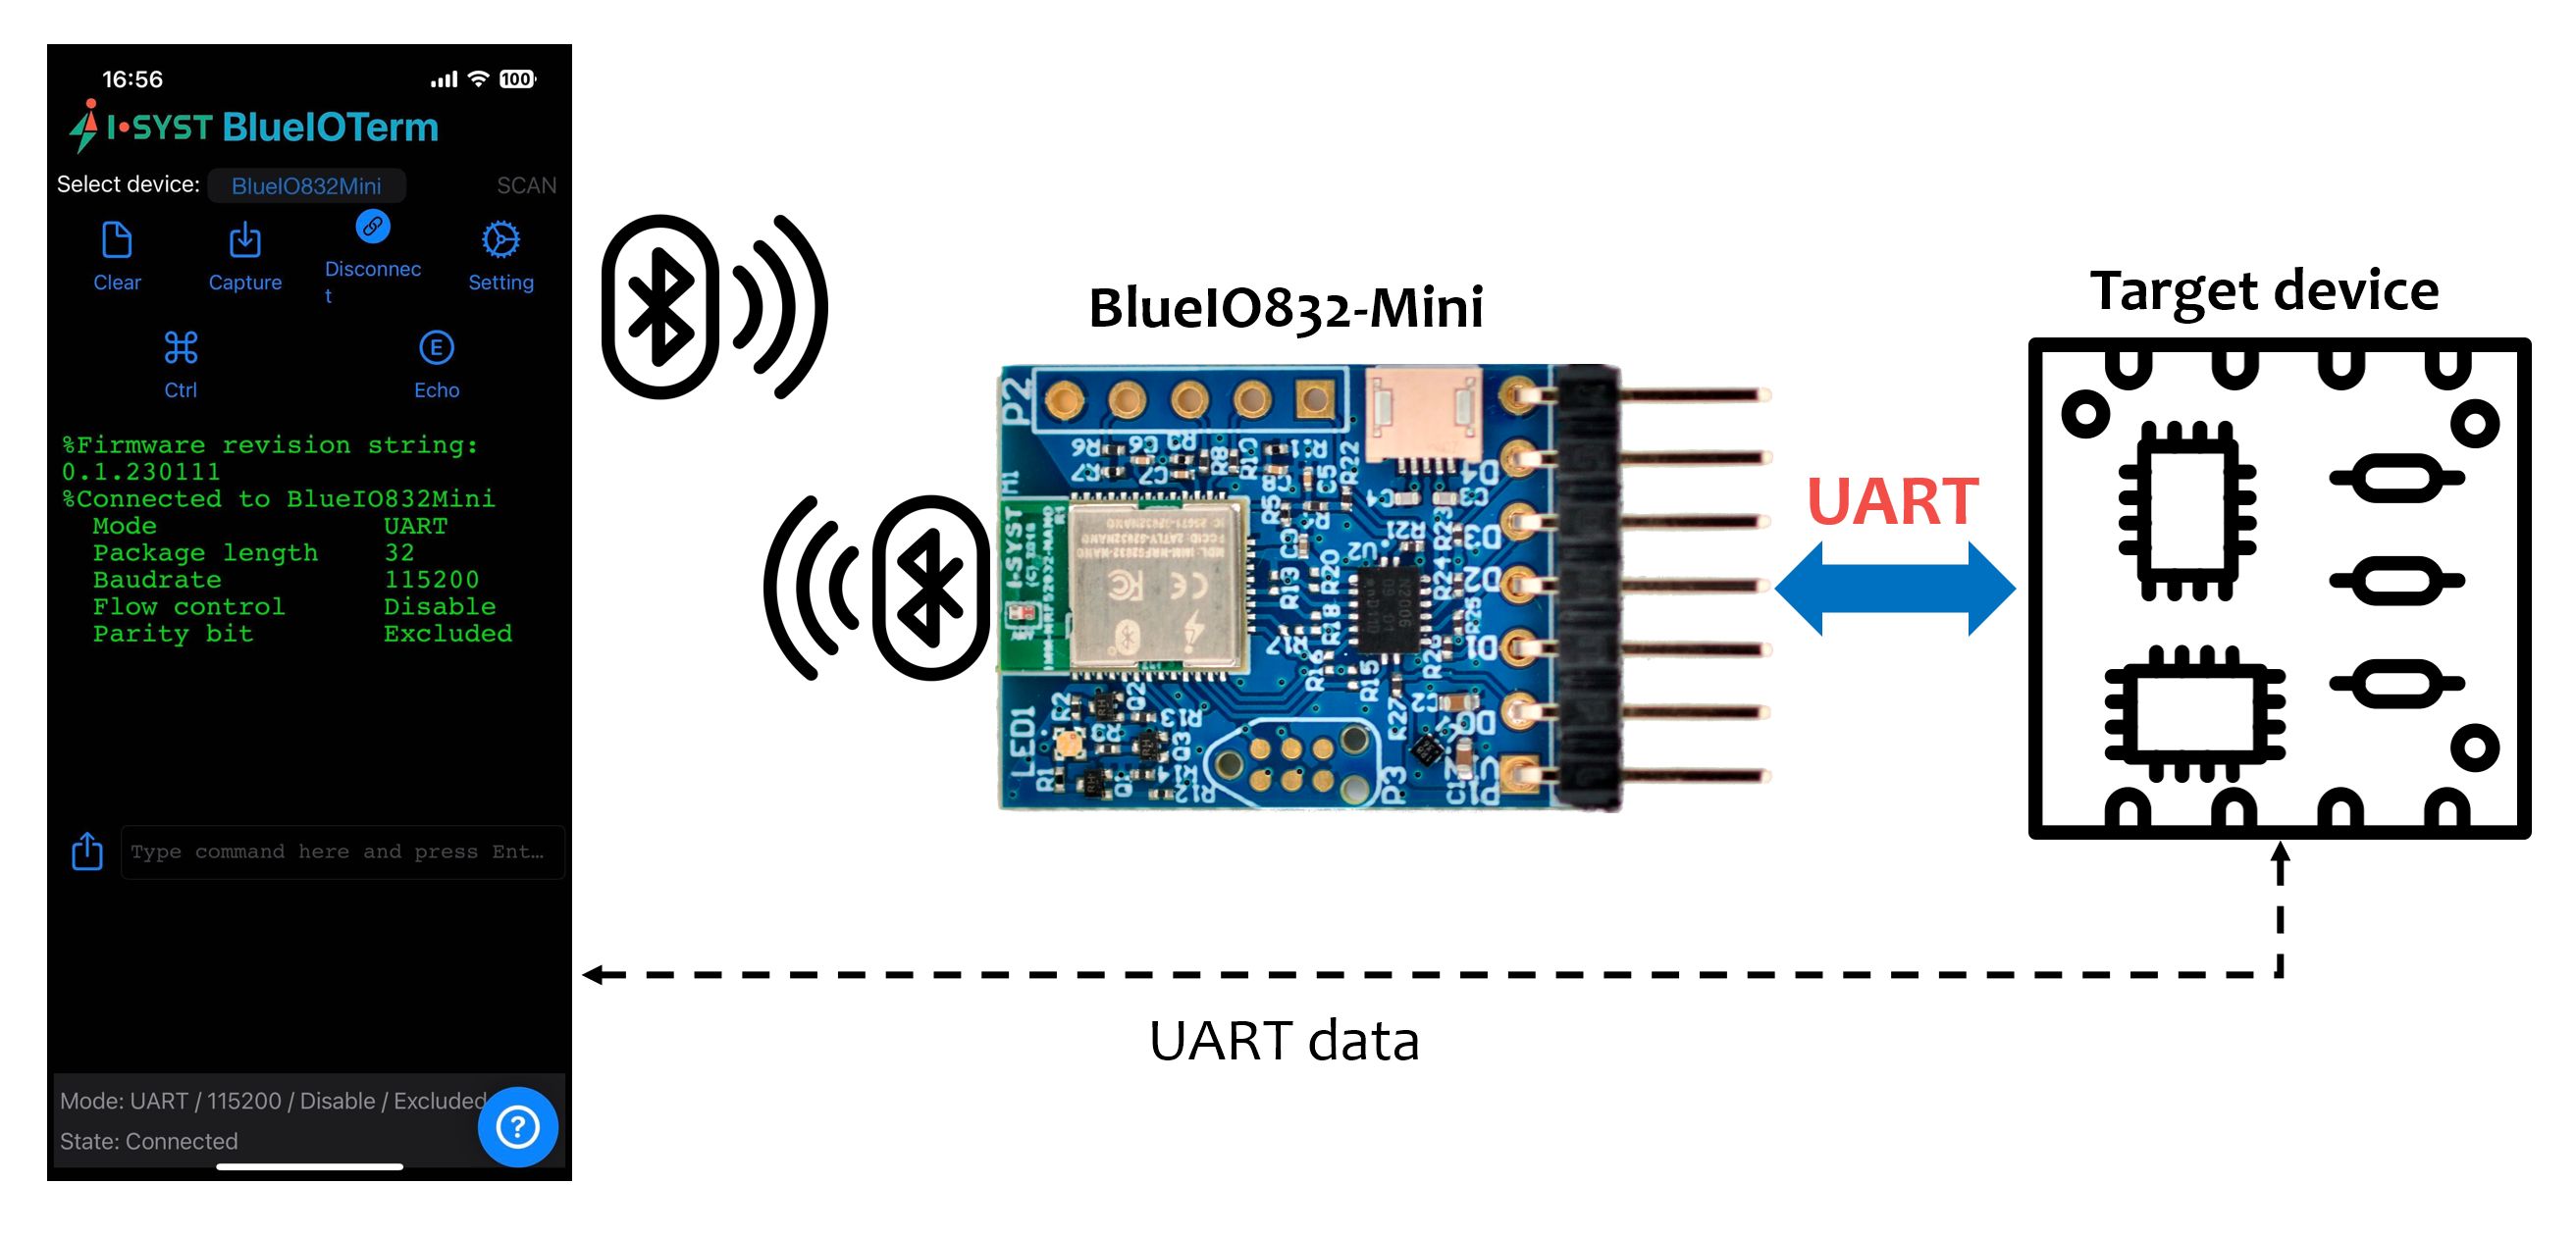
In this update, we would like to demonstrate the BlueIOTerm mobile app working as a UART serial port terminal application on a mobile device. The app is similar to desktop applications such as CoolTerm, TeraTerm, etc. It allows users to remotely communicate with a target device connected to the BlueIO832Mini via a UART interface (Fig. 2).
In what follows, we demonstrate two examples combining BlueIOTerm and BlueIO832Mini:
- Communicating with the CoolTerm desktop app emulating a UART terminal.
- Interacting with a MicroPython interpreter running on the target device.
Download and Install BlueIOTerm App on User’s Smart Device
BlueIOTerm is available for smartphone and tablet. Users can scan the following QR codes to directly download and install a BlueIOTerm version compatible with their devices.
Note: The Android version of BlueIOTerm will be available soon.
Use Case One: Data Streaming Between BlueIOTerm and CoolTerm
In this scenario, users can utilize the BlueIOTerm mobile app, via a paired BlueIO832Mini, to exchange data with CoolTerm.
System Setup
The setup for this use case is abstracted in Fig. 3. The steps are as follows:
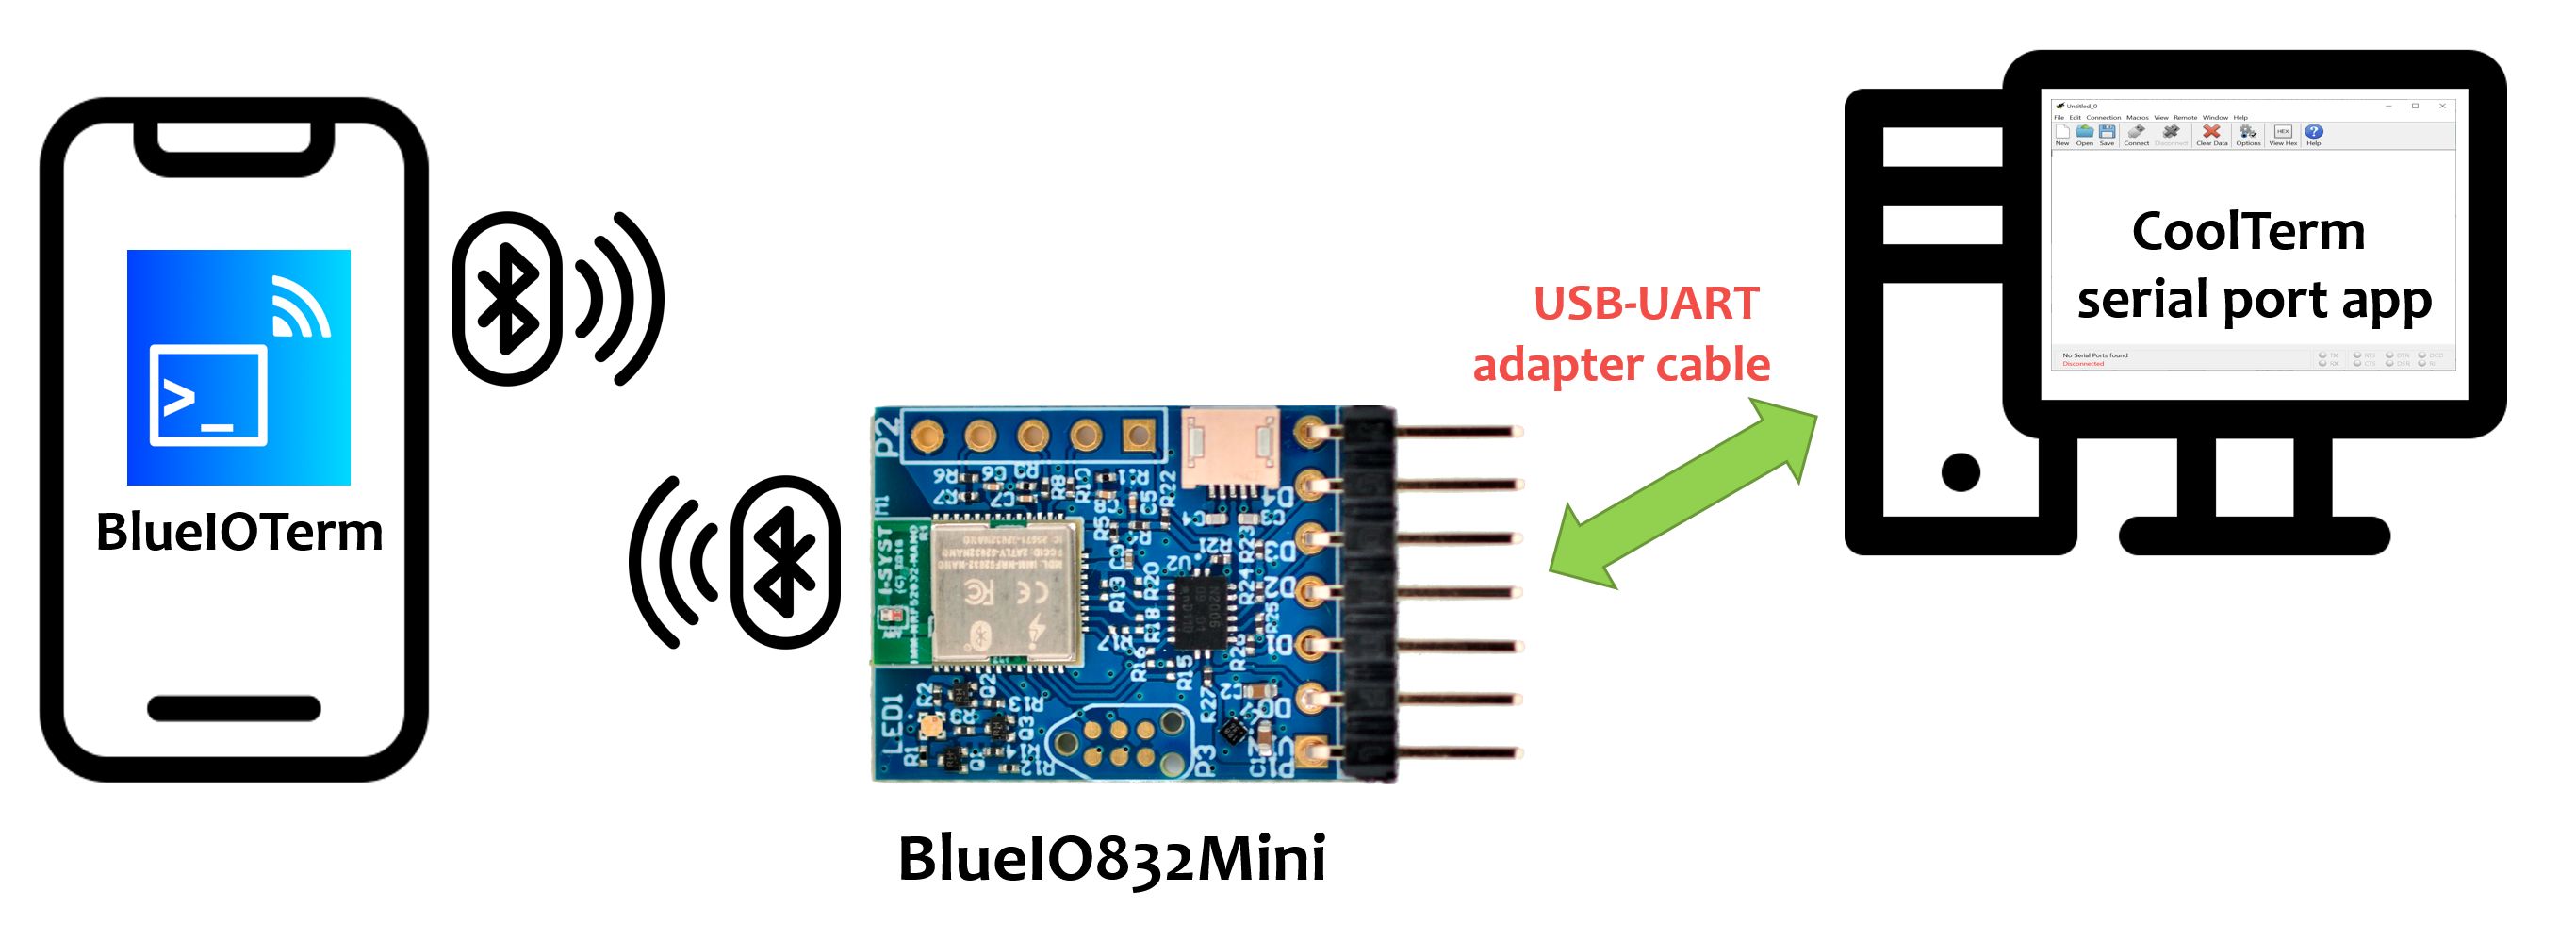
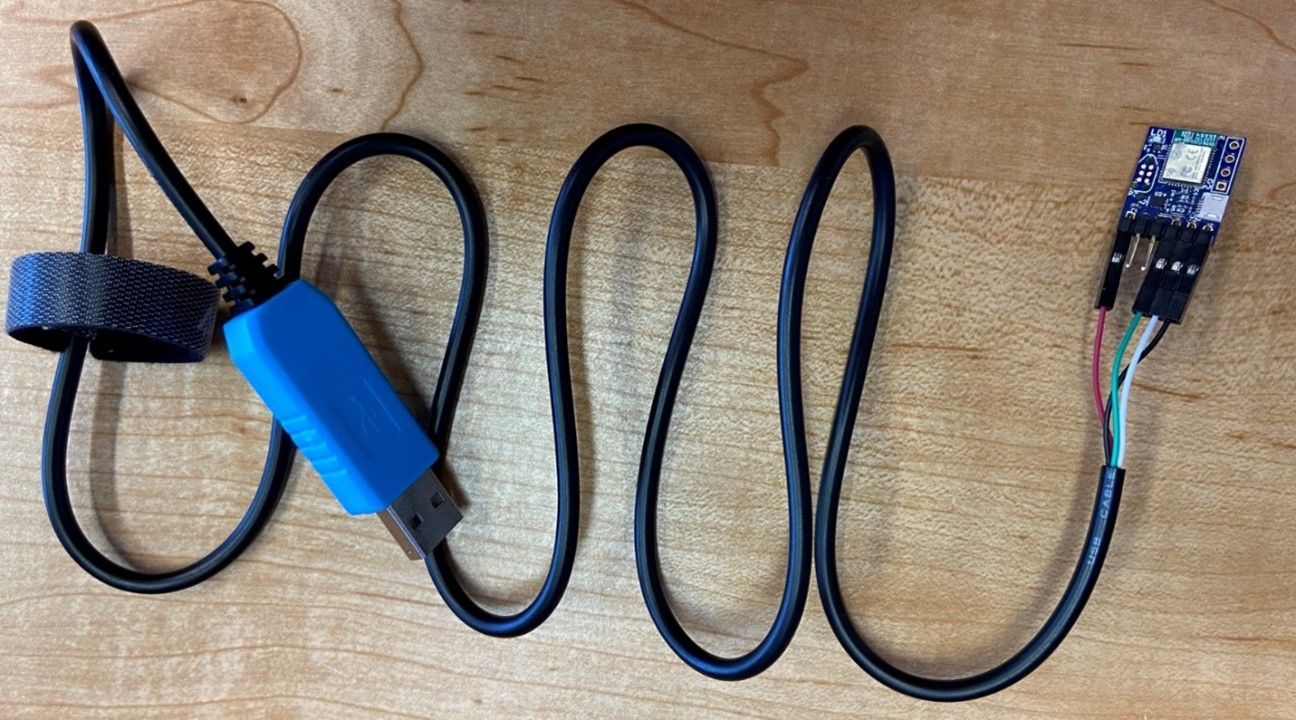
- Connect a BlueIO832Mini to a computer using a USB-UART adapter (Fig. 4). The 5V and GND wires can be used for powering the BlueIO832Mini thanks to its internal level shifter.
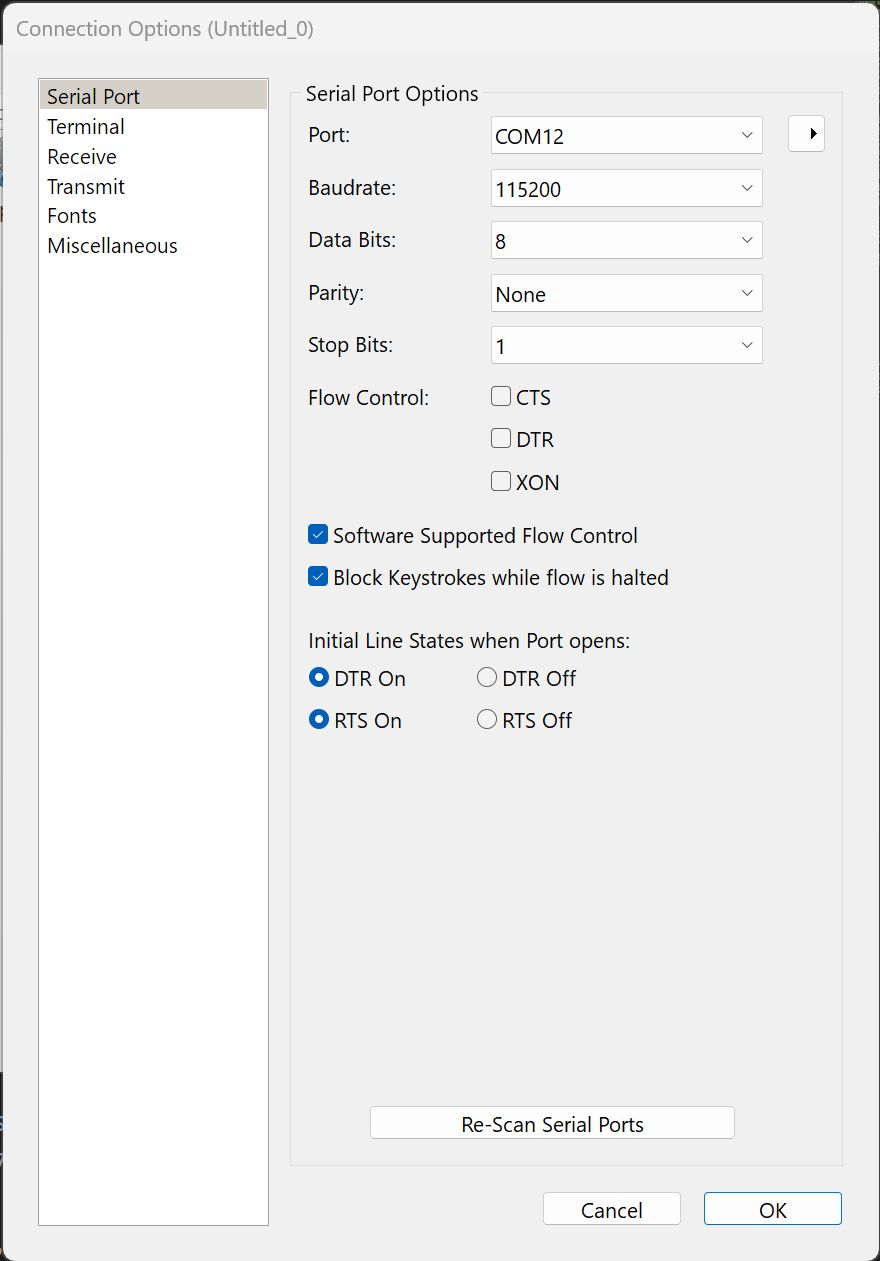
- Install and open the CoolTerm serial port terminal app. In the CoolTerm Options menu -> Serial Port Options, select the COM port number assigned to the USB-UART adapter, apply the UART parameters including baud rate, parity, stop bits, and flow control to Serial Port Options and click "OK" (Fig. 5). Note that the value for Data Bits is always 8. For this demo, the baud rate is 115200, with no flow control, no bit parity, and 8-bit data frame.
Remotely Communicate with CoolTerm
- Turn on the Bluetooth® feature in the user’s mobile device.
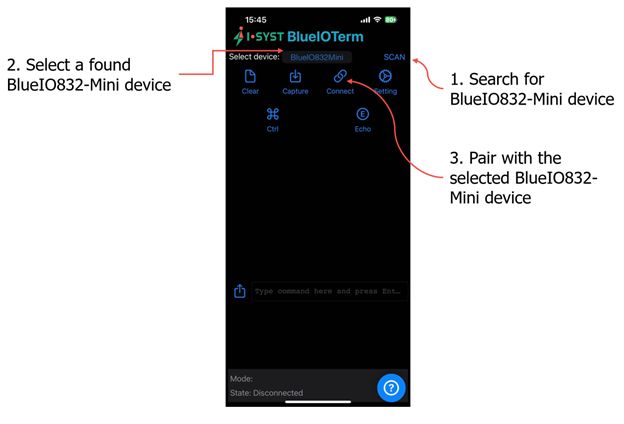
- Open the BlueIOTerm mobile app. The main user interface (UI) is shown in Fig. 6.
- Fig. 6 shows the three steps for connecting the app with a BlueIO832Mini.
- Tap the “SCAN” button to search for any existing BlueIO832Mini devices. If a BlueIO832Mini is found, the app displays “BlueIO832Mini” in the Select Device section.
- Tap the “Select device” window to select another BlueIO832Mini or
- Tap “Connect” to connect the app to the chosen BlueIO832Mini.
- After pairing BlueIOTerm with the selected BlueIO832Mini, the user can send and receive data between the app and the target device, which is the CoolTerm app in this demo. BlueIO832Mini works as a BLE-UART bridge between BlueIOTerm and CoolTerm.
- Fig. 7 illustrates the usage of other buttons in the BlueIOTerm app. From here, the user is able to send/receive data to/from the target device.
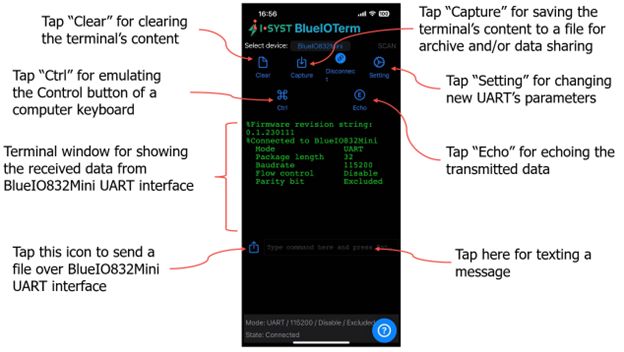
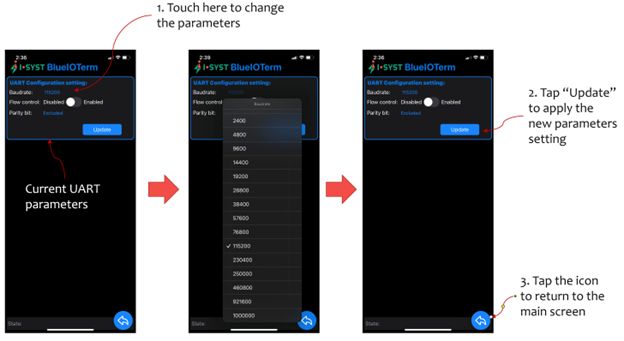
- To change the UART parameters, tap “Setting” to go to the UART configuration setting menu. The UART parameters shown in the menu are the current settings (Fig. 8).
Use Case Two: Python Programming via BlueIOTerm
The combination of BlueIOTerm and BlueIO832Mini can also be utilized for wirelessly interacting with a MicroPython interpreter running on a remote target device. This improves users’ convenience. For example, users can attach a BlueIO832Mini to a target device hosting MicroPython interpreter, and leave this combo on their office desk. Then they can write MicroPython code and test it on the target device with BlueIOTerm while sitting anywhere in their work-space. Furthermore, if the target device is connnected to LEDs and/or sensors, the user can remotely control them by sending code to the MicroPython interpreter.
System Setup
Users will need two pieces of hardware for this setup:
- A BlueIO832Mini running the BlueIO firmware
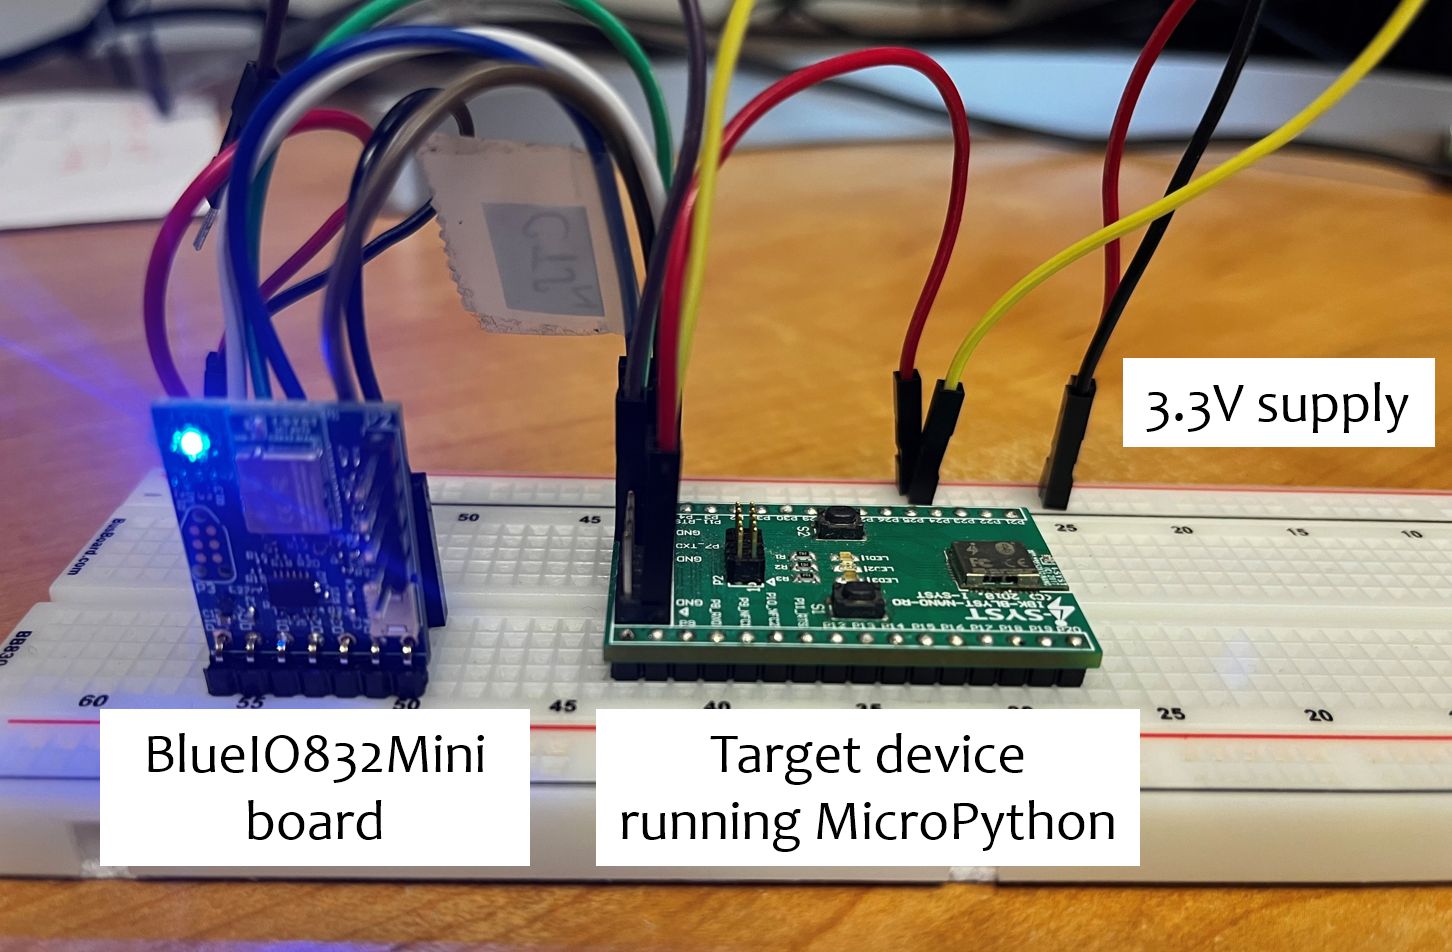
- A target device running the MicroPython interpreter. Typically, we use an IBK-BLYST-NANO board as the target device. A port of the MicroPython interpreter for the IBK-BLYST-NANO board can be found at SourceForge.
User will connect the BlueIO832Mini to the target device via UART interface. The UART pins of BlueIO832Mini are shown in Fig. 1. The pin configuration for the IBK-BLYST-NANO board can be found at I-SYST. The system is powered by a 3.3V power supply (Fig. 8).
Remotely Interacting with the MicroPython Interpreter
The steps for interacting with MicroPython interpreter via BlueIOTerm are as follows:
Pair the BlueIOTerm with the BlueIO832Mini board. The steps are the same as steps 1-3 in the previous section.
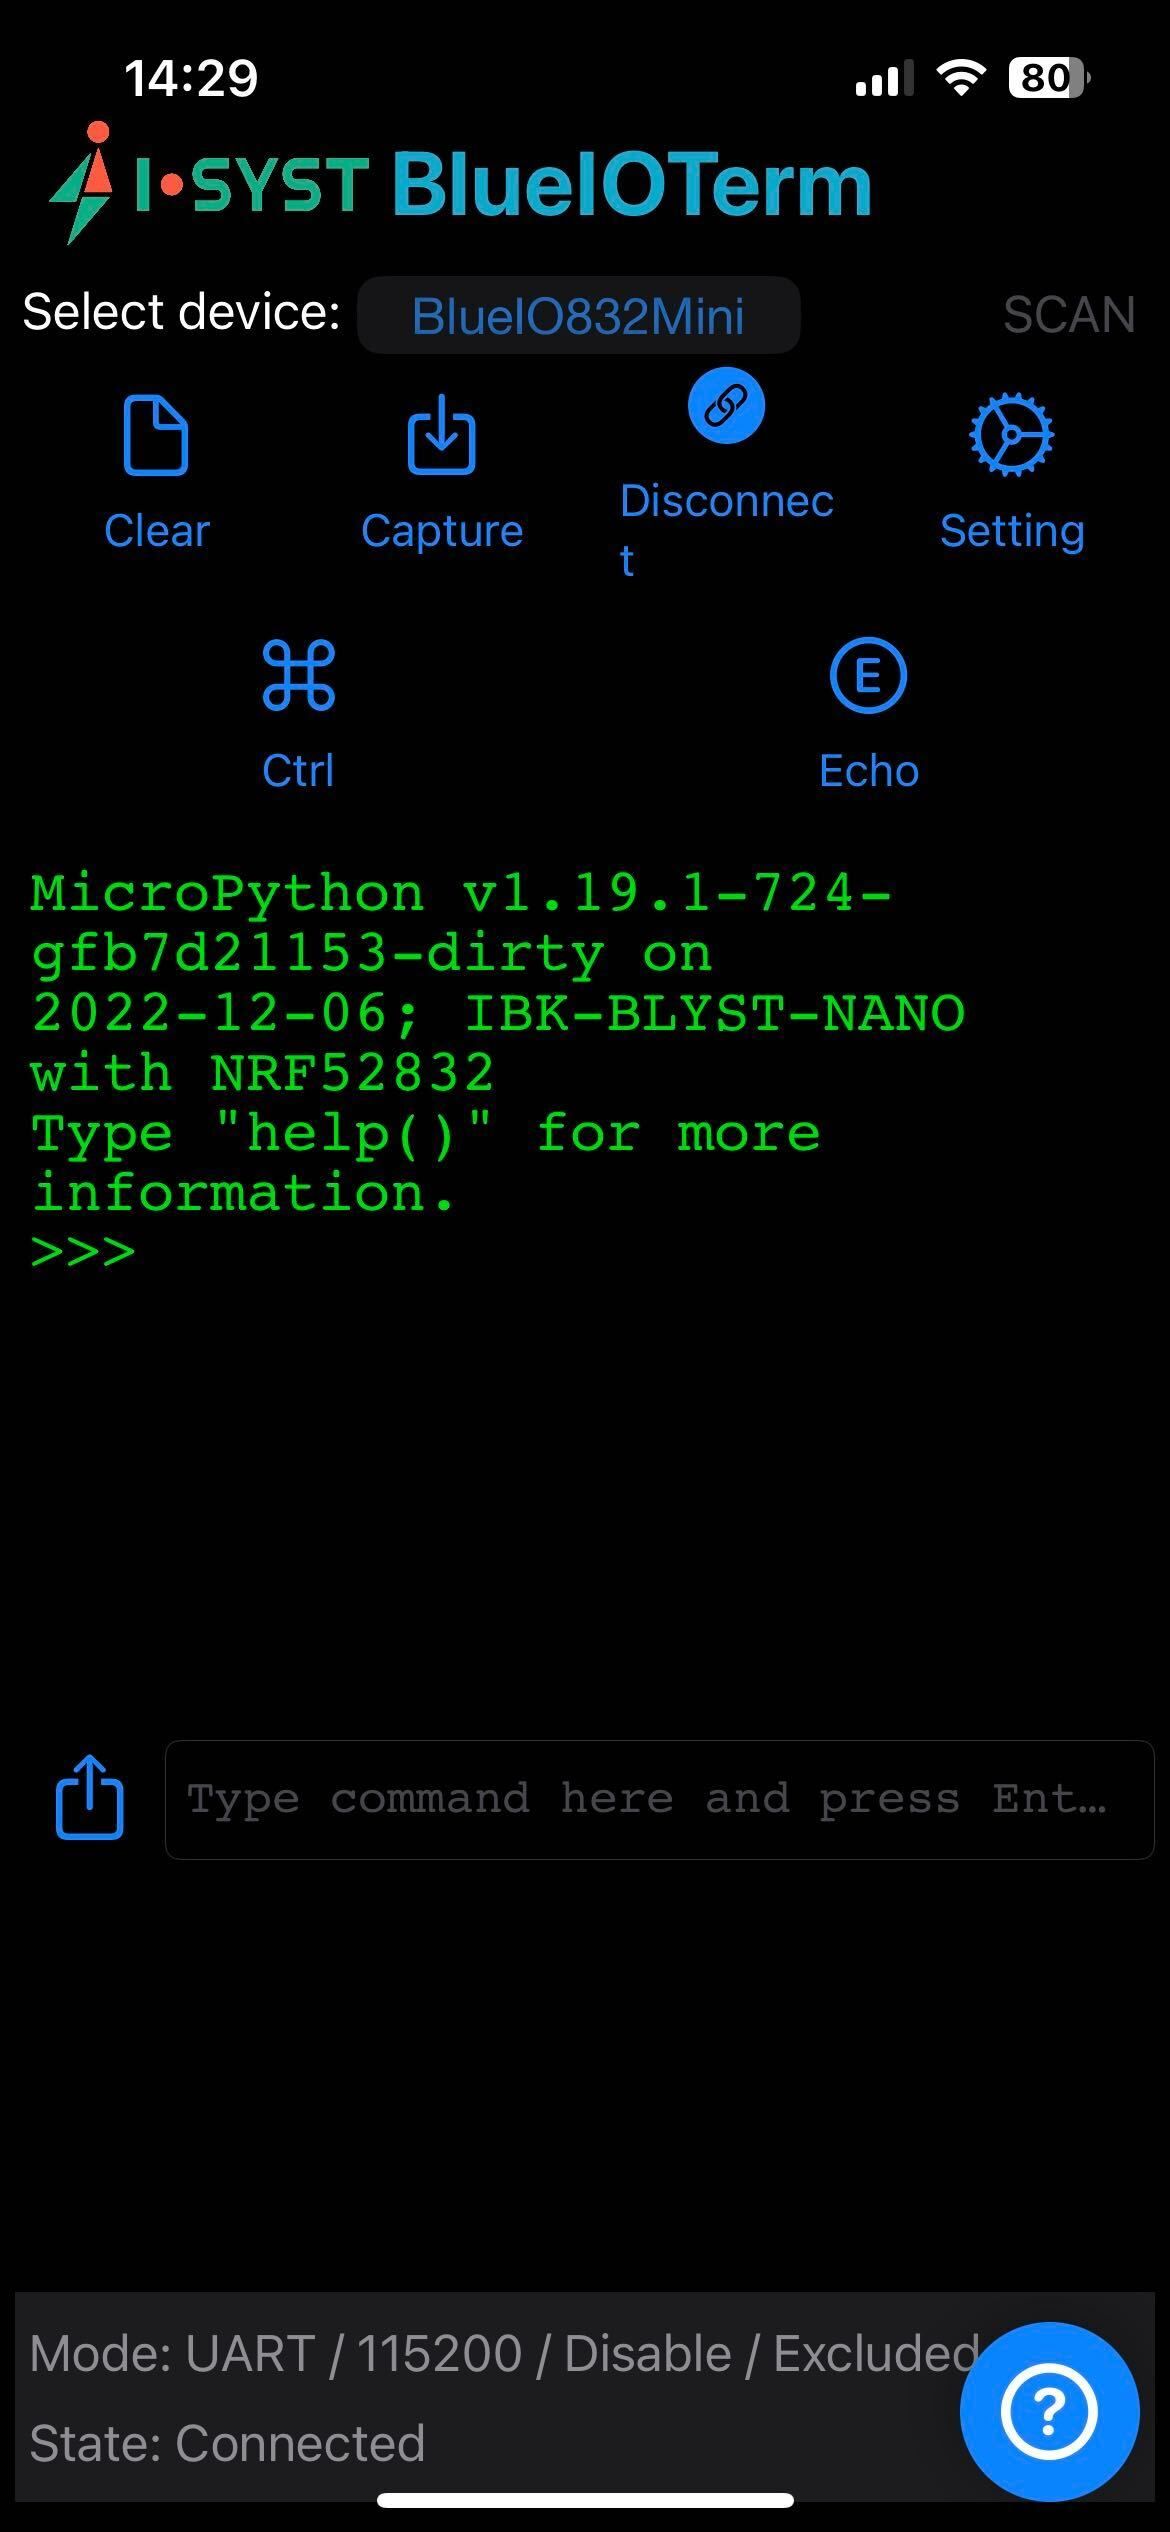
Reset the MicroPython interpreter by resetting the target device. Typically, for the IBK-BLYST-NANO board, tie the Reset pin to ground (GND) and release it. BlueIOTerm will then display as in Fig. 9.
Note: The user can trigger a soft reset for the MicroPython Interpreter by sending a "Ctrl+d" key combo to the interpreter. To do that, the virtual keyboard can be used.
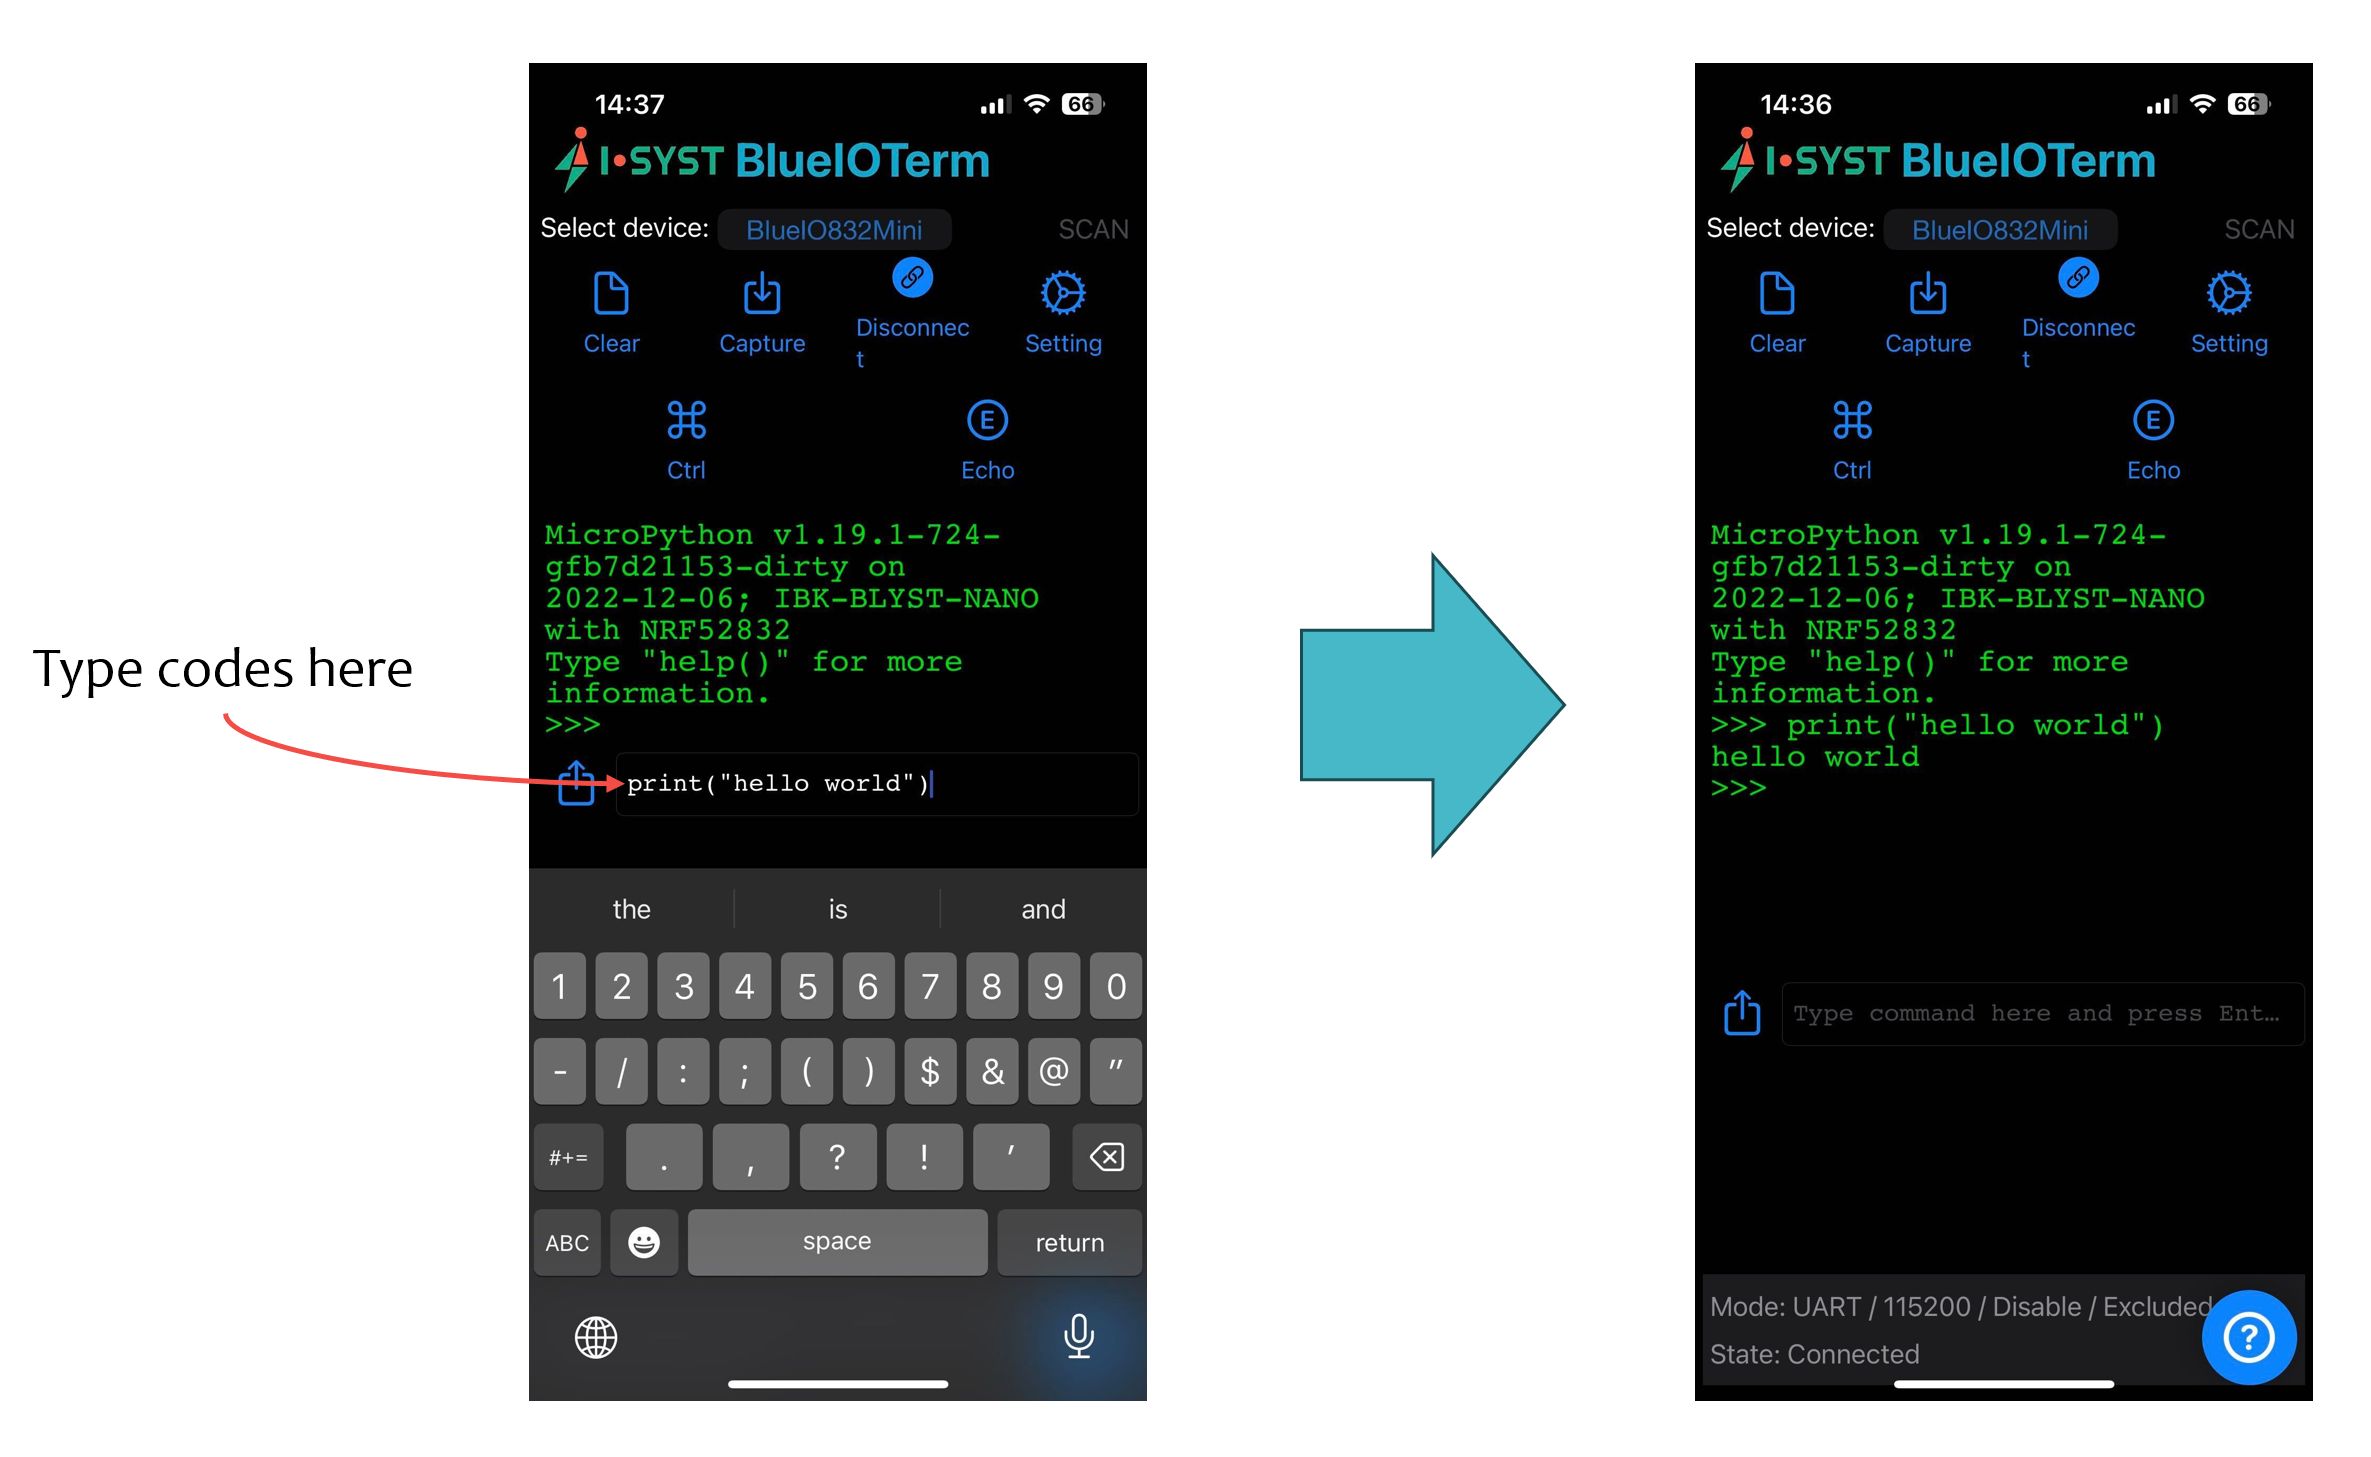
- Now, users can type Python code into the "input text" section and send them to the MicroPython interpreter for execution. The input code and the execution result are shown in the displayed section (Fig. 10).
Control an LED on the Target Device via MicroPython
- In this demo, we will turn on/off LED1 on a target device using MicroPython code. First, we create an instance of LED1 as follows:
import board
x = board.LED(1)
- Next, execute the following code to turn LED1 on and the LED will light (Fig. 11).
x.on()

- Execute the following code to turn LED1 off
x.off()
Execute a Python script on the MicroPython Interpreter
In this scenario, users prepare a Python script in a file, and send it to the MicroPython interpreter for execution.
- In this example, we want to turn the LEDs on and off according to the LedDance() function in the script below. First, we save the script into a file, here named "RGB_LED.py". Now we can upload this file to a location the smart device can access, such as cloud storage like iCloud.
import time
import board

LED1 = board.LED(1)
LED2 = board.LED(2)
LED3 = board.LED(3)

def LedOn(idx):
    if idx == 1:
        LED1.on()
    elif idx == 2:
        LED2.on()
    elif idx == 3:
        LED3.on()
    else:
        print("Wrong LED id")
def LedOff(idx):
    if idx == 1:
        LED1.off()
    elif idx == 2:
        LED2.off()
    elif idx == 3:
        LED3.off()
    else:
        print("Wrong LED id")
def LedDance():
    for i in range(1,4):
        LedOff(i)
    x = 600
    for i in range(10):
        LedOn(1)
        time.sleep_ms(x)
        LedOn(2)
        time.sleep_ms(x)
        LedOn(3)
        time.sleep_ms(x)
        LedOff(1)
        LedOff(2)
        LedOff(3)
        x = x - 50
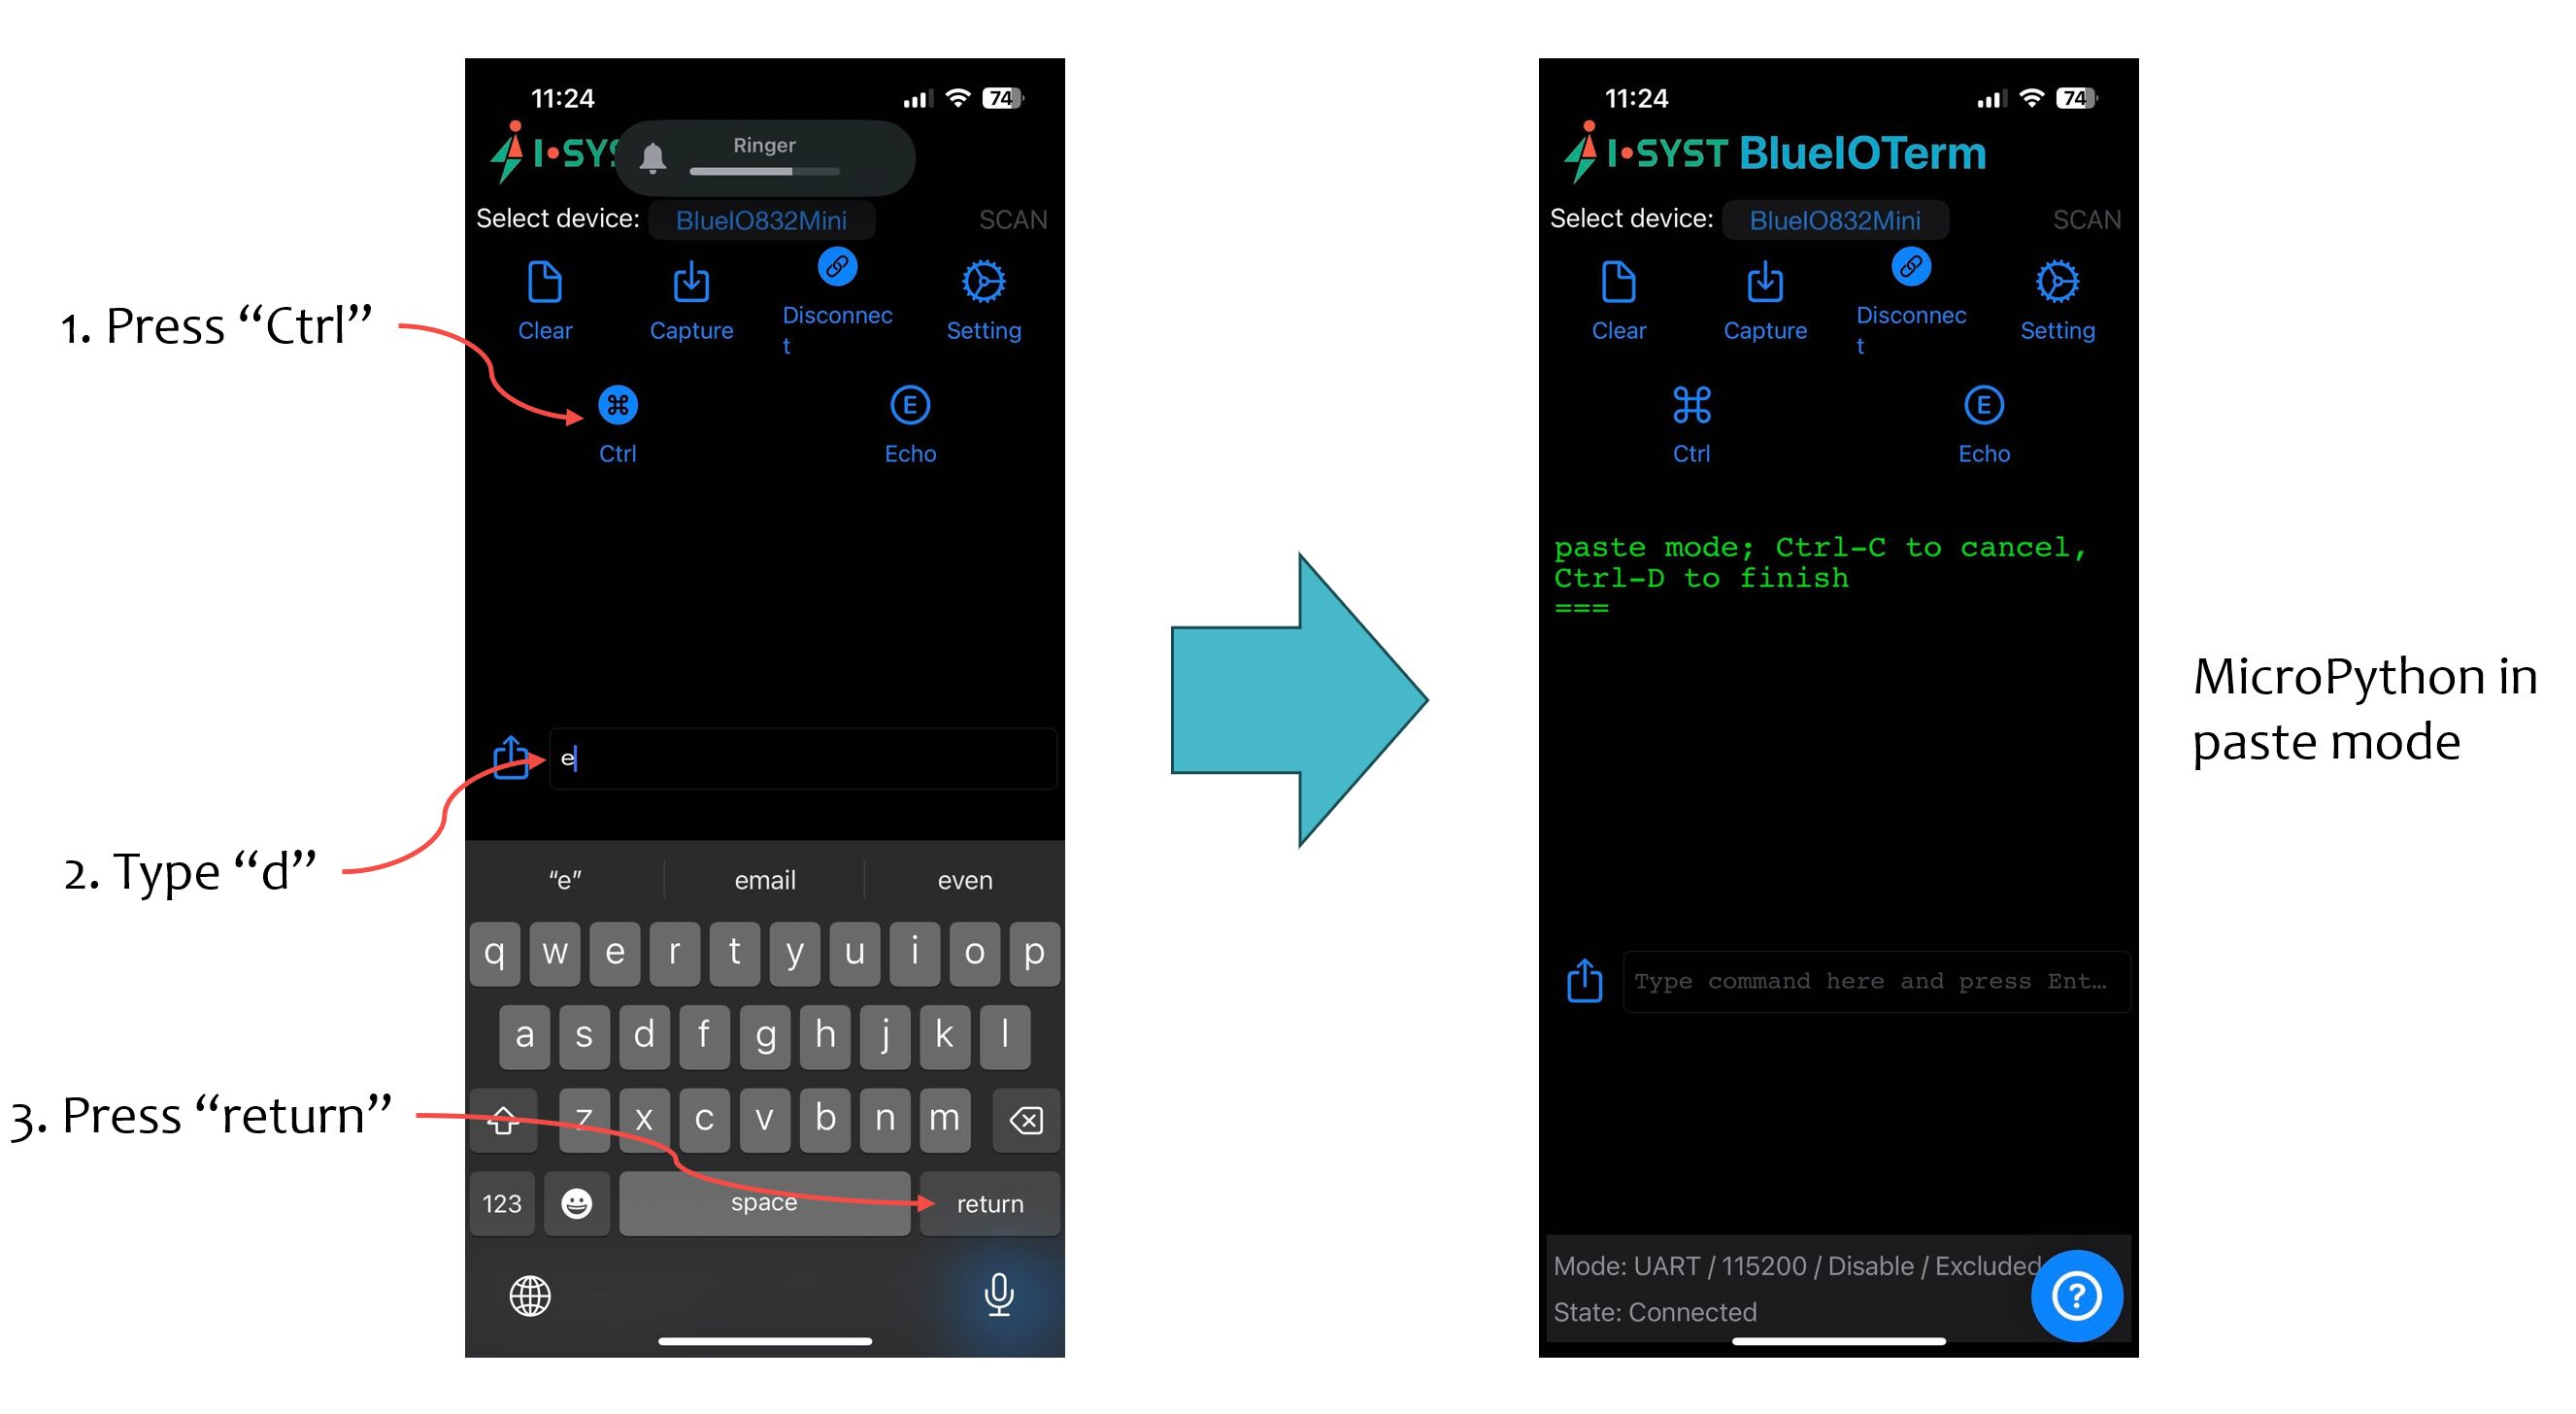
Switch the MicroPython interpreter to "Paste" mode (Fig. 12). To do that, we take the following steps:
- Press "Ctrl" button;
- Tap the "text input" section;
- Enter letter "e" and press "return". BlueIOTerm will send the key combination "Ctrl+E" to the MicroPython interpreter, making it switch to the "Paste" mode.
- Now, we can send a Python script file to MicroPython interpreter (Fig. 13). To do that, we take the following steps:
- Press the "Upload" icon;
- Browse to the Python code file location and touch its name;
- The source code in the file will be pasted to the MicroPython interpreter.
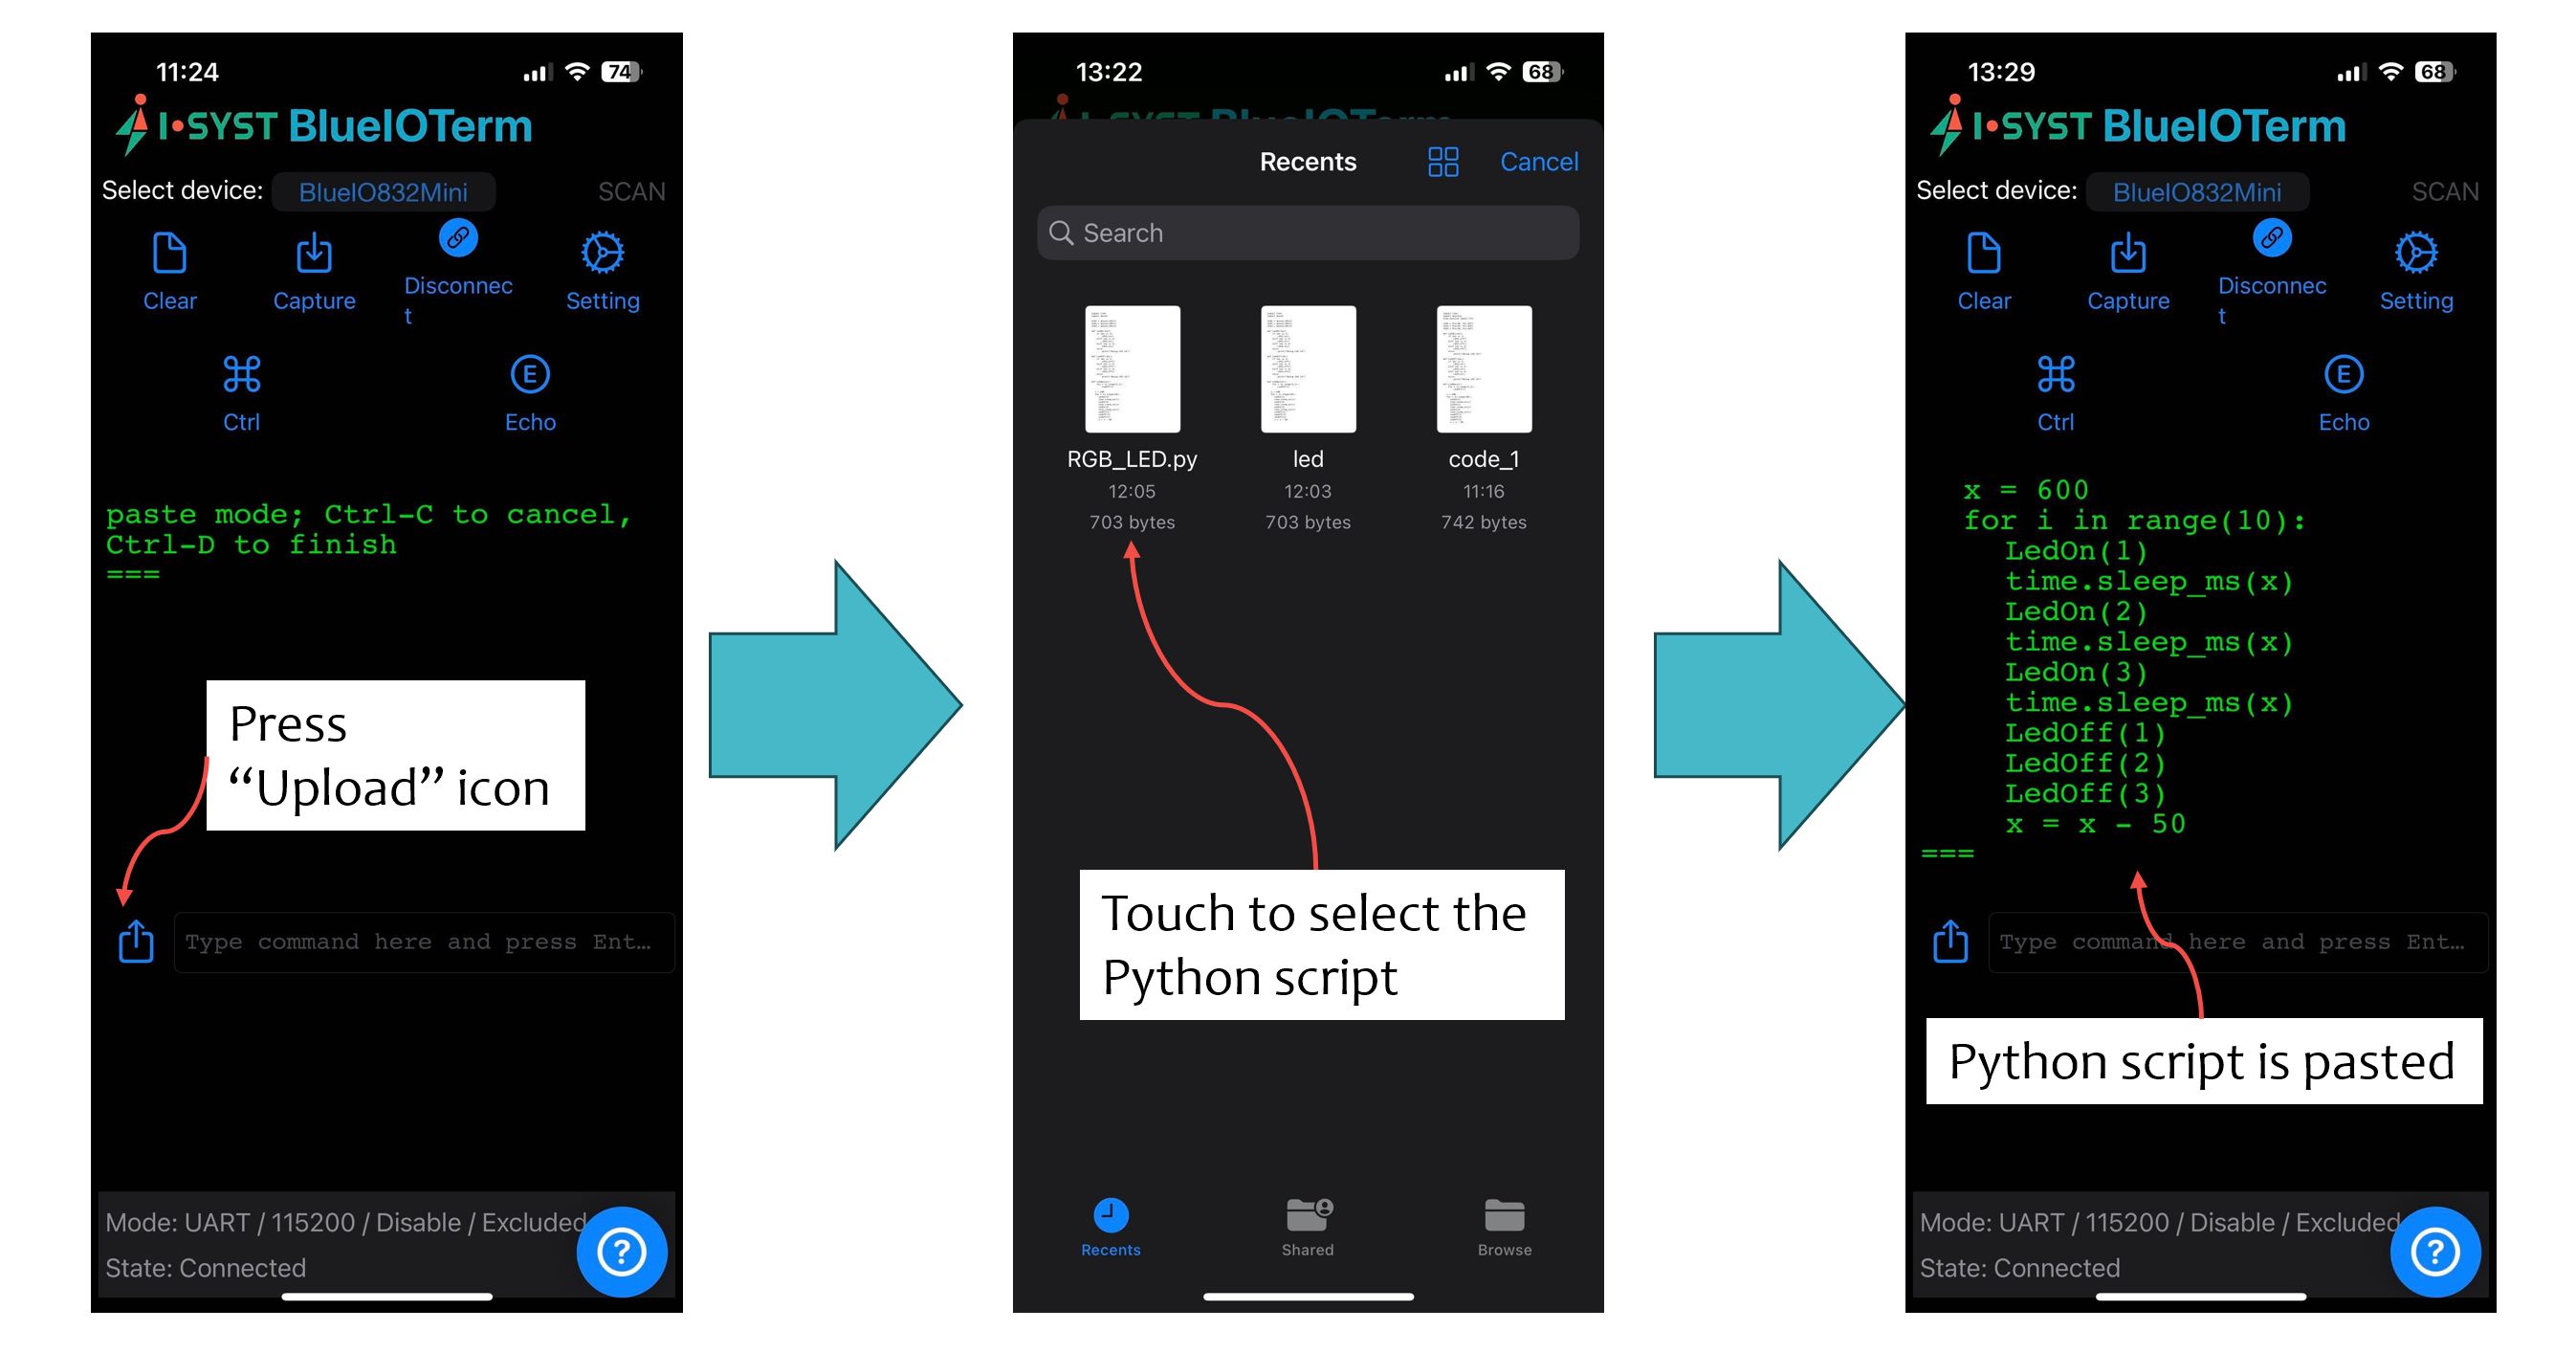
Enter "Ctrl + d" to finish pasting the script and to exit the paste mode. The interpreter will execute the Python script thereafter (Fig. 12).
Now, we can execute the
LedDance()function in the script by entering "LedDance()" into the input text. We can see the LEDs status in the following video:
Have fun playing with BlueIOTerm and BlueIO832Mini!
The BlueIO team.