Project update 72 of 83
Field Report: LimeSDR Digital Audio Broadcast
by Godfrey LSubmitted by Godfrey Laswai, PEng(T), a professional engineer registered in Tanzania.
(Note: this update is a condensed version of a four-part series on Medium. Check it out if you want more details.)
I’ve always been interested in digital audio broadcasting (DAB) since it offers several advantages over traditional, analog FM broadcasting or internet streaming. Digital radio doesn’t require an internet connection, allows for more channels than analog, is easy to tune, and the signal quality is excellent. Maybe best of all, digital radio allows the transmission of data in the form of images or text. Of course, there are some downsides to DAB as well. It doesn’t deal well with marginal signals and, in particular, commercial receivers are expensive compared to traditional analog sets. That’s what led me to pursue the creation of a low-cost DAB transmitter using LimeSDR and ODR Tools. Since it is open source, ODR was the obvious choice. I chose LimeSDR because it is basically unparalleled in terms of features and capabilities to cost.
I had heard that Raspberry Pi was capable of receiving standard, analog FM using software and that’s what led me to think that it could be possible for DAB as well, but everywhere I looked, I couldn’t find any examples of people who had tried it. I knew that LimeSDR could deal with almost any frequency, so that’s where I started my experiments. I quickly found that this guide from Open Digital Radio was the information i required. I read, studied it and understood exactly what was the tools designed to do, how they do it and what they can do and not do.
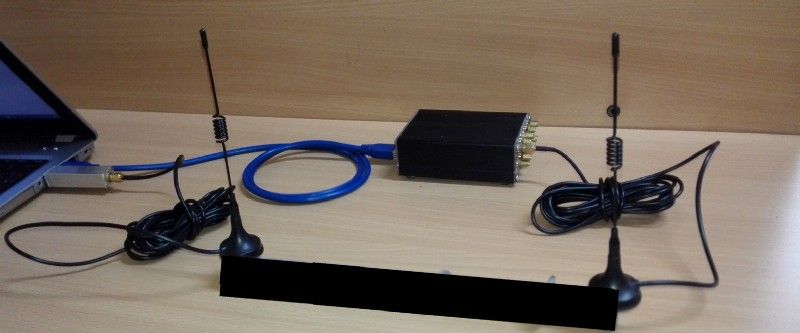
In the end, the hardware solution consisted of the following:
- A *nix compatible computer with at least 1 GB of RAM and ODR-mmbTools installed and working
- LimeSDR USB Radio
- Power amplifier
- Antennas
- RTL-SDR Device (Optional)
- Welle.io Software Defined Radio (Optional)
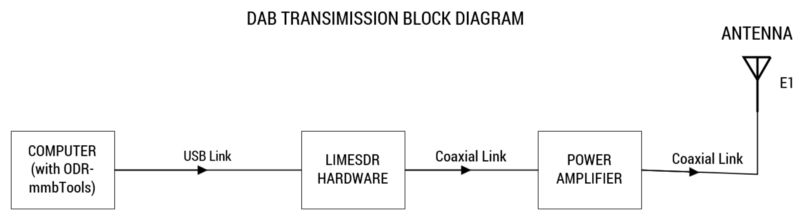
This diagram shows how everything is wired together:
ODR-mmbTools software is a suite of the following tools:
- ODR-DABMod — Used for modulation of the DAB/DAB+ signal
- ODR-DABMux — Used for multiplexing various audio streams
- ODR-AudioEnc — Used for encoding the audio streams to mp2 or aac formats which are essential for DAB and DAB+ transmission respectively.
- ODR-PadEnc — Used to encode multimedia information of images before transmission.
This diagram shows how the tools will be used and connected:
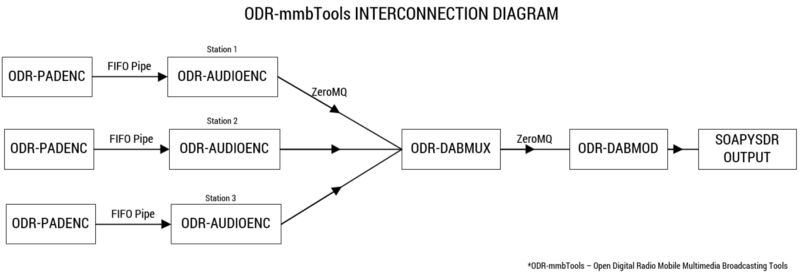
The diagram above shows the setup for transmitting three stations, but more stations can be included with the stream depending on the bandwidth requirements of the transmission system.
DAB signals are designated to be transmitted on BAND III, which means the LimeSDR is perfect for this application. For demonstration purposes, we will not connect the LimeSDR hardware to a power amplifier since we do not have the appropriate license to actually transmit DAB+ signals. Instead we will use a small whip antenna connected to the BAND1 transmission port of the LimeSDR.
Once you have all the hardware assembled, the first step is to install each of the ODR-mmbTools, one by one, including their dependencies. This is done with standard terminal command-line instructions. One thing to note though, all the tools should be installed as development packages (although they are production ready).
Once all the tools and their dependencies have been installed and successfully tested, the next step is to configure everything to work with the LimeSDR hardware. Each tool is configured individually, via a typical .config file. You can work from left to right or right to left as shown in the block diagram above. To streamline the setup of all tools, create a new command window for running each tool. This will help you to see and troubleshoot any communication problems between the tools.
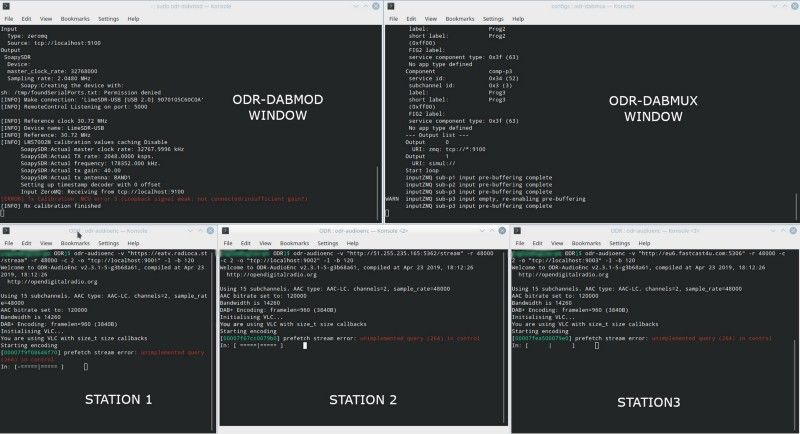
When everything is configured and you’ve verified each part of the chain can communicate with the other, it’s time to start broadcasting! Use this command to fire it up: $ sudo odr-dabmod -C dabmod.ini. You need to run it with root privs in order to properly access the hardware.
If there are no errors, you should now be transmitting on channel 5C of the DAB/DAB+ band III. Note that no signal will be picked up yet since you’re just broadcasting a carrier without data. We need to add broadcast stations using the ODR-DabMux tool. This tool defines the multiplexing and the individual DAB/DAB+ transmission stations. As before, we’ll use the command line to define the stations via a config file.
Once the config file is setup, you can run ODR-DabMux to generate the stations as follows:
$ odr-dabmux dabmux.mux
You should now be broadcasting three empty DAB+ stations on your setup. Next, we will add the audio stream to the stations using ODR-AudioEnc.
Above, you configured ODR-DabMux so that the stations are receiving inputs from any interface with tcp ports 9001, 9002 and 9003. So, you will have to send your inputs to these ports accordingly.
To do that, you will create a separate window for each of the three stations while leaving the window with ODR-DabMod and ODR-DabMux open and running since all tools are independent of each other. In the first window, run the following command:
$ odr-audioenc -v "https://eatv.radioca.st/stream" -r 48000 -c 2 -o "tcp://localhost:9001" -l -b 120
This will start ODR-AudioEnc with VLC support which opens the stream and sets the sample rate to 48KHz. It will send output to the ZeroMQ tunnel on port 9001 at a bit-rate equal to 120. The bit-rate must be the same as that defined for each station in the ODR-DabMux configuration file or you will get a bit-rate mismatch error. The other two stations are set up in a similar fashion. You are now transmitting three DAB+ stations using your LimeSDR.
You can listen to the broadcast output using any DAB+ capable radio. If you don’t have one, but you do have an RTL-SDR dongle, you can use it to tune to the signals using any DAB+ software receiver you have. I recommend Welle.io as one of the best DAB+ receivers available. Enjoy your broadcast!
Did you do something cool with a Crowd Supply project? Let the world know by submitting your own Field Report!