Project update 1 of 4
Heatsink Tests
The Rubicon was designed to accommodate several different form factors, including Arduino and Raspberry Pi. While Arduino’s don’t typically get very hot, a Raspberry Pi 3 can certainly reach its temperature limit and start throttling back the processor speed. This is especially true in IP67 weatherproof enclosures like the Rubicon, which necessarily doesn’t have any airflow to dissipate heat.
This is exactly one of the reasons the Rubicon has an aluminum base plate. By having an entire face of the enclosure made of a high thermal conductivity material, the waste heat from the internal electronics can be directed to this face, and ultimately rejected to its surroundings. Of course, for this to work, the Raspberry Pi’s processor must be thermally coupled to the aluminum base plate. Enter the heatsink accessory we’ve introduced in this Crowd Supply campaign.
We ran some real-world tests to compare the performance of a quad-core Raspberry Pi 3 when mounted inside the Rubicon enclosure with and without a heatsink accessory. The heatsink accessory kit provides the hardware necessary to mount the Raspberry Pi such that its processor is thermally tied to the base plate with a copper riser. This should, in theory, allow the heat to flow directly from the processor to the base plate of the Rubicon, and then out to ambient.
Experimental Setup
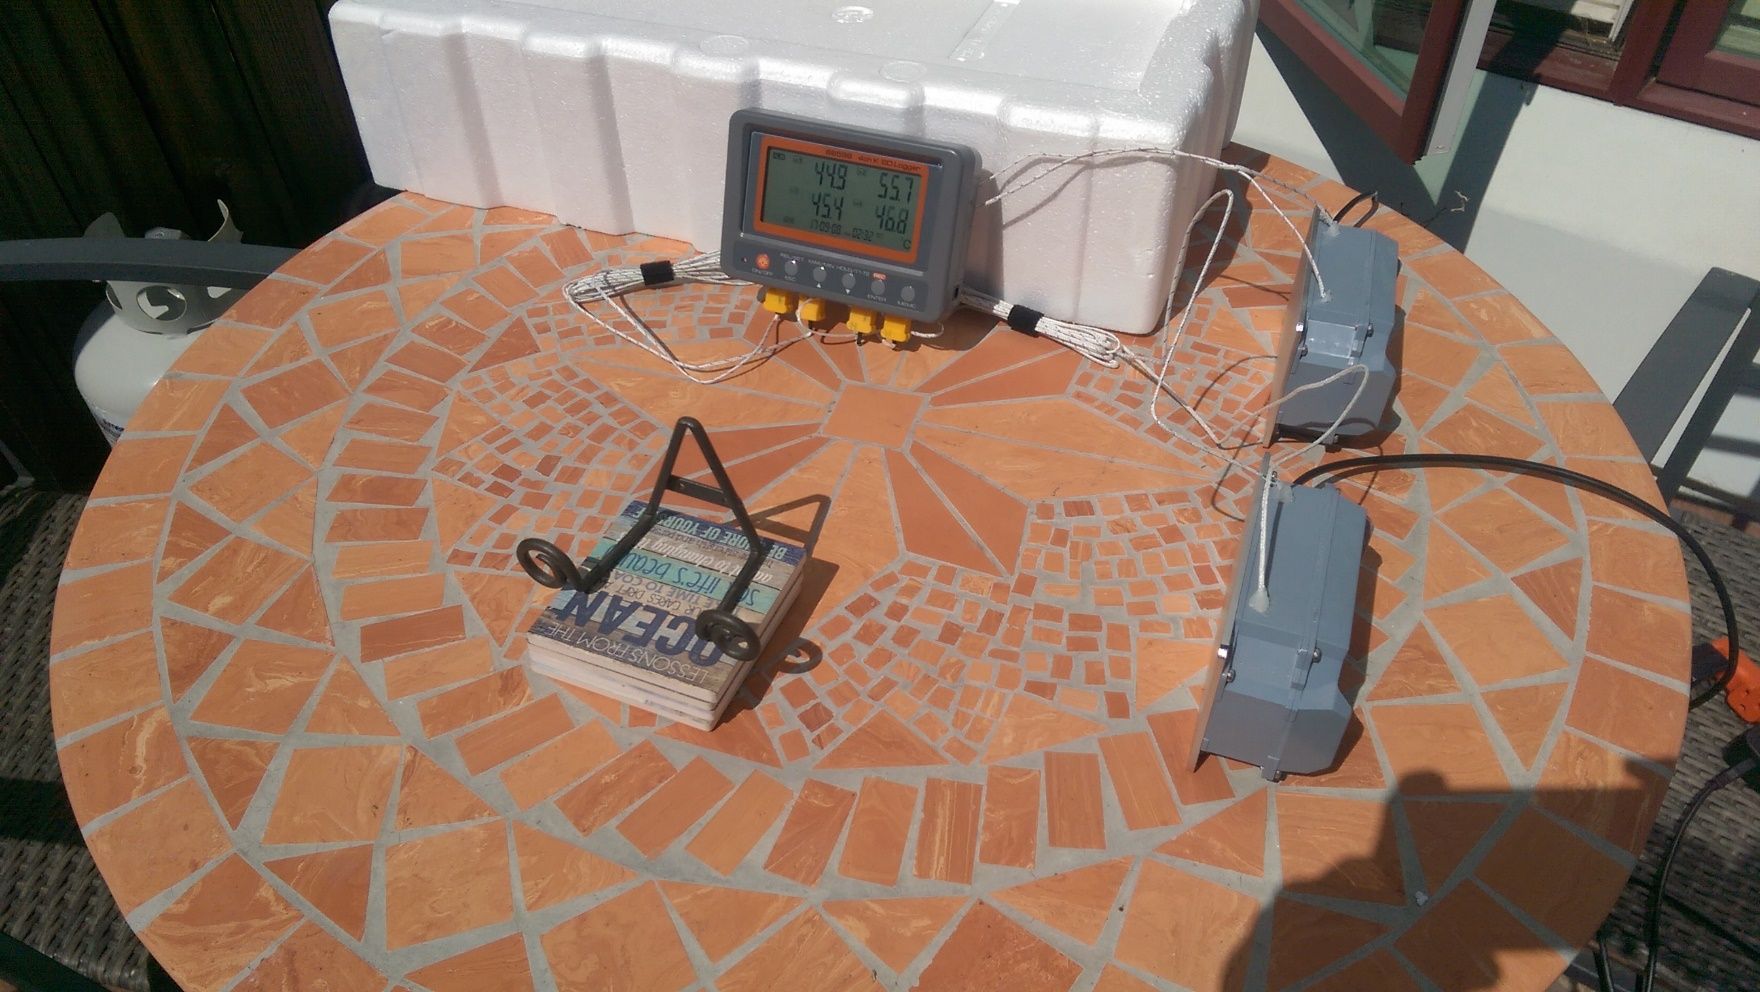
We performed tests outdoors, with assumed nominal and maximum thermal load scenarios, both using and not using the heatsink kit. The photograph below shows the setup with the data logger (upper left) and two Rubicon enclosures, one with a heatsink and one without.
First and foremost, we needed to get the Pi producing its maximum heat load. According to Christopher Stanton, who provided an excellent writeup on benchmarking the Raspberry Pi 3, "SysBench’s processor tests verify prime numbers by going through all possible divisions and only being satisfied when the result is zero." Using SysBench allowed us to utilize all four cores of the Pi’s processor for an extended period of time, which produced a sustained heat load that pushed the Pi to thermal extremes. SysBench can be installed using:
sudo apt-get install sysbench
To get SysBench to utilize all four cores, run:
sysbench –num-threads=4 –test=cpu –cpu-max-prime=100000 run
Next, we wrote a script to collect the self-reported CPU temperature, CPU speed, and time:
#!/bin/bash
echo “date, cpu temperature, cpu speed” > /home/pi/mycustomlog.txt
while :
do
cput=$(</sys/class/thermal/thermal_zone0/temp)
speed=$(</sys/devices/system/cpu/cpu0/cpufreq/scaling_cur_freq)
now=$(date +”%T”)
echo “\\$now,\\$((cput/1000)),\\$((speed/1000))” | tee -a /home/pi/mycustomlog.txt
sleep 1
done
This script dumps the data into a file named mycustomlog.txt, which can be later lined up with the temperature logger’s data and plotted.
Next, the temperatures of the base plate and internal air needed to be recorded. Using an AZ Instruments four-channel temperature logger (model 88598), we were able to monitor and record these temperatures to an SD card. Holes were drilled through the side of the Rubicon, and one thermocouple was attached to the base plate using aluminized tape, while the other was bent such that it was not in contact with any surface and could measure the internal air temperature. This operation was performed on both Rubicons with and without the heatsink. A hole in each Rubicon was also drilled to provide a power cable for the Pi’s. All holes were sealed with silicone caulking to prevent air leakage.
The test Rubicons were placed side-by-side on a table on their edges such that the base plate was not fully contacted by the table (see the above test setup picture). The temperature logger was set to record and then Pi’s were powered up and allowed to reach steady-state operating temperatures. Finally, the SysBench command was issued and the recording script executed.
The Rubicons were sitting in the sun, so the ambient temperature was recorded using a bare type-K thermocouple sitting in the sun. It registered 34.9 ̊C and is generally assumed the ambient conditions did not significantly fluctuate over the 45 minutes of testing. Wind speeds were under 5 mph and there were no consistent gusts, so it is assumed the heat dissipated from the base plate is dominated by natural convection. The Rubicons were at no point in the shade.
Results
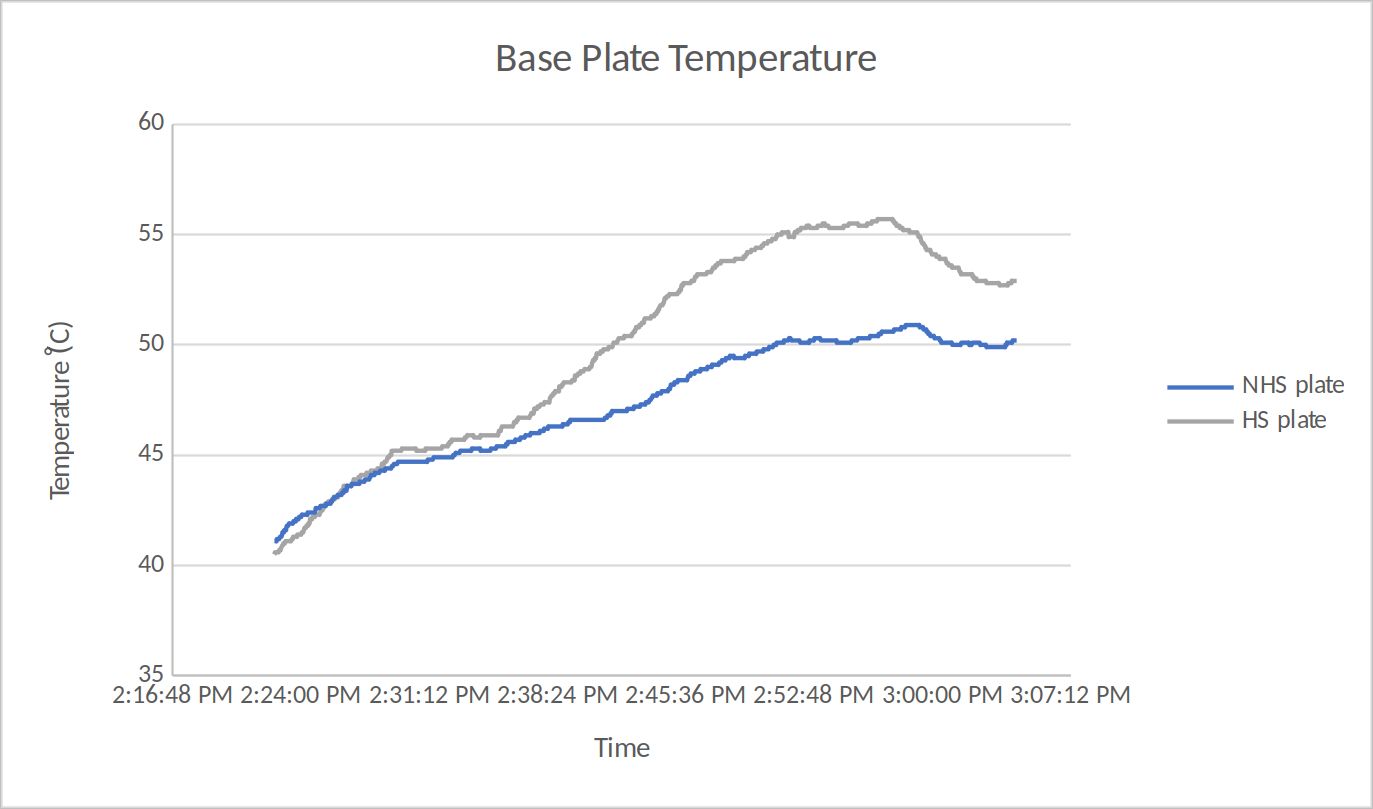
From the graph below, the base plate with the attached heatsink is clearly being heated by the thermal connection to the Pi, as originally intended.
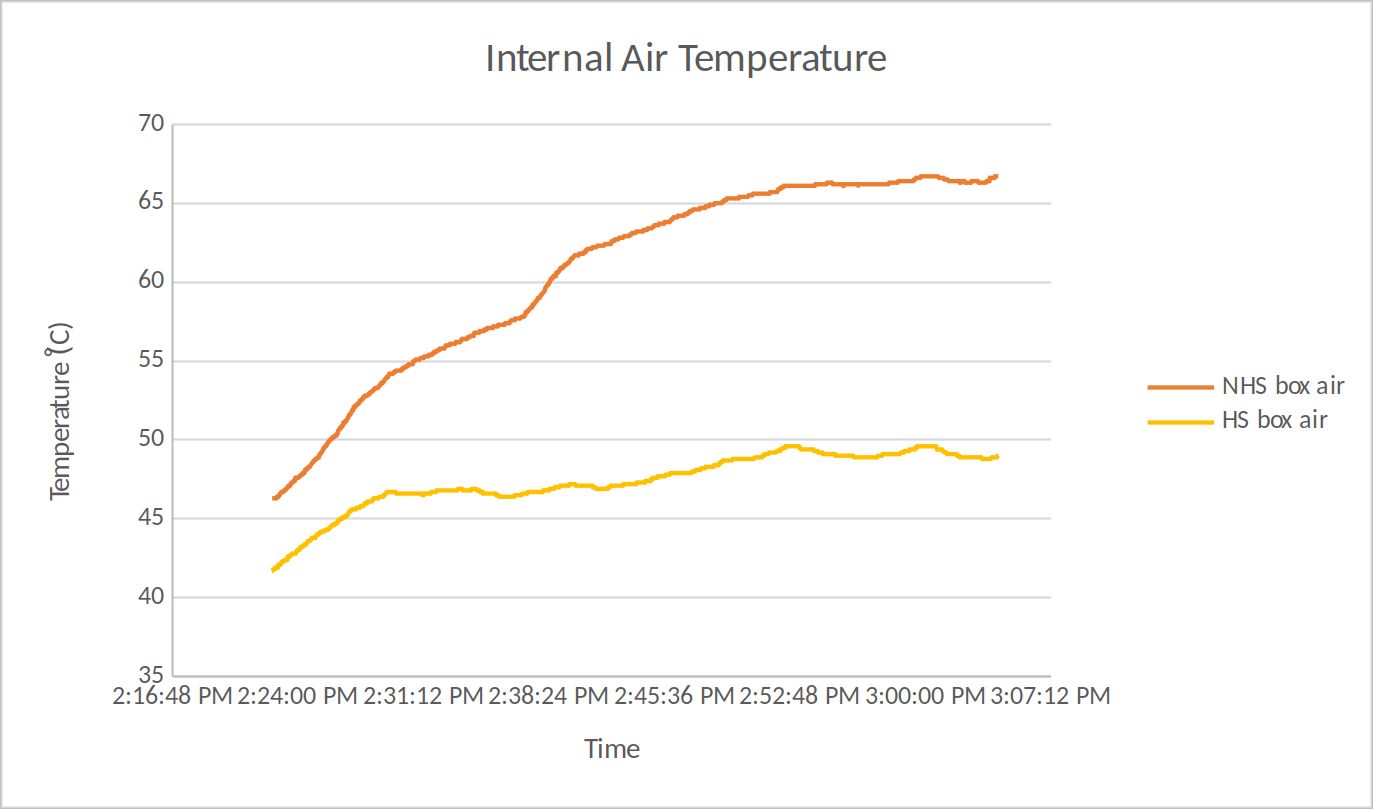
As shown in the graph below, the air temperature inside of the Rubicon without a heatsink is much higher than that of the Rubicon with a heatsink. This increase in temperature can significantly affect other electronics inside of the box, not just the Raspberry Pi.
The graph below shows the CPU temperature is lowered by approximately 20 ̊C with the use of a heatsink. Also, the transient response is much better, showing that for small spikes in CPU usage, the heatsink provides an even higher temperature difference.
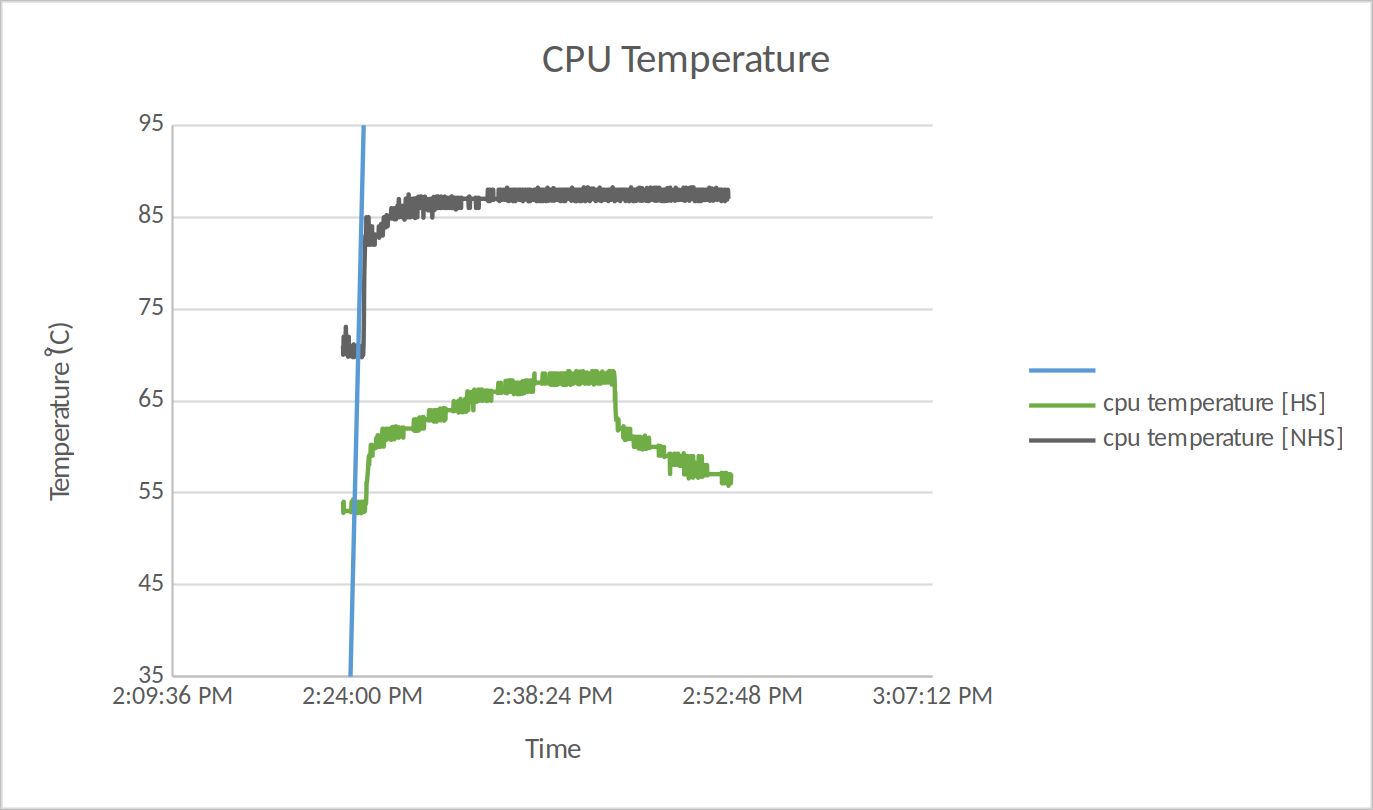
The significant drop-off in temperature with the heatsink at the end of the test is due to the fact the CPU did not need to throttle its clock speed, finished the computing task much more quickly, and began cooling off in an idle state. This shows just how much of a performance gain the heatsink provides — both CPUs were performing the same tasks, but the Pi with a heatsink could perform at full speed because of the heatsink, thus completing the task much faster.
Conclusions
The heatsink reduced the processor temperature by over 20° C. The heatsink functioned as intended, moving the heat from the processor to the base plate, and ultimately to ambient. It’s amazing what the right piece of copper can do in the right place at the right time!