Project update 1 of 15
Taking Health Data to the Cloud: How and Why
First, a huge thank you to our awesome first backers, 29 of them as of the time of writing this update. We have received a lot of recognition and encouragement for the HealthyPi v3, which makes us work harder.
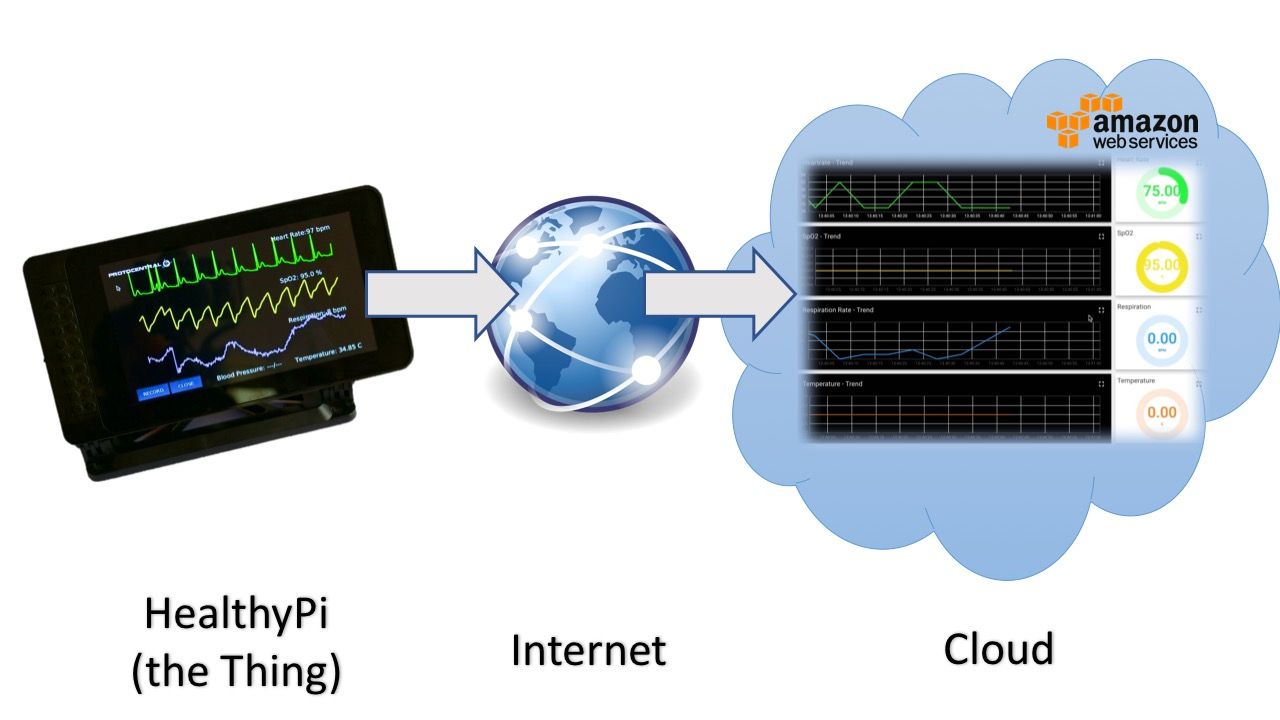
In this update, we cover the IoT functionality that will be built into the HealthyPi. One of our objectives in launching the Healthy Pi v3 was to capitalize on the value of integrating medical monitoring devices with cloud-based learning and decision making solutions.
Showcasing this unique capability and exploring its new frontiers, first requires getting data into the cloud. This is where the new HealthyPi v3 makes things easy. You take a Raspberry Pi, which already has great IoT capability including Wi-Fi and Bluetooth, and partner it with the HealthyPi HAT and you’ve got a cloud-connected vital signs monitor ready to generate and broadcast data!
Before we get into how we intend to do this, a quick look at why this would be beneficial:
The devil is in the data: Gathering large amounts of vital signs data is good, but even better is making sense of the data. This is where fancy-sounding concepts like Big Data and Deep Learning come in. These allow you to make sense of the data, however they require large amounts of storage and computational power that wouldn’t be possible on a system with limited resources. Take, for instance, a Holter recording, which the consulting physician can make sense of immediately, without going through hours of recording.
Telemedicine: Picture a rural setting in a developing country, where there are no dedicated health monitoring facilities, let alone medical personnel. A low cost, easy-to-use, scalable device is required to allow a physician in a more advanced location to monitor and consult with patients in real-time or near real-time.
Predictive Analytics: How much better would it be if a system could predict if an oncoming illness or condition required medical attention? This could be possible by analyzing historical vital sign data trends and detecting patterns before something happens.
How to Make This Possible with HealthyPi
MQTT(Message Queueing Telemetry Transport) is a lightweight communications protocol that runs on top of TCP to relay messages between devices with an MQTT Broker in between. The devices connect to each other using a publish/subscribe model, so taking data from one device or multiple devices is not very different. MQTT is popular in IoT applications due to their efficiency.
The GUI for the HealthyPi, running on Raspberry Pi is based on the Processing platform. Processing has out-of-the-box support for MQTT using user-contributed libraries. This code is embedded into the HealthyPi GUI. This means that while real-time waveforms are being plotted on the screen, the calculated values of heart-rate, respiration rate, SpO2, and temperature are send to the cloud for storage, visualization and analysis.
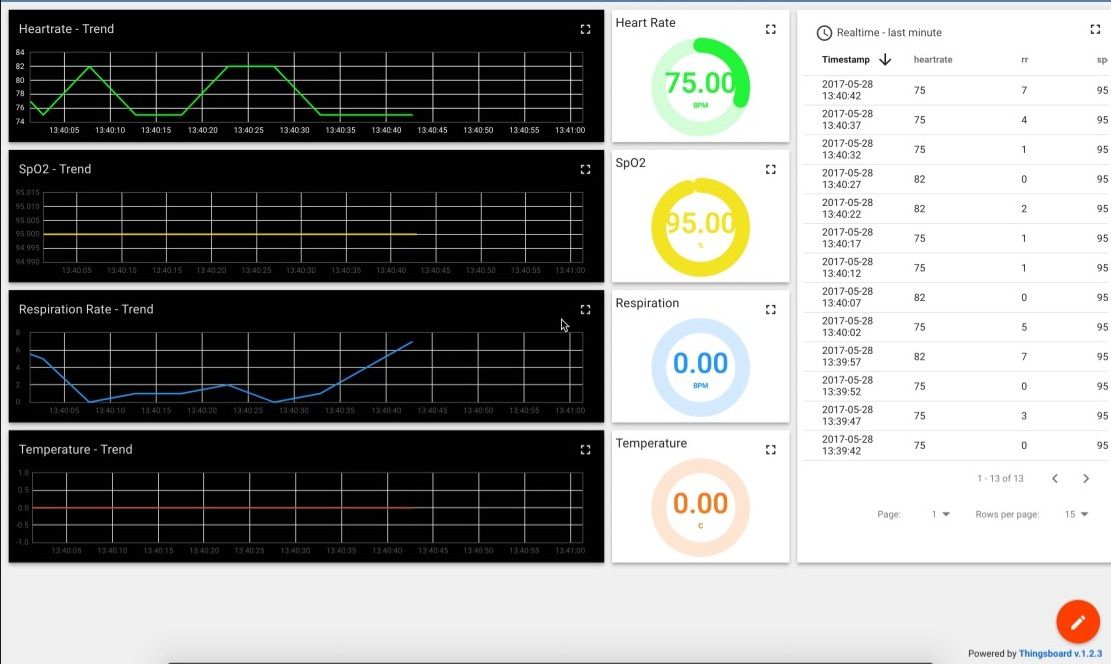
Enter Thingsboard
While looking around for various IoT platforms to receive, store, and visualize the data, we came across this great open-source platform called Thingsboard. This is an easy-to-set-up framework for creating IoT applications and dashboards which runs on pretty much any platform. We also wanted something with low latency that we could control. We were able to achieve 500 ms updates with this platform
These are the general steps that we followed to get data into Thingsboard:
Step 1: Installed Thingsboard as an Amazon Web Services (AWS) EC2 instance. This procedure is detailed in this installation guide. All the details are documented.
Step 2: Added "devices" which correspond to the things and generate tokens for device identification and authentication. This procedure is illustrated in this example project.
Step 3: Create dashboards. Thingsboard allows you to visualize the received data using several colorful widgets. Below is the dashboard we created for HealthyPi.
Now that we’ve got the data to the cloud, it’s time to do some analytics. We’ll keep you posted about any progress that we make in future updates.
We can’t wait to see what other interesting applications YOU would build using the HealthyPi and the power of the cloud. Write to us and let us know about your idea!