Project update 8 of 12
Connecting Jupiter Nano (running NuttX) to Wi-Fi
by AdamThank you
A huge thank-you to all the backers who made this campaign a success! As it draws to a close, we’ll be sending updates about more software for Jupiter Nano, our manufacturing process and status, and delivery estimates when we have them. Stay tuned!
And the board and accessories are all still available from Crowd Supply, at post-campaign prices. Boards to campaign backers will ship first, then we will ship to post-campaign backers after that.
Jupiter Nano, NuttX, and Wi-Fi
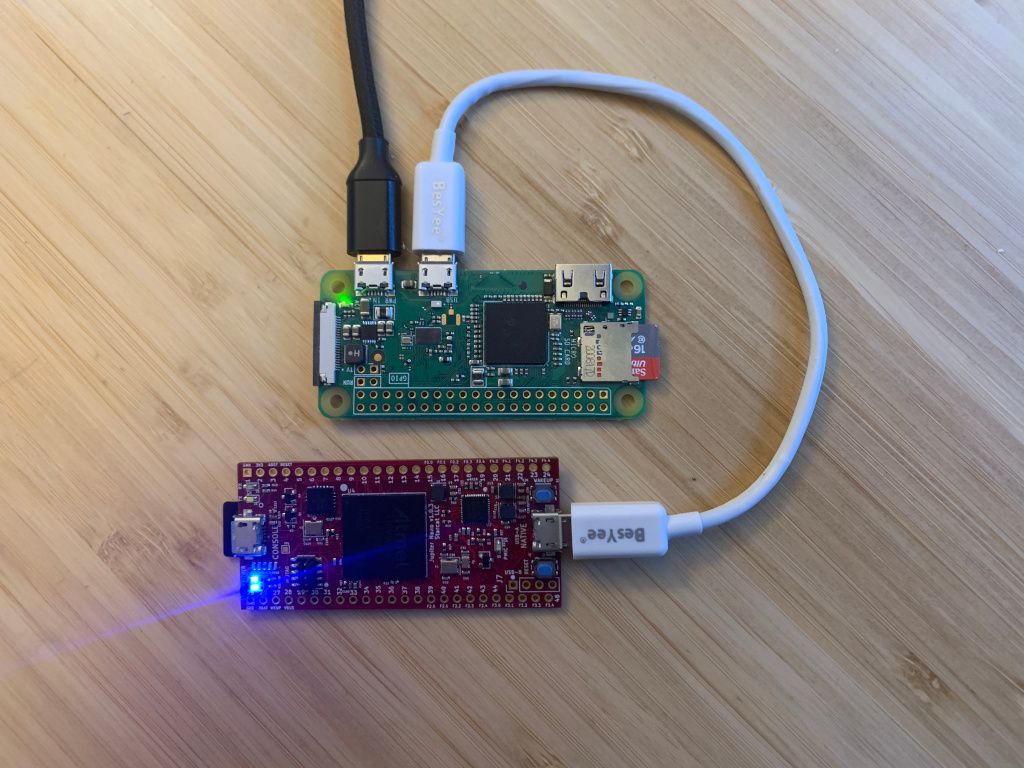
Today we’re going to dive into getting Jupiter Nano running NuttX onto a wireless network.
Until recently, that hasn’t been an easy task, as there is no WPA supplicant for NuttX yet. This is a piece of software that can handle the authentication with Wi-Fi access points. People have used specialized Wi-Fi modules made for embedded systems that connect through the SPI ports. These modules are special purpose computers that run closed-source software, are relatively expensive and hard to find, and also have fairly low performance.
NuttX has good wired Internet access though, with a high-performance TCP/IP stack. So what can we do? In one of the updates, we saw how to get Jupiter Nano on the Internet using an Ethernet over USB connection. Today we’ll show how to connect the Jupiter Nano to an inexpensive Raspberry Pi Zero W computer via Ethernet over USB. Raspberry Pi Zero W’s are available for $10-$25 from online retailers.
This solution will give you a small system running the NuttX Real Time Operating System and Linux, connected to the Internet with a very fast Wi-Fi connection.
See the Resources section below for more in depth information if you need it.
What you need
- Jupiter Nano
- Raspberry Pi Zero W – available from Mouser and other online retailers
- Two Micro SD cards (2 GB or larger)
- A Micro-USB-to-Micro-USB cable with which to connect the Raspberry Pi Zero to the Jupiter Nano Native port
- A regular Micro-USB cable with an appropriate connector on the other end – to connect to a power source, like a battery or a computer, or to use as a serial console over USB if you need that functionality
How to set it up
Download the Raspbian SD card image
- Here's where to download the Raspberry Pi OS: Raspberry Pi imager and downloads
Write the image to an SD card
- Here's a tutorial on how to install the OS: Installing the Operating System
Download and install Balena Etcher - this is a program that can write SD Card images
Download and write the Starcat Apache NuttX image
- Download this Starcat Apache NuttX image for Jupiter Nano
- Write the image to your Micro SD card using Balena Etcher.
Configure the Raspberry Pi Zero W to…
Connect to your Wi-Fi network
Create a file on the
rootpartition called/etc/wpa_supplicant/wpa_supplicant.conf. Put the following text in it, changing thecountry, Wi-Fissid, andpsk(password) to the ones for your network (if you are in the USA, your code isUS):ctrl_interface=DIR=/var/run/wpa_supplicant GROUP=netdev country=<Insert 2 letter ISO 3166-1 country code here> update_config=1 network={ ssid="<Name of your wireless LAN>" psk="<Password for your wireless LAN>" }(More info: Raspberry Pi documentation: Configuring Networking
Route TCP/IP packets
Edit the file on the
rootfsvolume called/etc/sysctl.conf; uncomment the following line:#net.ipv4.ip_forward=1So it reads:
net.ipv4.ip_forward=1Save the file.
Be a USB host (instead of the default, being a USB device)
Edit the file
cmdline.txton the root directory ofbootpartition to read:console=serial0,115200 console=tty1 root=PARTUUID=1e787c50-02 rootfstype=ext4 elevator=deadline fsck.repair=yes rootwait modules-load=dwc2,cdc_ether,usbnetThis loads the following Linux driver loadable modules:
cdc_etherandusbnet, needed to do Ethernet over USB.Use USB network devices
Now copy the usbnet Linux driver loadable module usbnet.ko to the following directory on the
rootfspartition:/lib/modules/5.10.17+/kernel/drivers/net/usb/usbnet.koThis module is not supplied by default with the Raspberry Pi OS, so must be compiled and supplied separately. It’s compiled for Linux kernel version
5.10.17+, so if you’re running something different you’ll need to compile it yourself. Email jupiter-nano@starcat.io for more
info if you need help with this.Run an SSH server
Create an empty file on the root directory of the
bootpartition calledssh. That tells the OS to start an ssh server.Have the netusb.sh script that sets up routing and network address translation (NAT)
Set up the hardware connections
Insert the SD Cards into their respective computers.
Connect the Micro-B to Micro-B USB cable
Connect the Raspberry Pi Zero W USB port (not PWR) to the Jupiter Nano Native USB port
Connect the other Micro-B USB to other flavor of USB connector (Type A, Micro-B, etc.) to your
power source and to either Raspberry Pi Zero W’s PWR port or the Jupiter Nano console port.Wait for both computers to boot.
Verify the Raspberry Pi Zero W is on the Internet
     pi@raspberrypi:~ $ ping -c 1 www.google.com
     PING www.google.com (172.217.14.196) 56(84) bytes of data.
     64 bytes from sea30s01-in-f4.1e100.net (172.217.14.196): icmp_seq=1 ttl=117 time=3.79 ms

     --- www.google.com ping statistics ---
     1 packets transmitted, 1 received, 0% packet loss, time 0ms
     rtt min/avg/max/mdev = 3.790/3.790/3.790/0.000 ms
Configure the Raspberry Pi Zero W routes and network address translation (NAT) rules
     pi@raspberrypi:~ $ sudo ./netusb.sh wlan0 usb0 on
     default via 192.168.1.1 dev wlan0 proto dhcp src 192.168.1.221 metric 303
     169.254.0.0/16 dev usb0 scope link src 169.254.15.88 metric 204
     192.168.1.0/24 dev wlan0 proto dhcp scope link src 192.168.1.221 metric 303

     usb0: flags=4163<UP,BROADCAST,RUNNING,MULTICAST>  mtu 1500
             inet6 fe80::de3f:6c9a:d1b5:6cee  prefixlen 64  scopeid 0x20<link>
             ether 02:00:00:11:22:33  txqueuelen 1000  (Ethernet)
             RX packets 5  bytes 140 (140.0 B)
             RX errors 0  dropped 0  overruns 0  frame 0
             TX packets 36  bytes 5545 (5.4 KiB)
             TX errors 0  dropped 0 overruns 0  carrier 0  collisions 0


     RTNETLINK answers: File exists
     Error: Invalid prefix for given prefix length.
     default via 192.168.1.1 dev wlan0 proto dhcp src 192.168.1.221 metric 303
     10.0.0.0/24 dev usb0 proto kernel scope link src 10.0.0.1
     10.0.0.2 dev usb0 scope link src 10.0.0.1
     192.168.1.0/24 dev wlan0 proto dhcp scope link src 192.168.1.221 metric 303

     PING 10.0.0.2 (10.0.0.2) 56(84) bytes of data.
     64 bytes from 10.0.0.2: icmp_seq=1 ttl=64 time=0.980 ms

     --- 10.0.0.2 ping statistics ---
     1 packets transmitted, 1 received, 0% packet loss, time 0ms
     rtt min/avg/max/mdev = 0.980/0.980/0.980/0.000 ms
Verify the Jupiter Nano is on the Internet
Connect a USB Micro-B cable to the Jupiter Nano Console port, start a serial terminal program like
picocom (replace the/dev/ttyACM0with whatever device it is on your system):picocom -b 115200 /dev/ttyACM0 --imap lfcrlf nsh>nsh> ping -c 1 www.google.com PING 142.250.69.196 56 bytes of data 56 bytes from 142.250.69.196: icmp_seq=0 time=10 ms 1 packets transmitted, 1 received, 0% packet loss, time 1010 ms
You are done!
Now you have an RTOS system with fast Wi-Fi Internet access. There are programs in the NuttX Applications repository that show how to write NuttX applications that can do hard realtime tasks and access the Internet at the same time – the TCP/IP stack is preemptable.
Questions? Email jupiter-nano@starcat.io for help or more info.
-adam
Resources
- Raspberry Pi Zero W – about it, and links to retailers
- Starcat Apache NuttX image for Jupiter Nano
- Balena Etcher – this is a program that can write SD Card images
- Apache NuttX Applications repository – check out the
examples/directory,
udpblaster, wget, and webserver are interesting. - Apache NuttX Documentation - Applications - info on writing new commands.
These can be set to automatically run on startup. - Apache NuttX Networking info – on the NuttX wiki
- Raspberry Pi Documentation
- Raspberry Pi forum post on how to set the USB port to host mode –
dwc2,dr_mode=hostincmdline.txt - Raspberry Pi imager and downloads – download Raspberry Pi OS and installer for your platform
- Raspberry Pi documentation: Configuring Networking