Project update 8 of 10
Gaming with Your Mind: Control GTA-V Using Brainwaves and Muscle Signals
by Upside Down Labs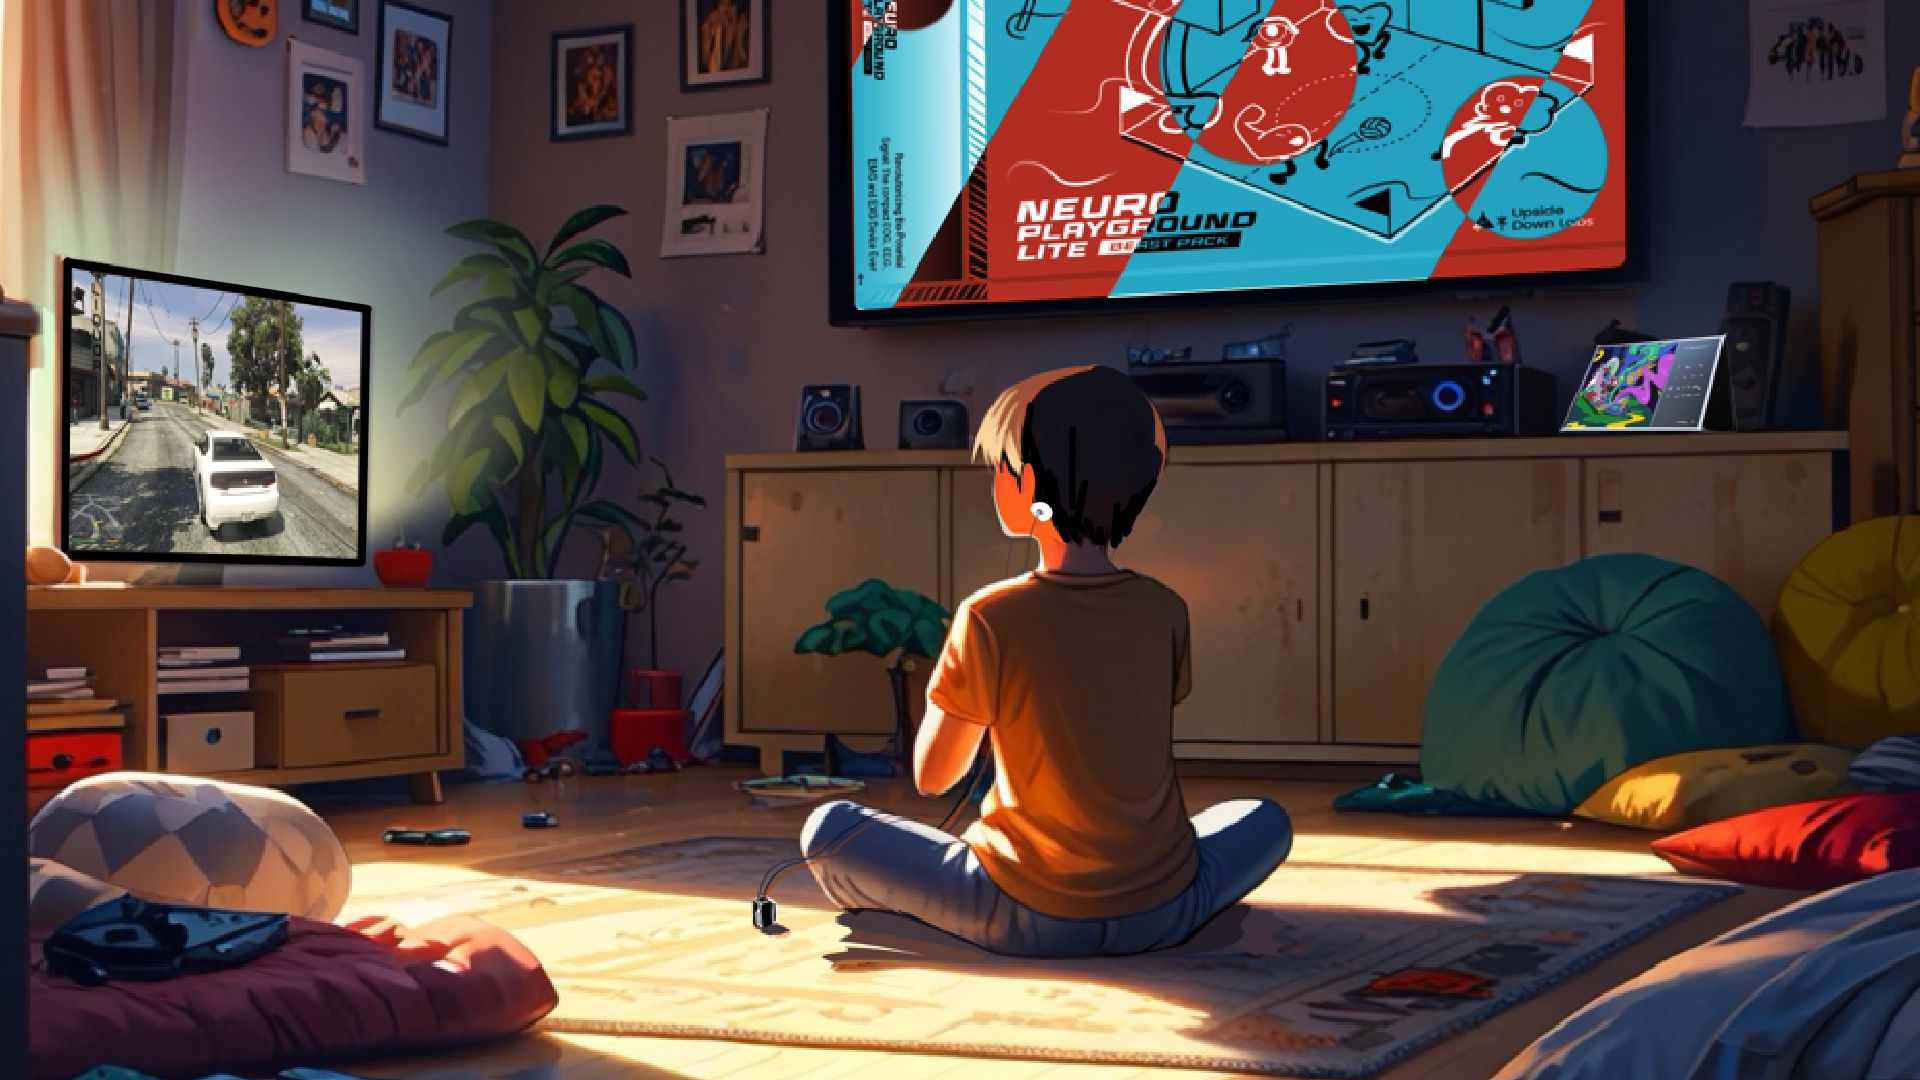
Introduction
Have you ever wanted to play games using just your mind and muscle movements? It might sound impossible, but with the Neuro PlayGround Lite, you can turn your brain and muscles into a wireless game controller.
This tutorial shows you how to control games (we’ll be using Grand Theft Auto-V in this example) with:
- Your focus (EEG brainwaves) to accelerate
- Your left hand (EMG muscle signals) to steer left
- Your right hand (EMG muscle signals) to steer right
- Both hands together to switch to reverse mode
No traditional controller needed, just your natural body signals! By the end, you’ll be cruising through your gamescape using pure neural control.
Watch the Complete Tutorial
What You’ll Need
Here’s your shopping list for mind-controlled gaming:
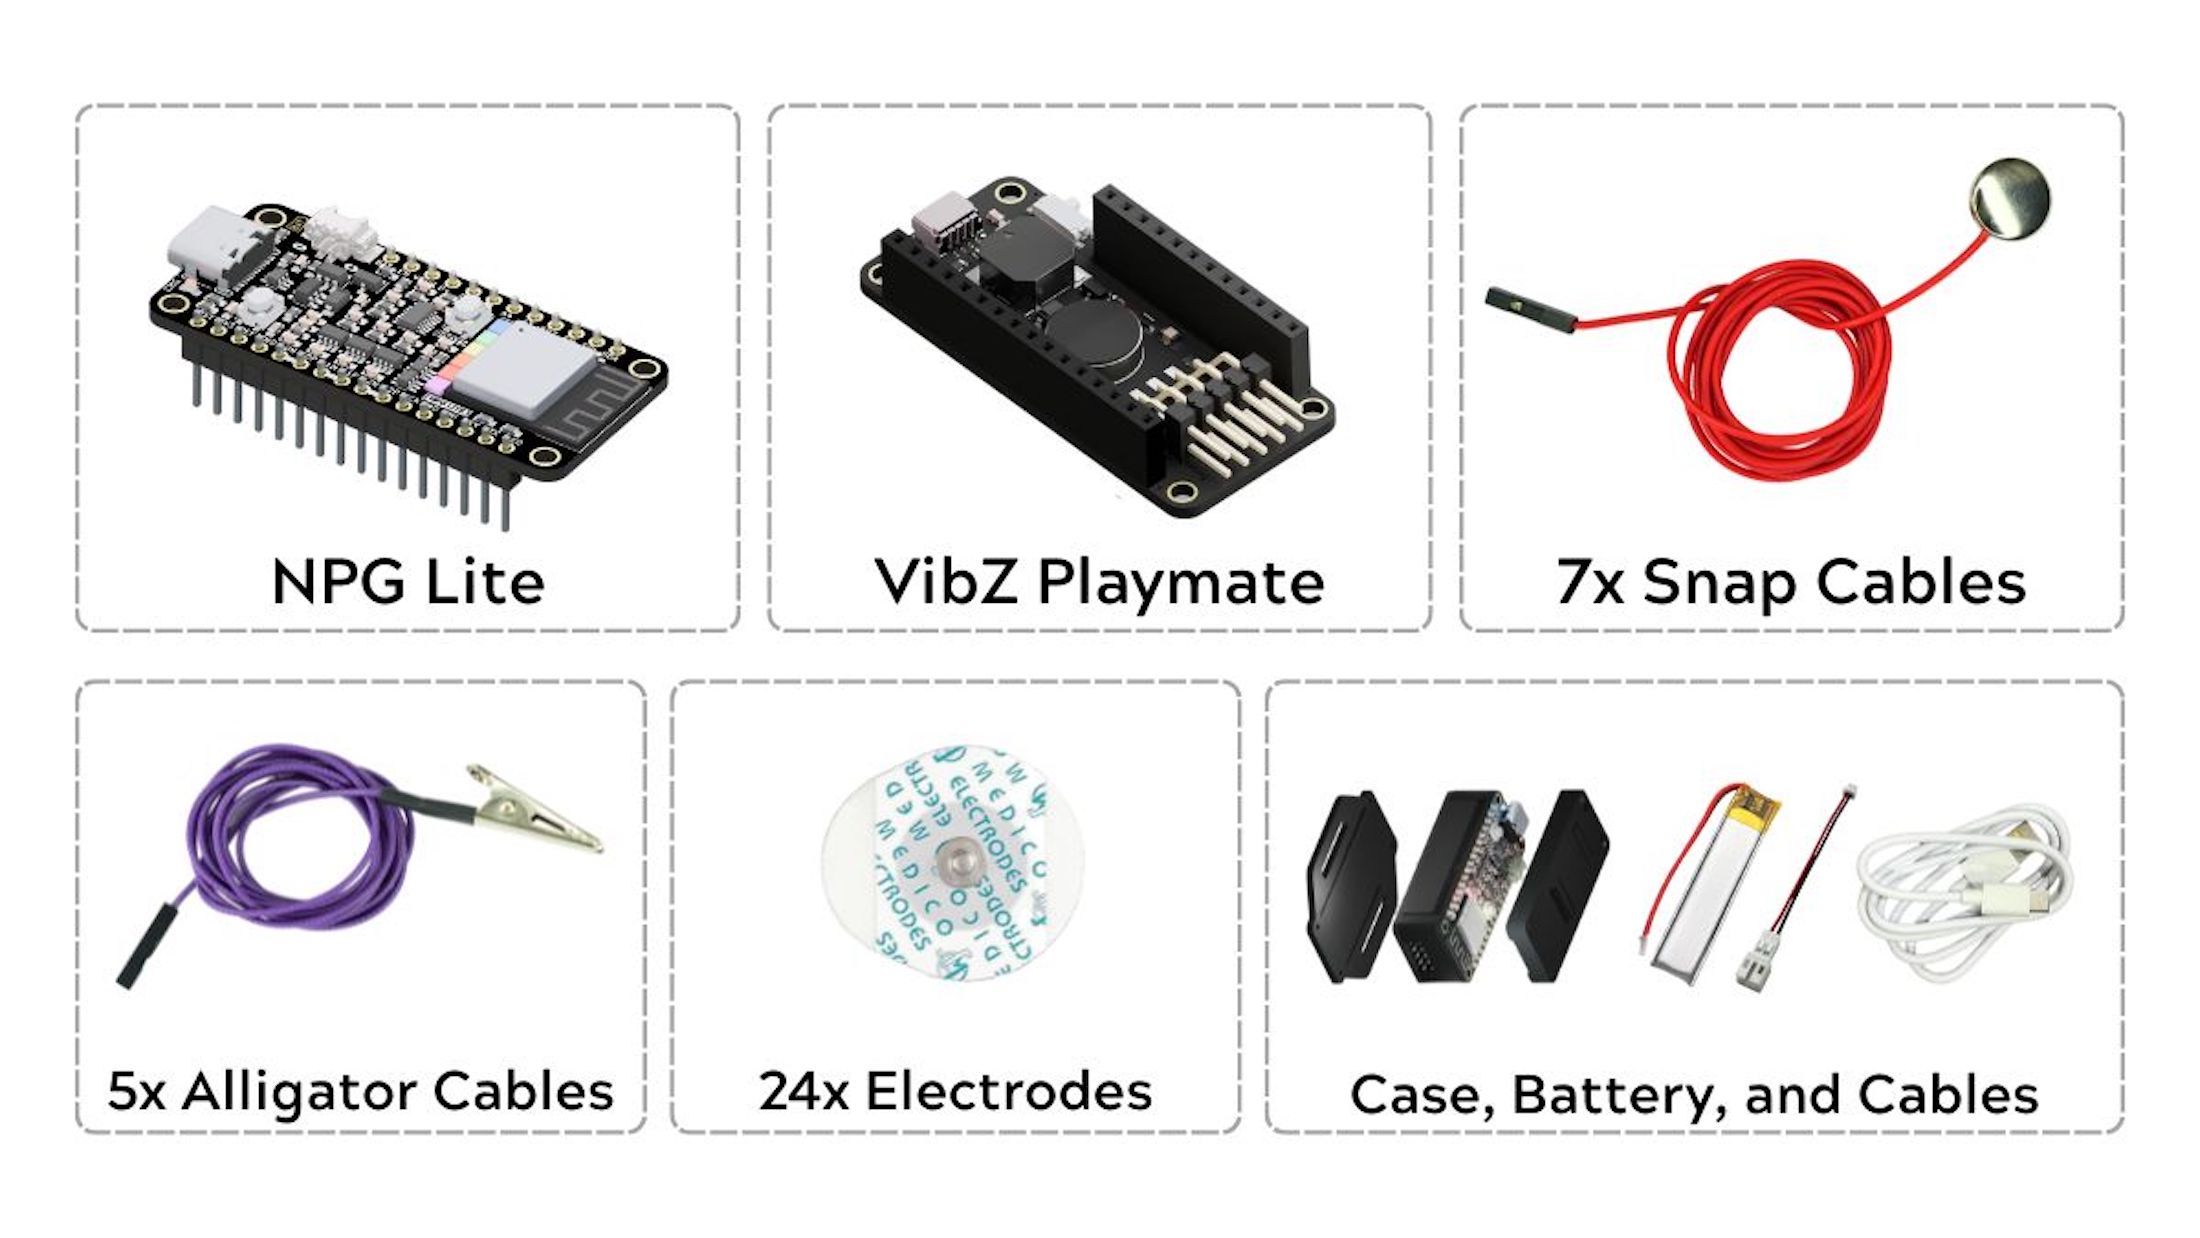
Hardware (included in NPG Lite kit)
- Neuro PlayGround Lite board
- VibZ Playmate (or any NPG Lite Playmate)
- Seven gel electrodes
- Seven BioAmp snap cables
- LiPo battery (Comes built-in if you get Ninja or Beast Pack)
- USB-C cable (Only for flashing the firmware)
- A Windows PC/laptop with Bluetooth
Supplies
- NuPrep skin preparation gel
- Alcohol swabs
Software Requirements
Software (free downloads):
- NPG Lite Flasher Tool
- BCI-BLE-Gamepad firmware
- XOutput controller mapping software
- Any game with controller support, in this example we will be using Grand Theft Auto V (GTA-V)
Get your complete kit from Crowd Supply, everything you need is included!
Step 1: Prepare Your Skin
Clean skin = clean signals! This step is crucial for reliable control.
What to do:
- Apply NuPrep gel to these areas:
- Your forehead (for brain signals)
- Behind both ears (for negative and reference)
- Both both forearms on palmaris longus muscle (for steering)
Note: NuPrep gel is not a conductive paste for dry electrodes, use it only for skin-prep and remove excess (using an alcohol swab) after skin prepration.
Scrub gently with the gel to remove dead skin and oils
Clean with alcohol swabs to remove any gel residue
For visual reference on electrode placement locations, see the EEG and EMG placement images shown in the next section.
Pro tip: Good skin prep makes the difference between frustrating gaming and smooth control!
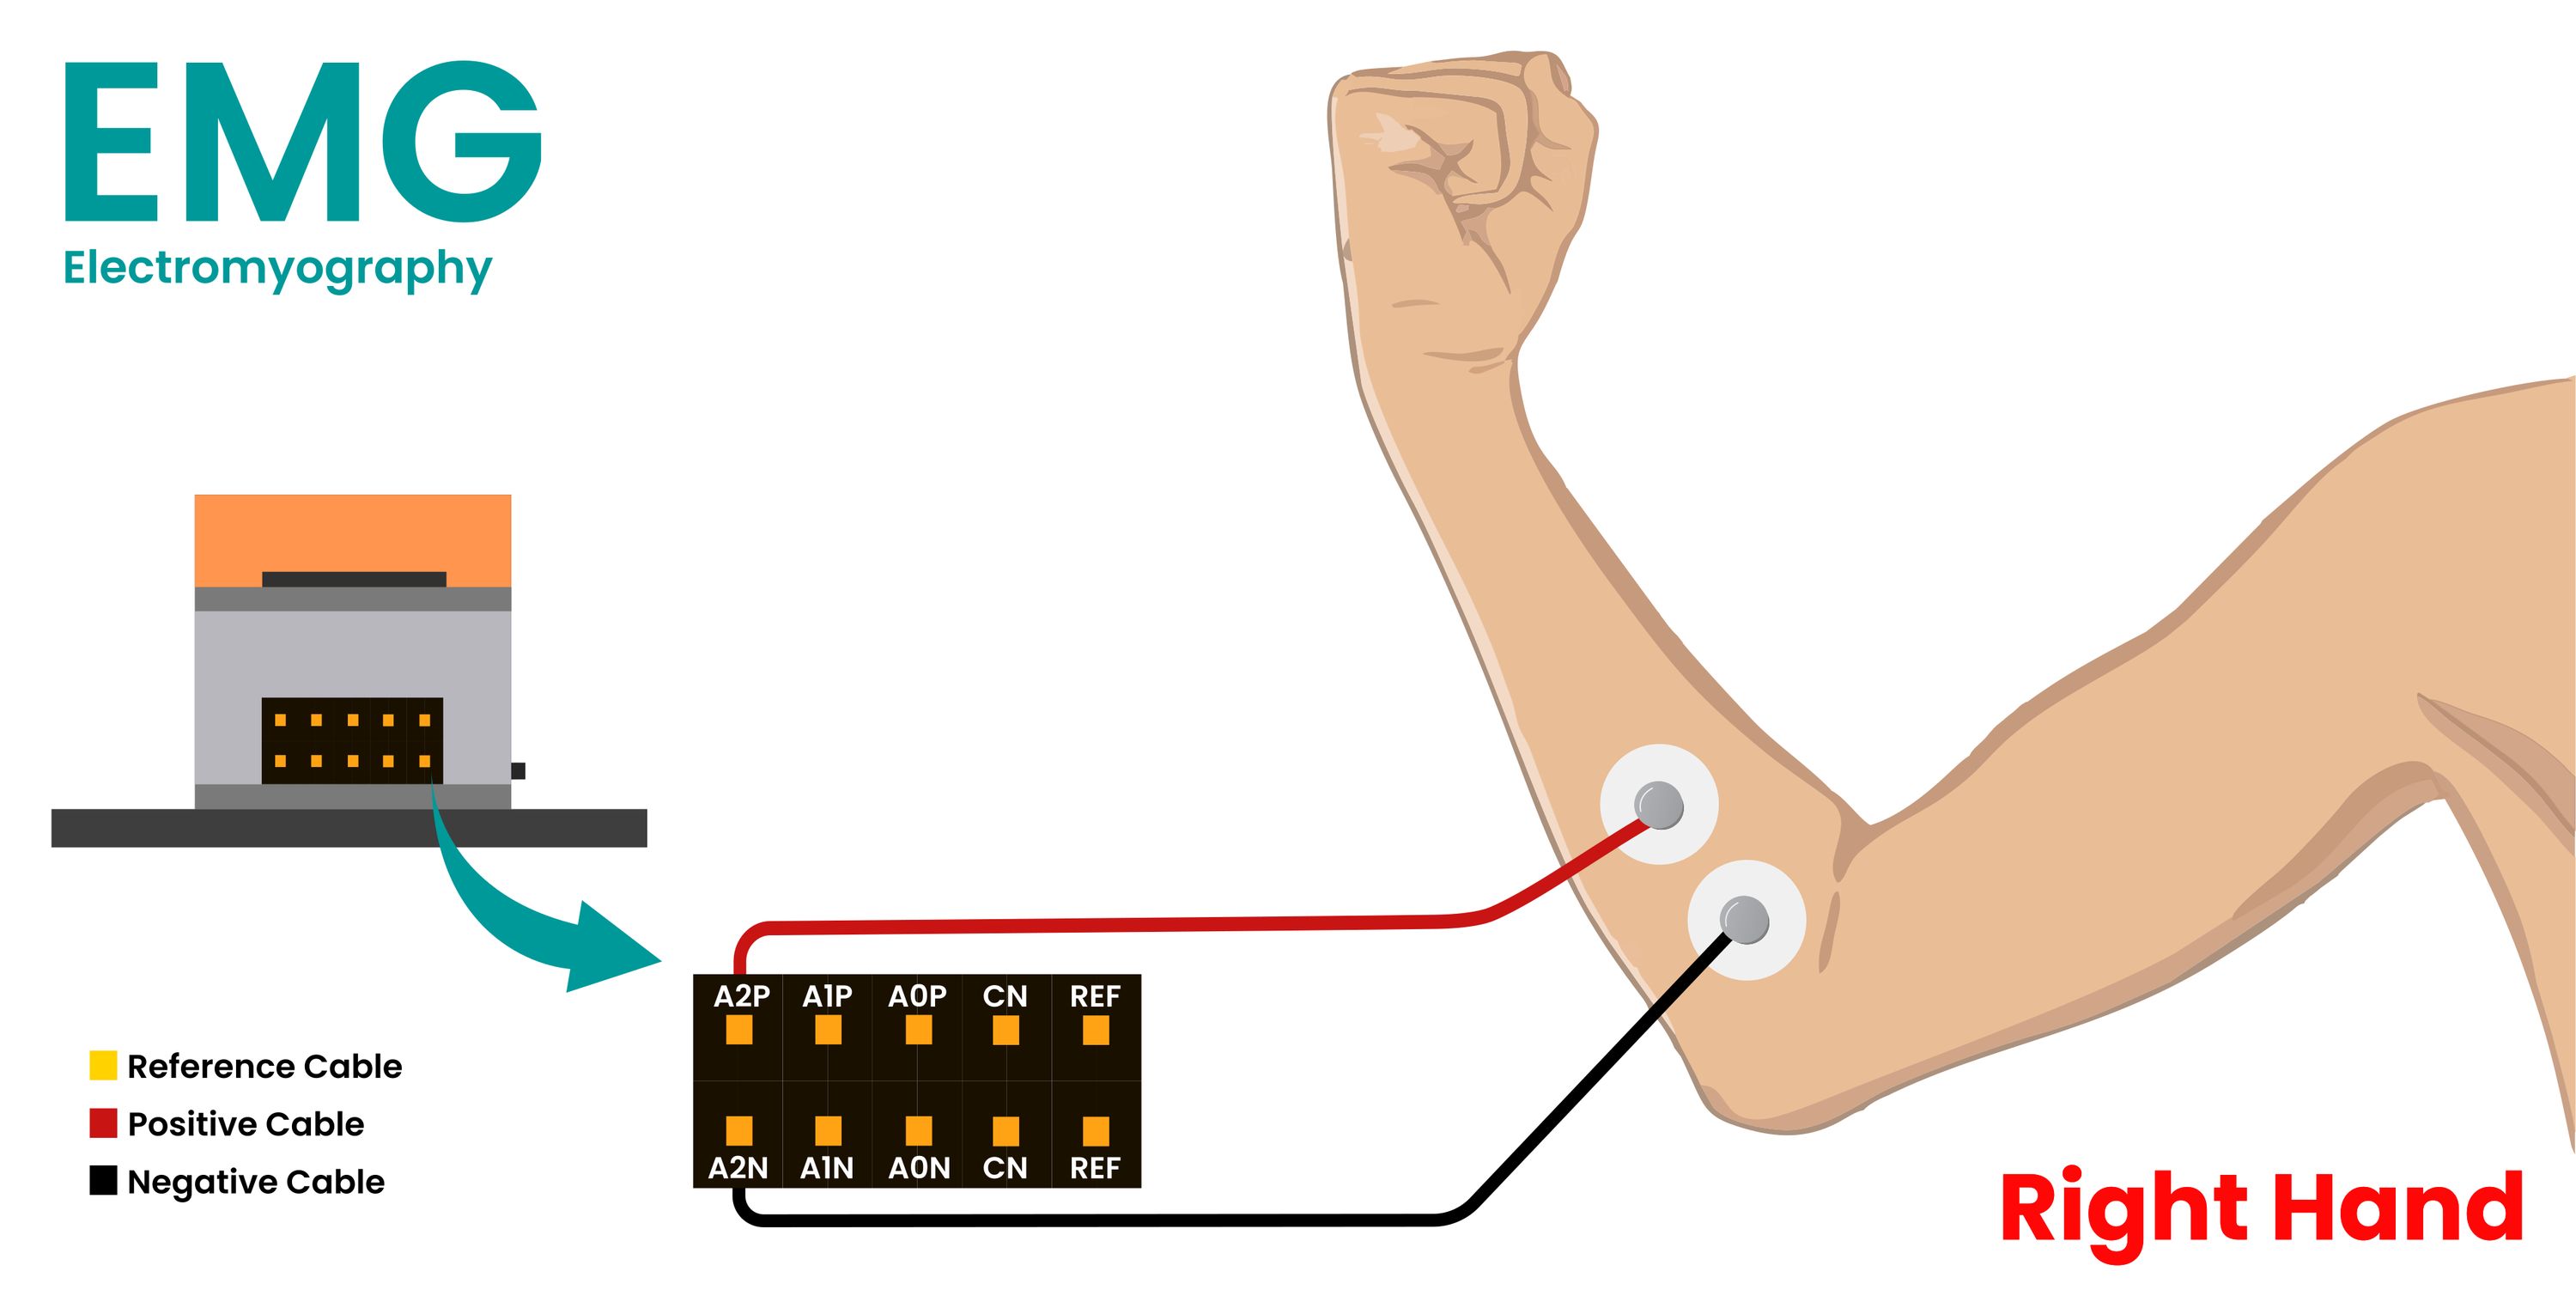
Step 2: Connect the Electrodes
Now let’s turn your body into a game controller!
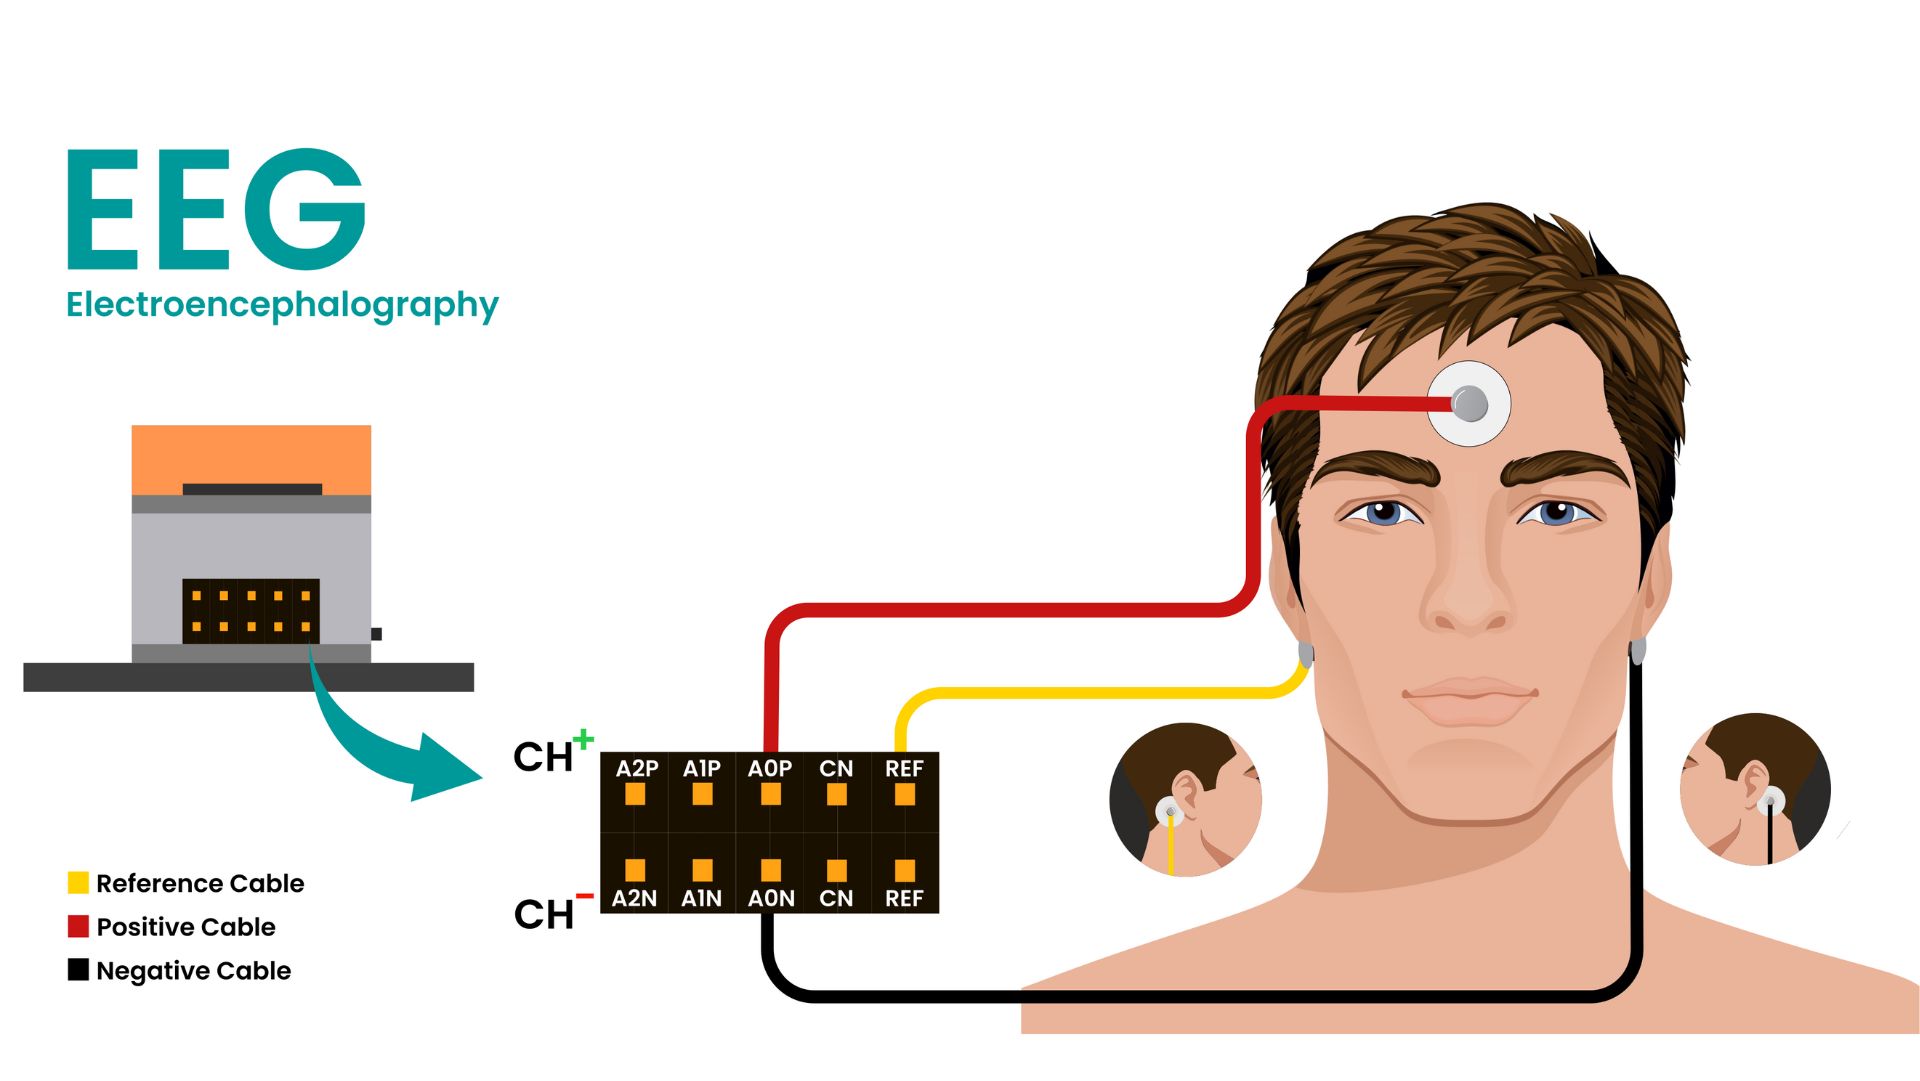
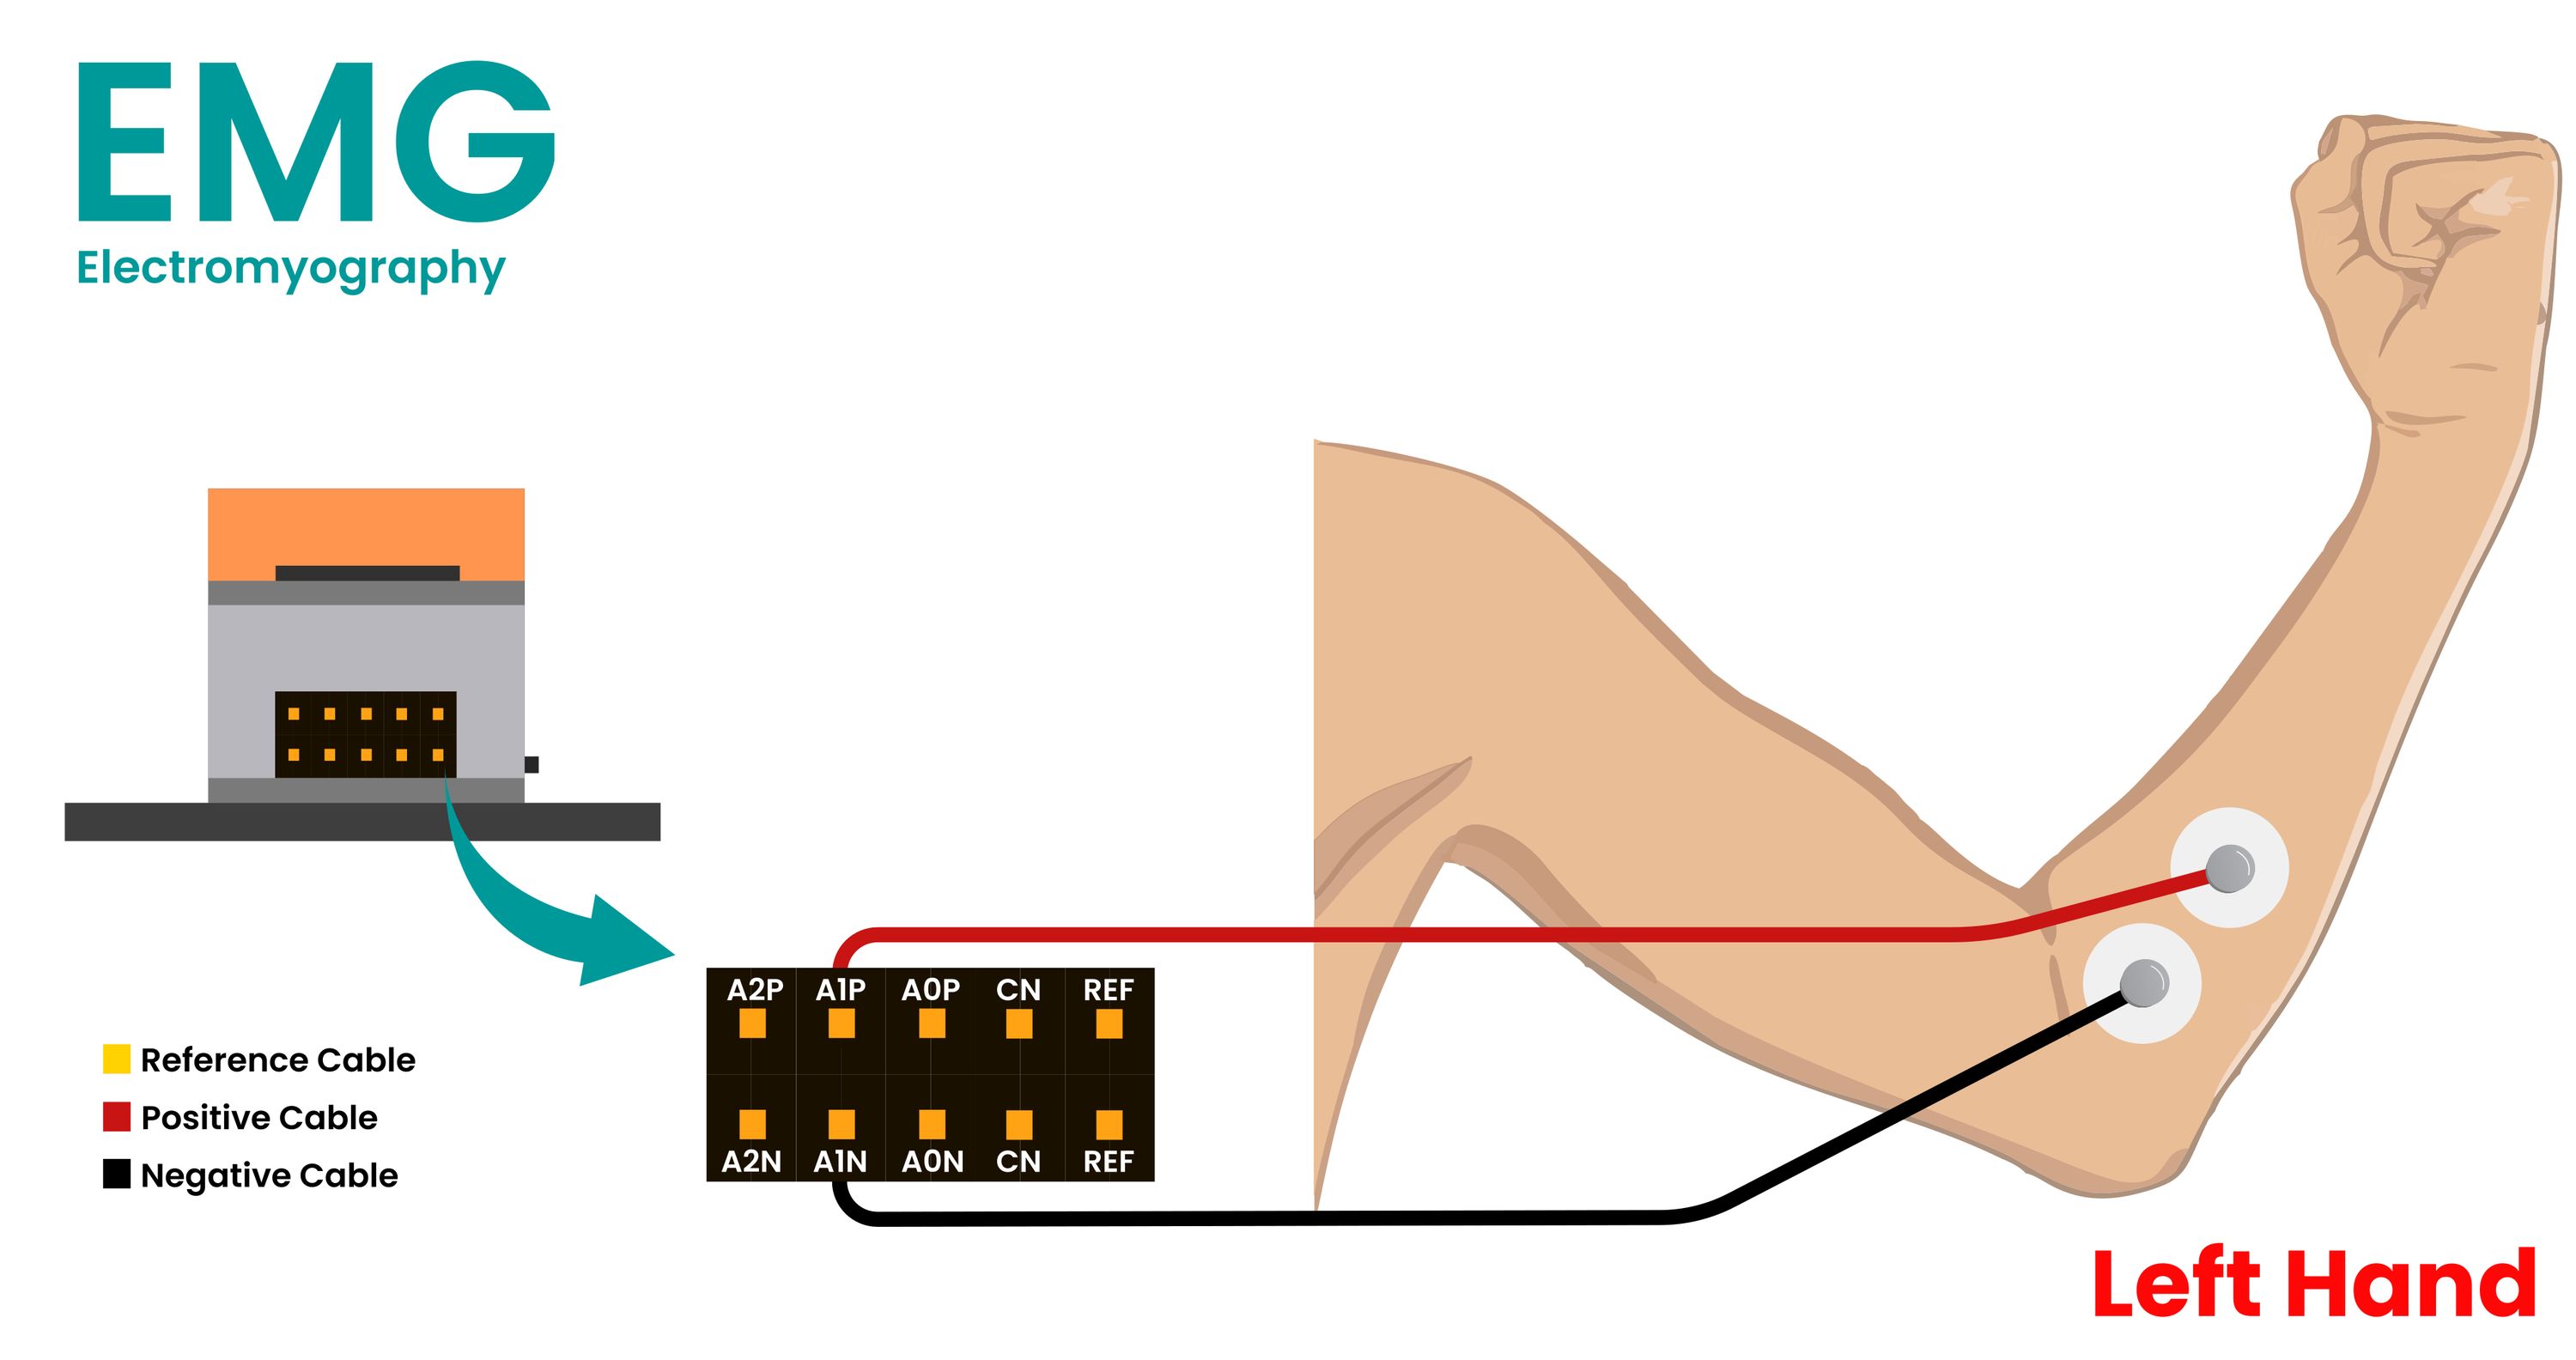
Electrode Placement Guide
First, snap all the cables to the gel electrodes and attach them to your body. Then, connect the BioAmp cables to your NPG Lite board using the channels shown below:
| Signal Type | NPG Lite Pin | Body Location | Signal Type |
|---|---|---|---|
| EEG Brain | A0P | Forehead (center) | EEG |
| EEG Brain | A0N | Behind right ear | EEG |
| Left EMG | A1P | Left forearm muscle | EMG |
| Left EMG | A1N | Left forearm muscle | EMG |
| Right EMG | A2P | Right forearm muscle | EMG |
| Right EMG | A2N | Right forearm muscle | EMG |
| Reference | REF | Behind left ear | Reference |
EEG electrode placement (brain signals for focus control):
EMG electrode placement (muscle signals for steering control):
- A1P & A1N on your left forearm muscle (flex = steer left)
- A2P & A2N on your right forearm muscle (flex = steer right)
Quick test: Try flexing each arm-you should feel the muscle tighten under the electrodes!
Step 3: Final Check
Important: NPG Lite should not be connected to a charging laptop or any other device connected to an AC power source, such as a power adaptor.
Before we start gaming, let’s make sure everything is set up safely and correctly:
Quick Checklist
- Skin prepared and electrodes attached securely
- Sit at least one metre away from your laptop or desktop
- Stay five metres away from large appliances (e.g., microwave, fridge)
- NPG Lite battery is charged
Why this matters: Electrical interference can make your controls jumpy or unresponsive!
Step 4: Upload the Gaming Firmware
Now let’s turn your NPG Lite into a wireless game controller!
Power On and Connect
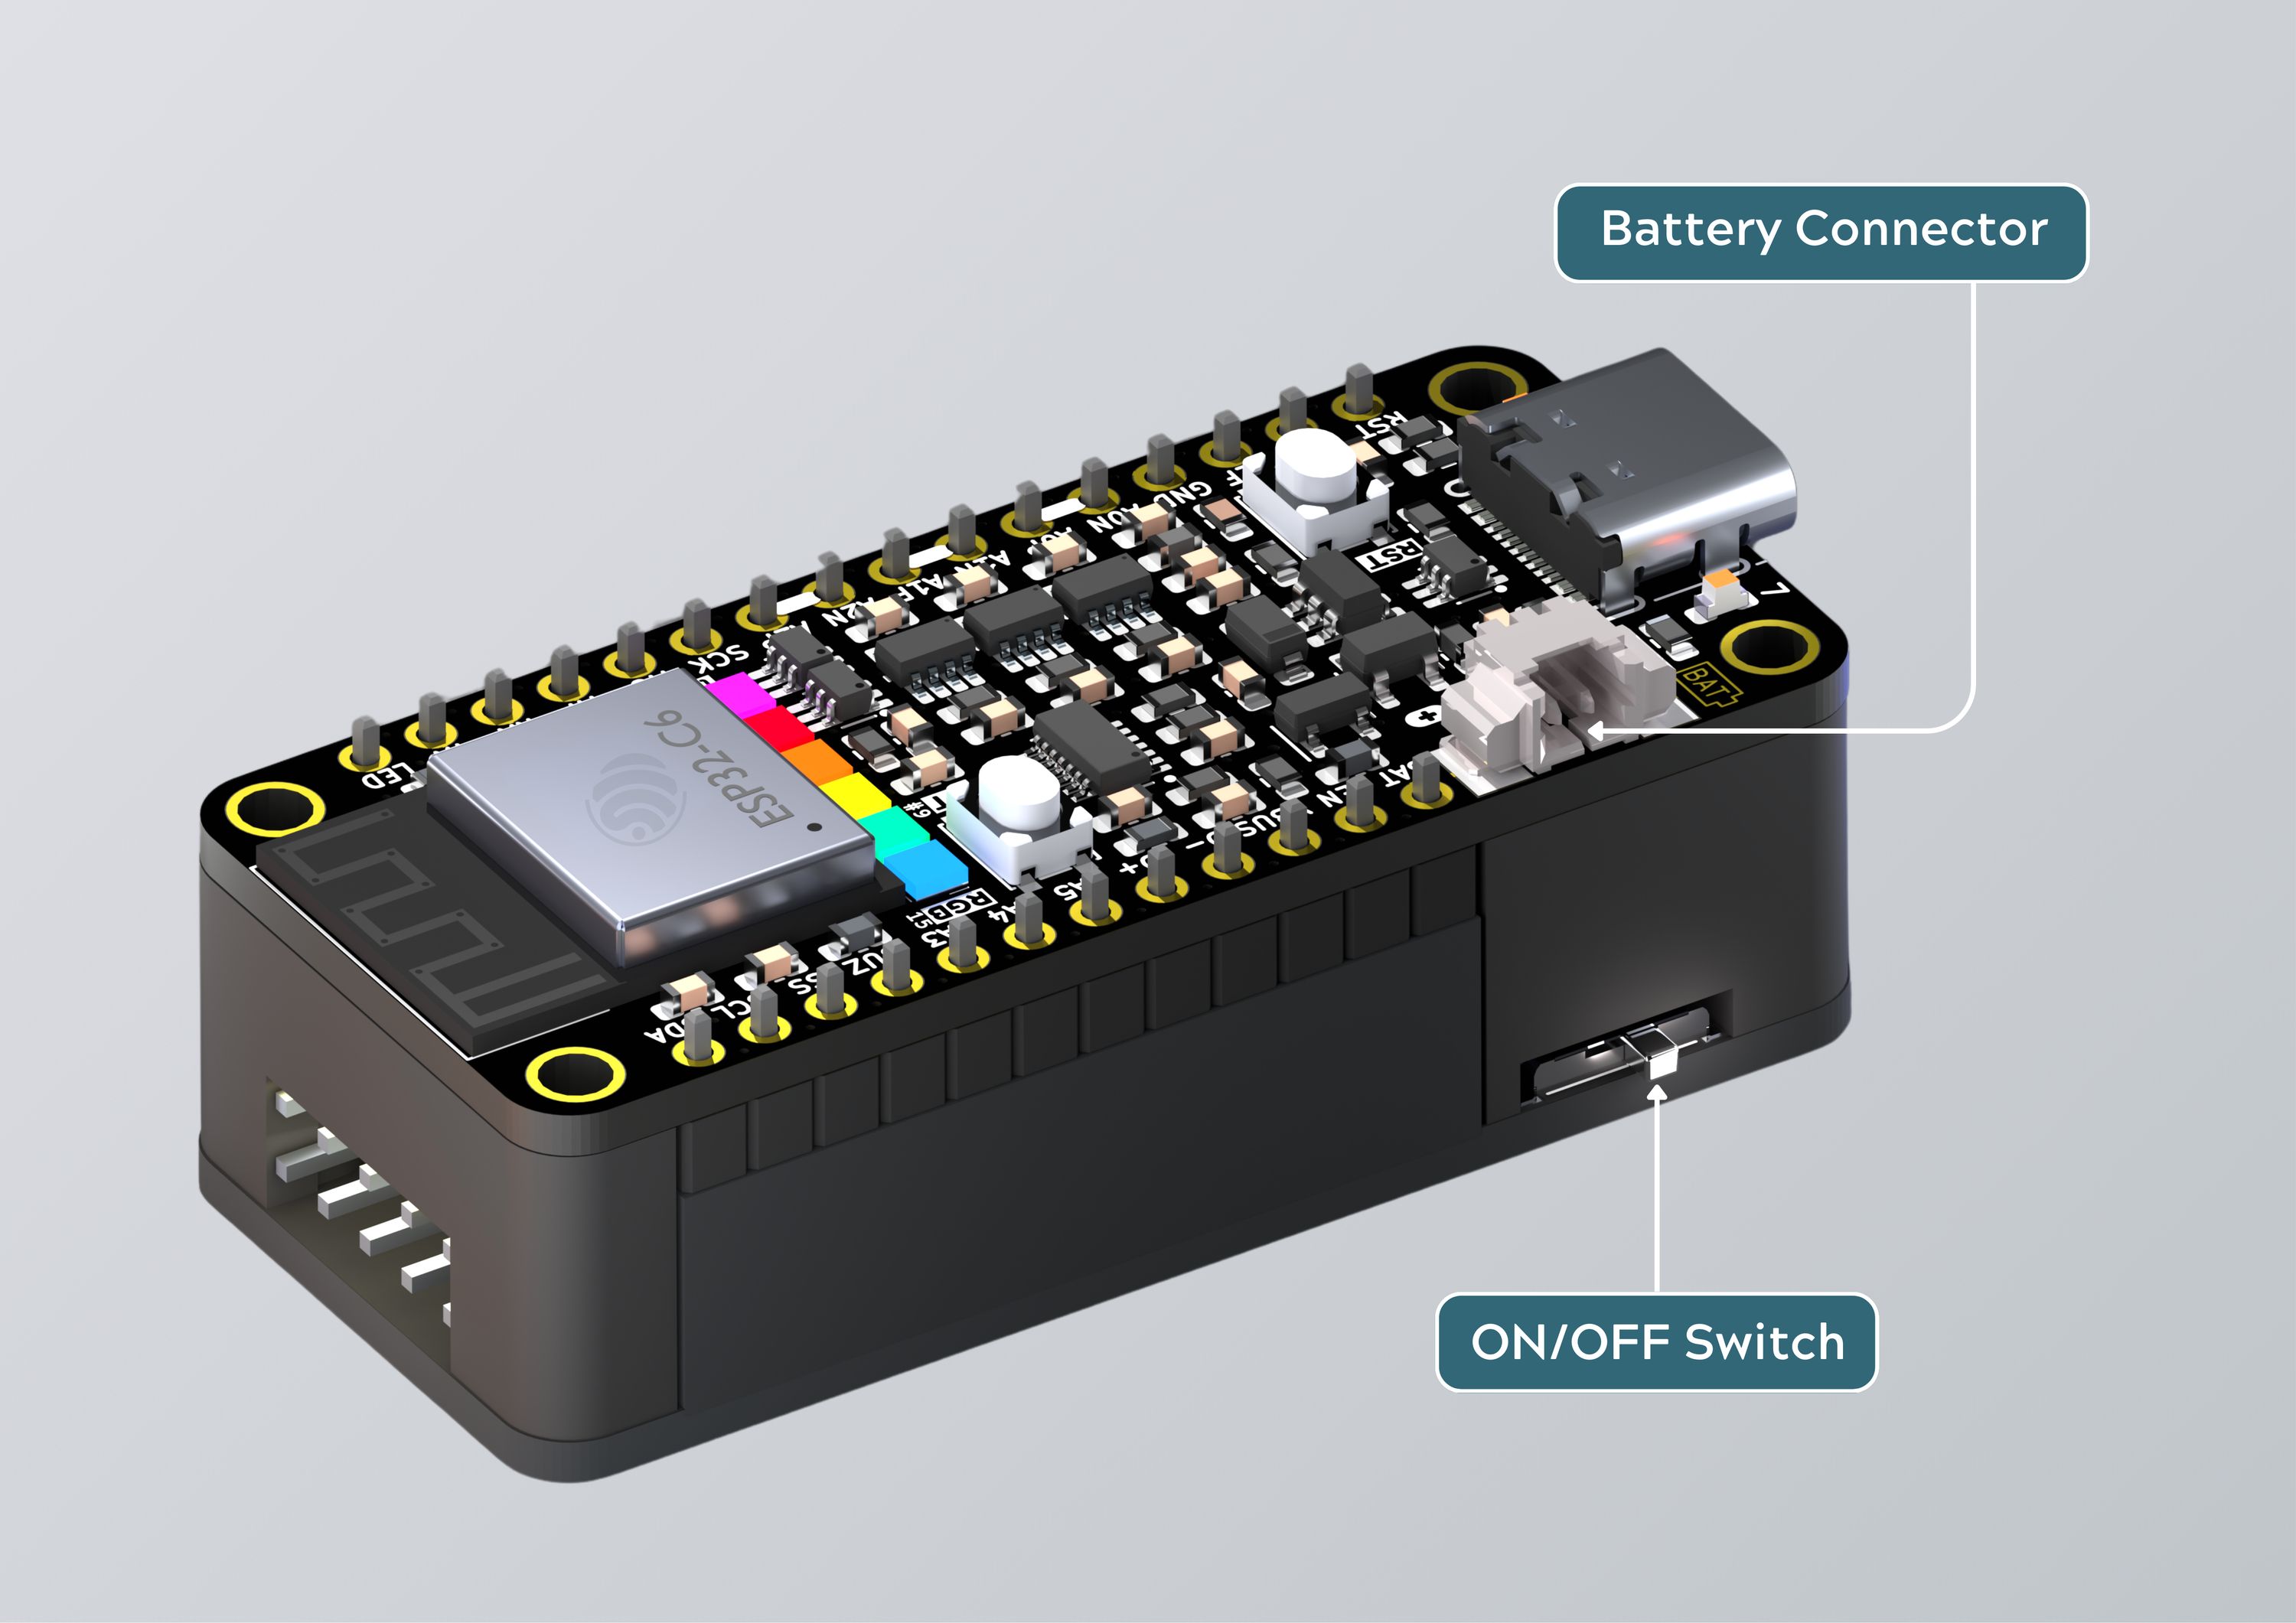
- Turn ON your NPG Lite using the switch on the Playmate
- Connect to your laptop with the USB-C cable
Flash the Firmware
- Download NPG Lite Flasher for your Operating System.
- Open the flasher tool: click Get from GitHub.
- Download and select BCI-BLE-Gamepad firmware.
- Connect your NPG Lite via USB-C.
- Select the correct port and flash firmware.
When the upload finishes, unplug the USB cable, and your NPG Lite is now a wireless controller!
Step 5: Connect to Your Computer
Let’s pair your new BCI game-controller with Windows:
Pair via Bluetooth
- Turn on Bluetooth on your computer
- Look for NPG GamePad in available devices
- Click to connect
Test the Connection
- Press the [Windows key] + [R]
- Type
joy.cpland press Enter - You should see a game controller listed
- Click it and select Properties
Important: Make sure to remove/forget the paired NPG GamePad device if you want to use other supported software that uses a Bluetooth Low Energy (BLE) connection, like Chords-Web or CortEX.
Test Your Controller Responsiveness
Now for the fun part, test each control:
- Flex your left hand: Should move the analog stick left
- Flex your right hand: Should move the analog stick right
- Focus intensely (look at a single point without blinking): Button One lights up
- Flex both hands, then focus: Button Two lights up
If something’s not working: Re-check your electrode placement and skin prep.
Step 6: Set Up Game Controls
We need to translate your bio-potential signals into game controls that GTA-V understands.
- Download the XOutput software
- Extract the files and open the program
Map Your Body Signals to Controller
Set up steering (left/right movement):
- Click Add Controller then Edit
- Click Configure next to LX
- Flex your left and right hands until you see:
- Minimum: 0, Maximum: 100
- Selected Input: X-Axis
- Click Save
Set up acceleration:
- Click Configure next to RT
- Focus intensely until you see:
- Selected Input: Button One
- Min/Max: 0-100
- Click Save
Set up reverse:
- Click Configure next to LT
- Flex both hands, then focus until you see:
- Selected Input: Button Two
- Min/Max: 0-100
- Click Save
- Save your configuration when done
What you just did: You told your computer how to turn muscle flexes and brain focus into game controls!
Step 7: Start Gaming!
Time to take your mind-controlled car for a spin!
Launch GTA-V
- Start GTA-V and get into the game world
- Find a car and get in (any car will work)
- Click on Start next to your controller in the XOutput software
- You're ready to drive with your mind!
Your New Controls:
- Focus hard: Car accelerates forward
- Flex left hand: Steer left
- Flex right hand: Steer right
- Flex both hands + focus: Reverse
Pro tip: Start with gentle movements. As you get comfortable, you can be more dramatic with your flexing and focusing!
How This Magic Works
Ever wonder how your thoughts and muscles become car controls? Here’s the science:
The Signal Chain
- Your brain creates electrical patterns when you focus (beta waves)
- Your muscles create electrical signals when they contract/flex (called EMG)
- NPG Lite detects these tiny signals and amplifies them
- The firmware processes the signals in real-time
- Bluetooth sends commands to your computer as controller inputs
- XOutput translates bio-potential signals into game controls
- GTA-V receives standard controller commands
Why It Works
- **Focus creates beta waves (Shift in beta activity, 13-30 Hz frequency range)
- Muscle contractions generate distinctive electrical patterns
- Each signal type has a unique "signature" we can detect
- Real-time processing makes it feel instant
The coolest part? You’re literally controlling the game with central (brain) and somatic (muscles) parts of your nervous system.
Try Other Games Too!
Your BCI game-controller isn’t limited to GTA-V! Here are more games to try:
Racing Games
- Forza Horizon: Perfect for BCI controlled racing
- Need for Speed: High-speed focus training
- F1 games: Precision steering practice
Other Games
- Flight simulators: Use focus for throttle, hands for banking
- Rocket League: Score goals with your mind
- Any controller-supported game: Experiment and have fun!
Beyond Gaming
- Accessibility tools: Help people with limited mobility
- Research projects: Study brain-computer interfaces
- Art installations: Create interactive experiences
- Therapy applications: Bio-feedback and training
Challenge yourself: What creative ways can you think of to use BCI controlled gaming?
If Something Doesn’t Work
Don’t worry, troubleshooting BCI game controller is part of the learning process.
Common Issues & Quick Fixes
"My controls are too sensitive or not sensitive enough"
- Adjust threshold values in the firmware code
- Check electrode contact; you should press them down firmly to ensure better contact
- Make sure your movements are consistent
"Nothing happens when I flex or focus"
- Reapply skin prep gel and clean electrodes. Do not use prep excessively, as it may cause irritation
- Check all cable connections to NPG Lite. Use a multimeter to check cable continuity
- Try moving to a quieter electrical environment. Sit away from noisy electrical appliances like microwaves and tube lights
"Bluetooth won’t connect"
- Restart Bluetooth on your computer. Remove/forget all paired devices
- Look for NPG GamePad in the device list once the search for new devices is complete
- Try resetting your NPG Lite using the reset button or by turning it OFF and then ON
- Make sure it's fully charged. It can take a couple of hours (the orange CHG LED turns off when fully charged)
"Controls are jumpy or erratic"
- Move further away from your laptop or desktop
- Move away from large electrical appliances (5+ meters)
- Check that electrodes aren't loose
Remember: Bio-potential signals vary from person to person, so some tweaking is normal.
Congratulations!
You’ve just built your first brain-computer interface (BCI) for gaming!
What You’ve Accomplished
- Turned your body into a wireless game controller
- Learned how EEG and EMG signals work
- Created a real brain-computer interface
- Experienced the future of human-computer interaction (HCI)
Share Your Experience
We’d love to see your BCI gaming setup in action! Please share videos, ask questions, or suggest new project ideas with the community.
Happy BCI gaming!
Learn More
Resources
Community
Support
Need help?
- Contact
- File issues on GitHub
- Contribute improvements via PRs
The future of gaming is here-and it’s powered by your mind! What will you control next?