…our final week! Dear backers and subscribers, today we have another update of the practical variety. So let’s get started by answering a few fundamental questions.
When Should I Consider a GetWired Installation?
Since GetWired uses wired communication, it cannot be installed right away in every building. It requires a certain electrical setup to operate. That setup is not very complex, but it does have to be prepared properly. As a result, GetWired is best suited for use in homes that are under construction or undergoing a renovation that allows you to route additional wires.
Why is it a Good Idea to Use GetWired?
The most important reason is stated on our main campaign page. Wireless modules do not require any changes in electrical installation, and can therefore be installed in almost any structure, but wired communication is faster, safer, more stable, more resilient, and more private. Because of that, if you only want to automate your home once, you probably want to get wired.
How to Plan a GetWired System?
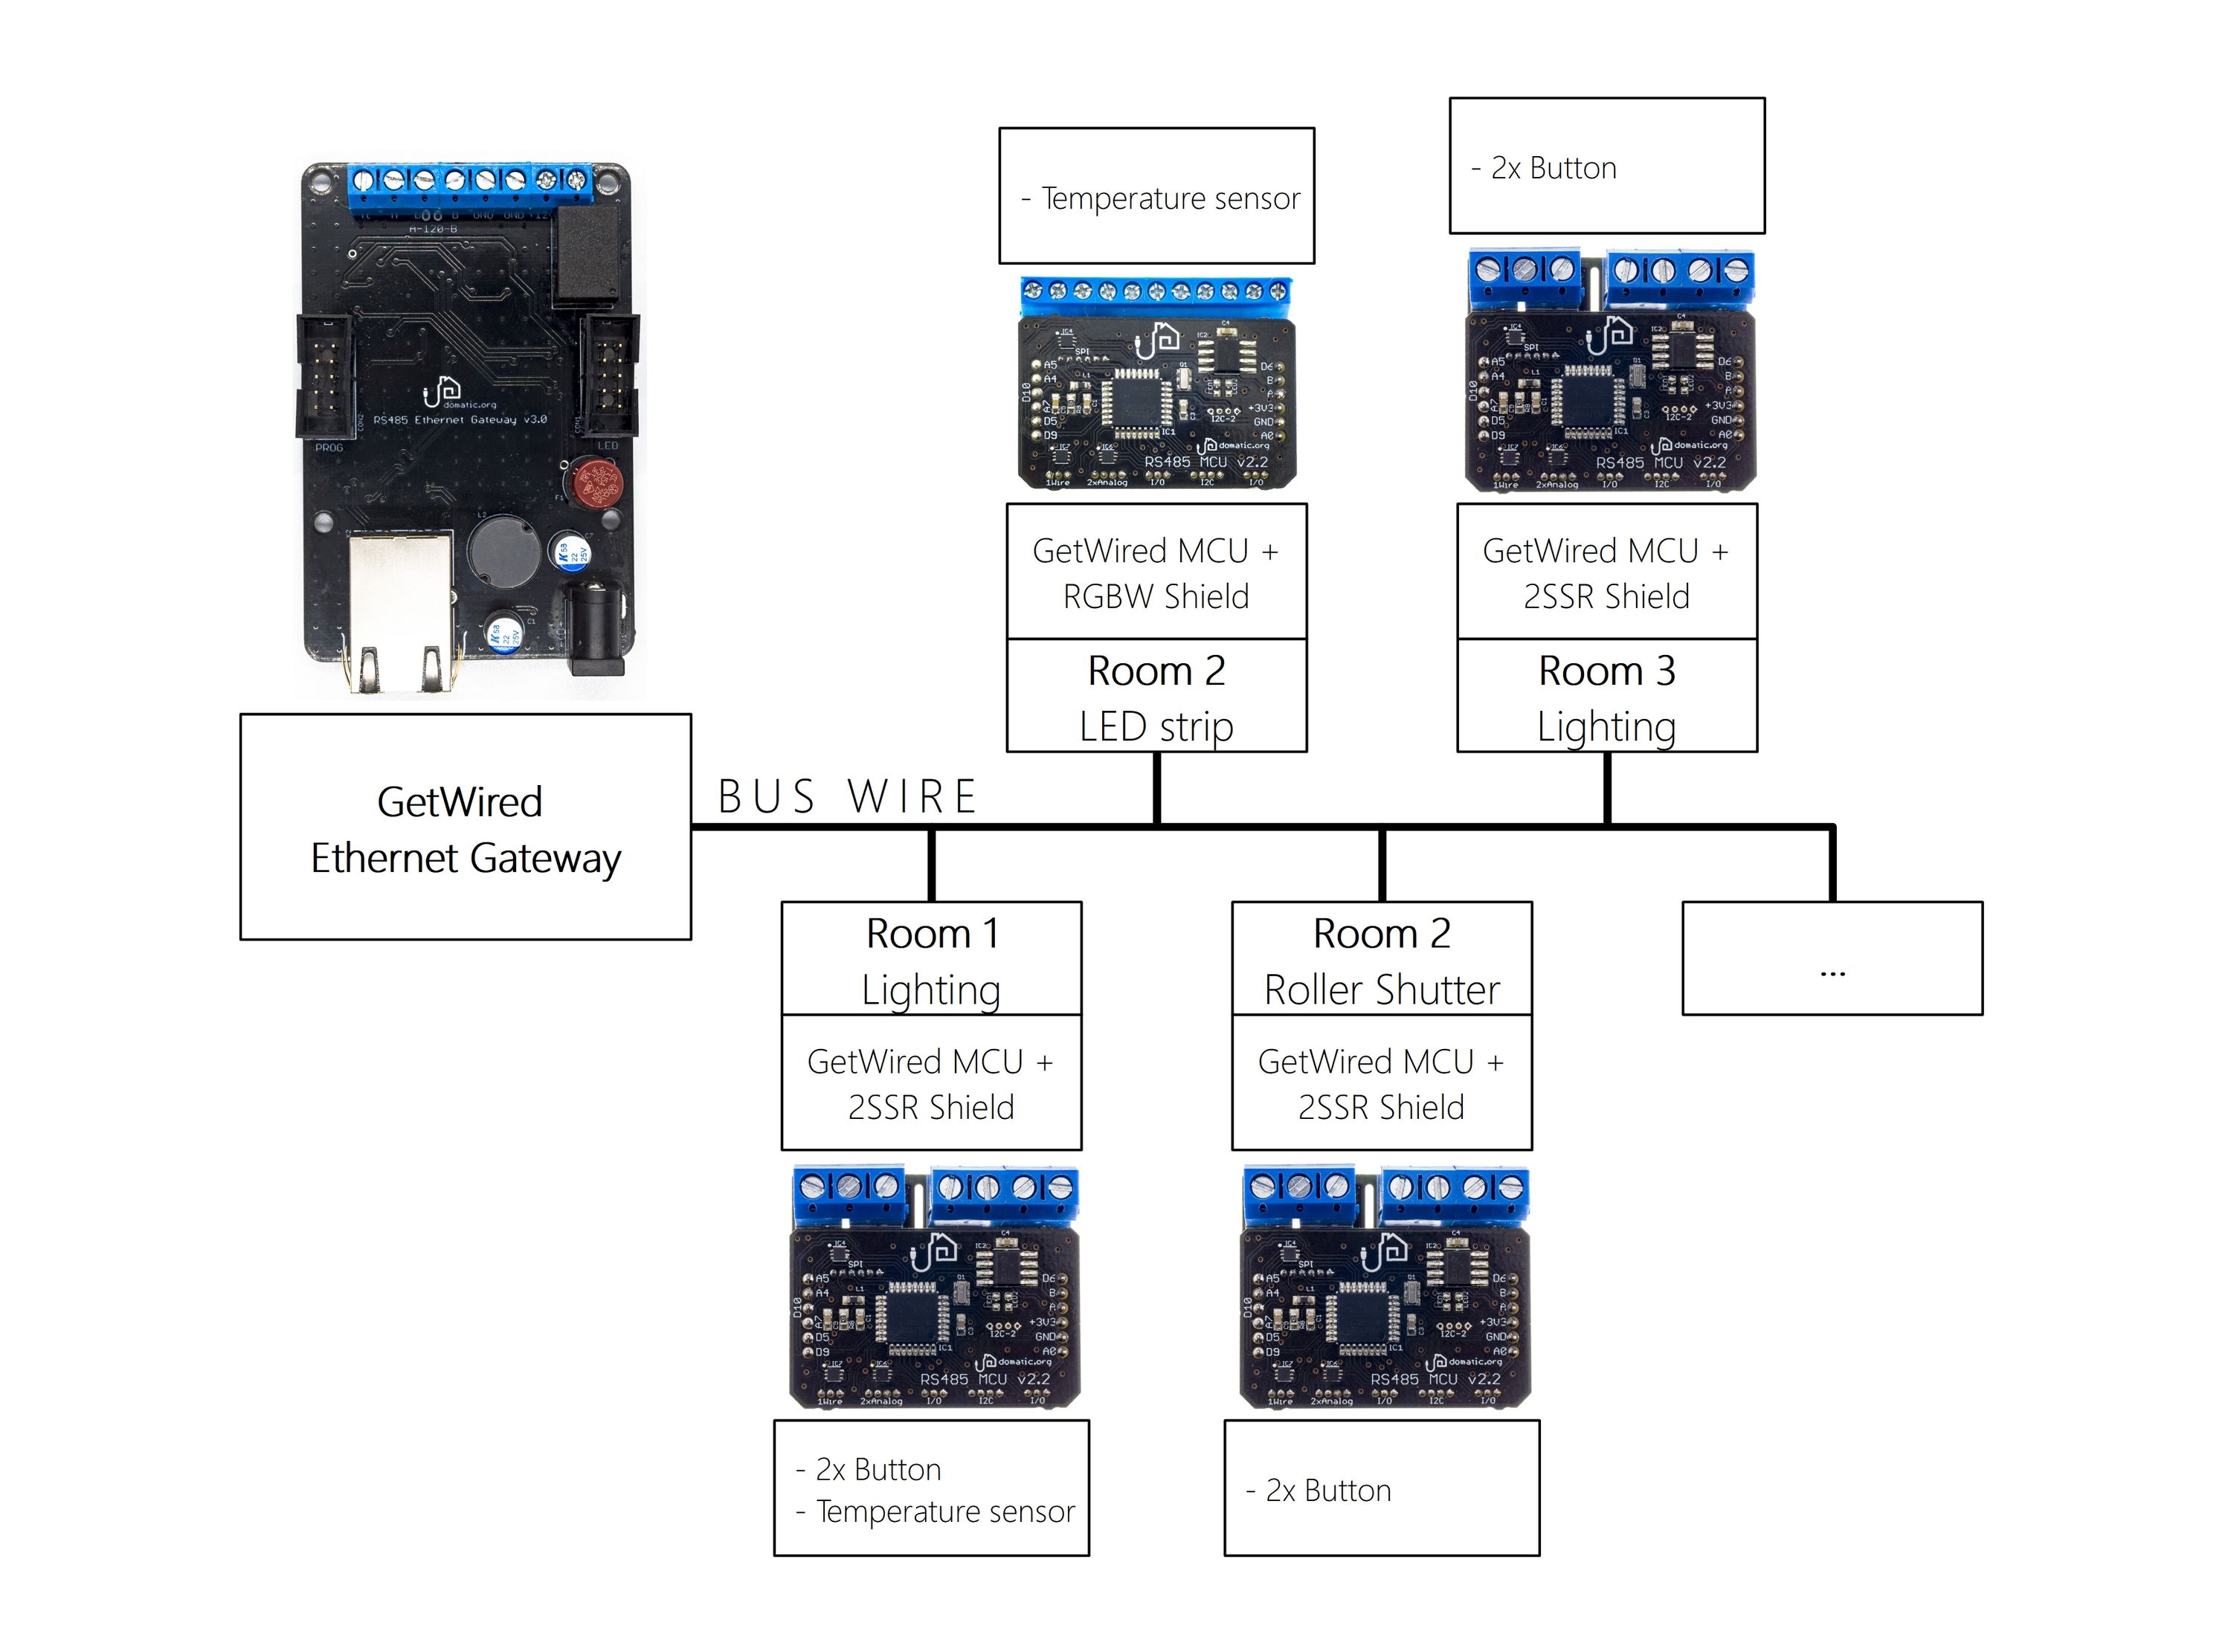
If you do decide to get wired, there are some things you should know about how to plan your installation. With the modules available through the current campaign, it is possible to accommodate a decentralized architecture. Let’s have a look at what that means.
Know Your Modules
As with most home automation modules — including wireless ones — GetWired modules are meant to be distributed, throughout a building, in electrical boxes just behind your electrical switches. As such, you will only need to route one additional cable (the bus cable) alongside your traditional electrical infrastructure. Planning such an installation does not require any special skills, and simply removing the modules will revert your home back to its original electrical configuration. Easy uninstallation might not be the most exciting feature of a smart home system, but we’ve found it quite comforting to know that we can remove the smart from our home should we need to for any reason (and to know it’s no great chore to take our modules with us if we move).
Alright, that’s enough about the overall GetWired philosophy. Let’s now have a look at the potential of our specific designs.
MCU
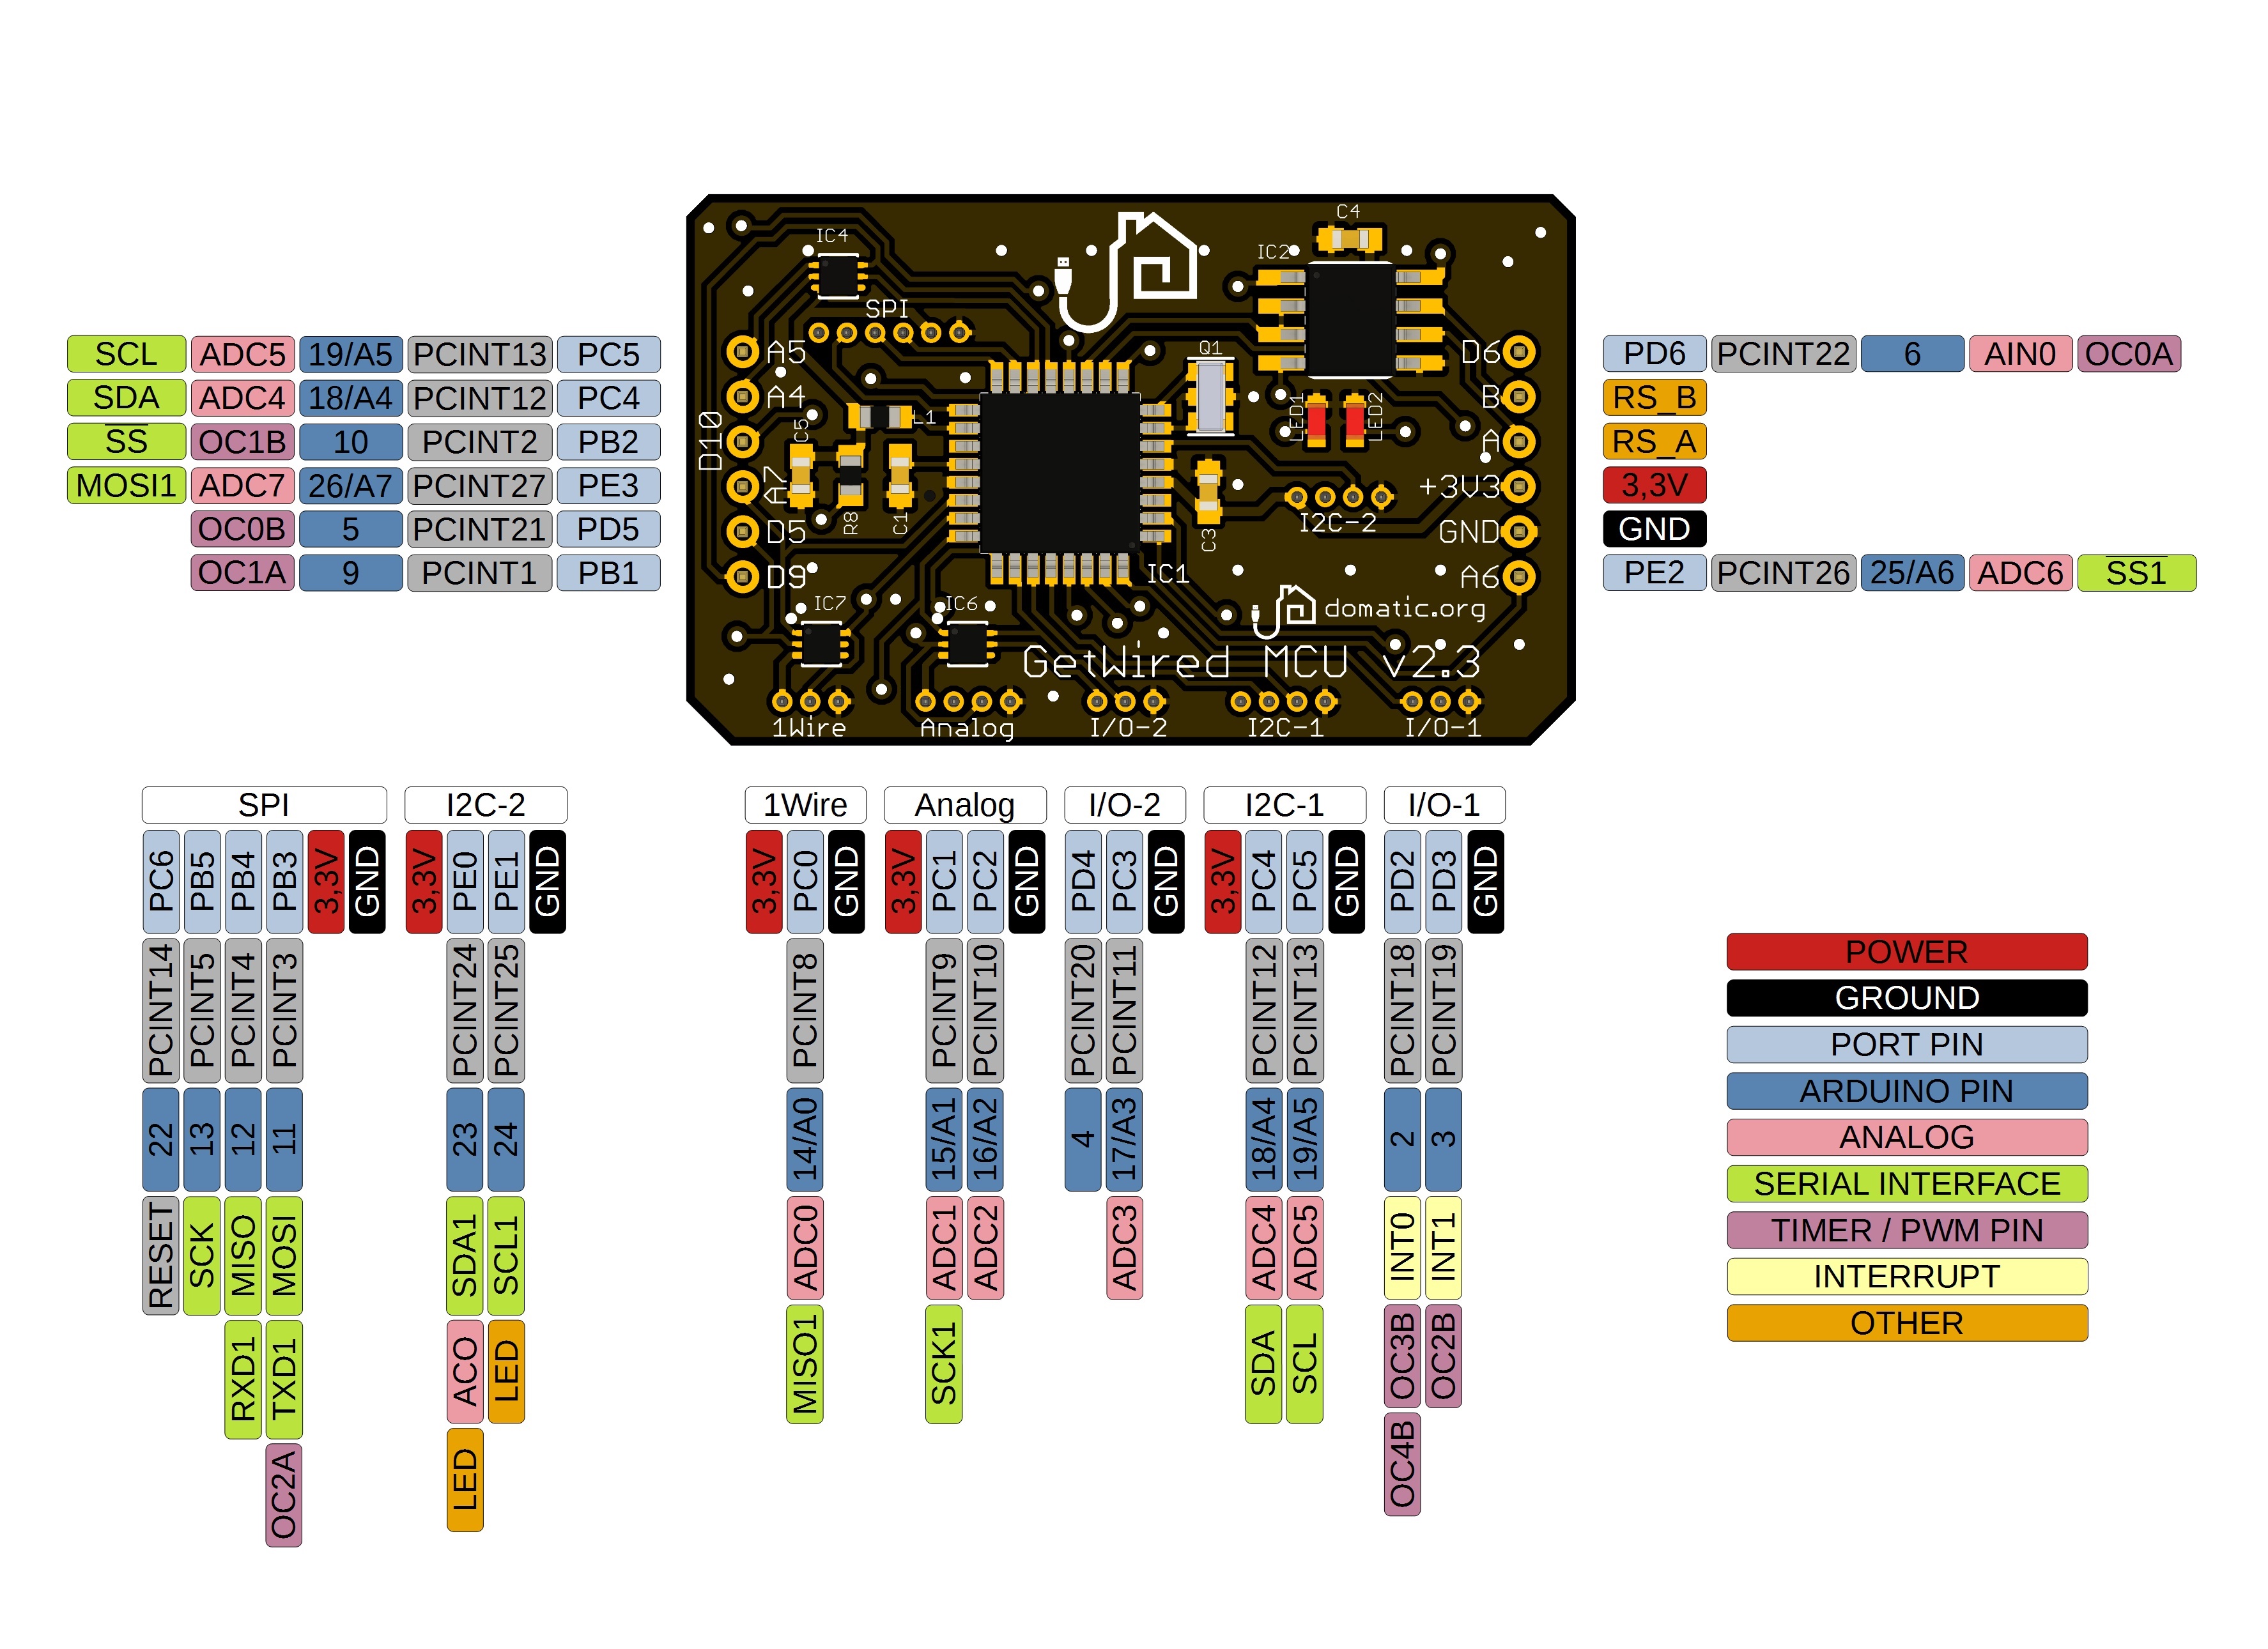
While the MCU Module is meant to be used with a shield that expands its functionality, it is already quite powerful on its own. It can read various digital and analog inputs, like buttons and sensors, and can even control a small display. When using our default software configuration, the MCU Module can host up to six buttons. Four inputs can be also used for digital sensors like PIR sensors or door and window sensors. 1Wire and I²C buses are available, as is an I²C-2 connector if you need a second I²C bus. Six pins are also capable of analog inputs. See the MCU pinout for details.
2SSR
A module with a 2SSR Shield can be used to control AC lighting or roller shutters. This shield is designed to withstand 1 A of sustained load and up to 3 A of transient load, which is plenty for modern, energy-efficient LED lighting and most roller shutter motors. Use it to control two channels of lighting or one roller shutter. The solid state relays used in this module have zero voltage detection, so they are more gentle than the standard electromagnetic ones when turning on receivers. That prevents voltage strokes and contributes to the longevity of your receivers. From the electrical point of view, a 2SSR Shield requires live wires in an electrical box to operate (the AC supply wire and a receiver wire; neutral wires should be connected outside the module).
RGBW
Our RGBW Shield can control 12 or 24 V DC LED strips with maximum working current of 10 A. You can use white, RGB, or RGBW strips. Let’s consider an example: if you used a 12 W/m 12 V strip, the RGBW Shield would be capable of operating with 10 m of such a strip. It would be 20 m if you used a 24 V strip. Electrically speaking, an RGBW Shield requires DC supply wires (positive and negative) and receiver wires in an electrical box.
Ethernet Gateway
One GetWired Ethernet Gateway is capable of operating with up to 63 GetWired modules, which should use no more than 3 A of current. Typical module power usage is no more than 0.5 W (about half that value when idle), so there is still a small margin even if you connect all 63 modules to one gateway. We recommend that you use a bus topology, so there should be no more than two separate bus cables connected to one gateway. Star topology (more than two separate lines with modules connected to one gateway) should be avoided.
Routing the Bus Cable
Bus Cable
As we mentioned in a previous update, you can use a popular twisted pair cable (such as Cat 5e) as your bus cable. There are, however, some wires that are better suited to this task. We recommend a special data-transmission cable designed for home automation, such as this one, which has four cores (two twisted pairs) and a core diameter of 0.8 mm (~20 AWG). It is much thicker than standard Cat 5e and much more convenient when installing GetWired modules. The link above leads to a popular electronic parts warehouse in Poland, but they probably ship to wherever you happen to live. And, even if they don’t, you can use that part as a reference when shopping locally. Anyway, it is just a suggestion. Cat 5e or Cat 6 will also get the job done.
Maximum Bus Length
There are two things you will need to take into consideration here:
Maximum bus length is baud-rate dependent – The default GetWired baud rate (57,600 bps) should provide stable communication to up to 1200 m (4000 ft) of total bus length. If you want to use bigger baud rates (such as 250,000 bps), you should remember not to exceed about 300 m (1000 ft) of total bus length
Supply voltage drop is an even more important factor – Supply voltage drop can be an issue because GetWired is using a 12 V DC central power supply. The low power usage of GetWired modules helps mitigate this concern, but we recommend that you keep the bus cable short and consider the following:
- Planning a separate bus for each level of the building
- Installing both ends of every bus wire in the switchboard or distribution box so it can be supplied from both sides
- Increasing the core diameter can be helpful, so if you decide to use standard Cat 5e cable, you might want to use more than one core for supply voltage and GND.
In the end, GetWired modules can operate under 7-14 V DC, so a small drop in supply voltage shouldn’t be an issue.
Actual Planning
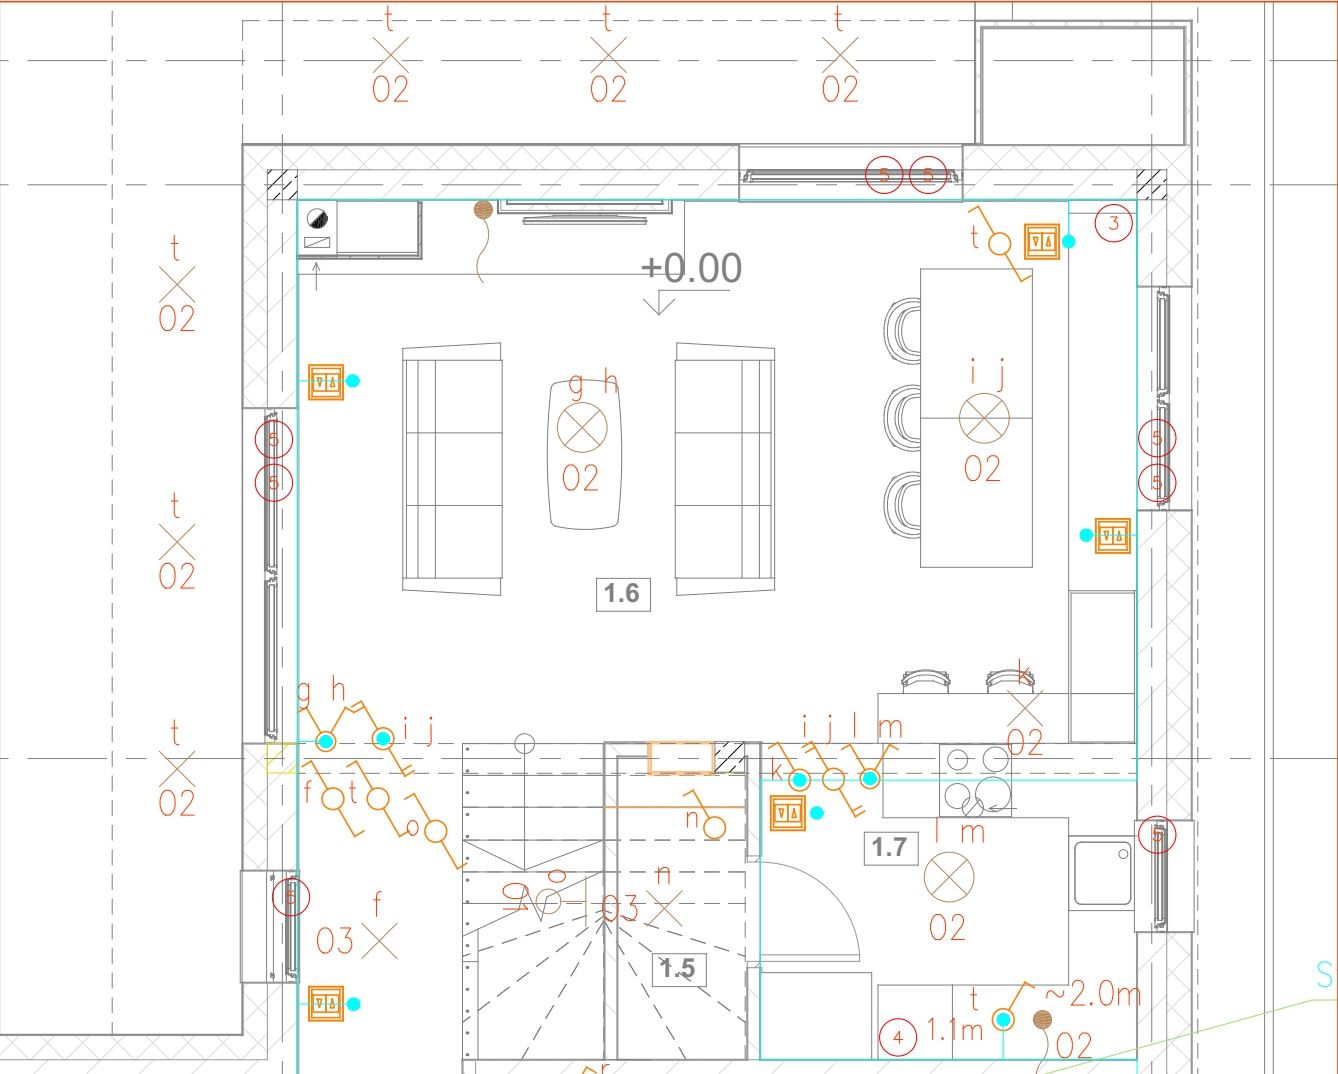
With all that in mind, you can begin planning your actual GetWired installation. The first thing you should do is to take your house plan (which may include the electrical installation) and mark a location for each modules. To do this properly, use the information in Know Your Modules, above.
Next, plan a route for your bus cable. It should start in a home automation switchboard or distribution box, then it should go through all electrical boxes that will house your GetWired modules. As mentioned previously, the bus cable should end in the very same distribution box where it started.
Regarding the route itself, we recommend keeping your signal cables a fair distance away from your AC supply cables. Remember to leave at least a few inches between them, especially over long distances. (It is fine to have them closer together inside the electrical boxes.)
Preparing a Distribution Box
Your GetWired switchboard or distribution box will not be very crowded. It should only contain the Ethernet Gateway (sometimes more than one; see the Ethernet Gateway section) and a central, 12 V DC power supply. You might want to reserve some of that extra space for future GetWired designs! (We’ll introduce a few of those in our next update.)
Meanwhile, to review, your distribution box should contain the following wires:
- Both ends of every bus cable
- An AC wire for the power supply.
When it comes to the power supply itself, we recommend something like this, which is efficient, well protected, and reliable.
Choosing Electrical Equipment
GetWired works with normally-open switches by default. It is possible to use almost any such switch. They can be connected directly to the MCU module by way of firm Molex PicoBlade connectors. Unfortunately, access to the specific wires is quite limited – Aliexpress was the only provider we found with good availability and inexpensive prices. MCU connectors have 3 or 4 pins (a six pin cable is included in the Programmer, Adapter, and Wires pledge level). We recommend a 30 cm length for use in electrical boxes.
Approaching our Final Week
We are approaching the final week of our campaign. We still have a long way to go before we hit our funding goal, so please support us if you want to see the first ever open solution for wired home automation take this all-important step from something that works to something you can buy.
We will continue to do our best to produce the highest quality updates covering the most important information about our project. If there’s anything you’d like to know about, please just drop us a line!