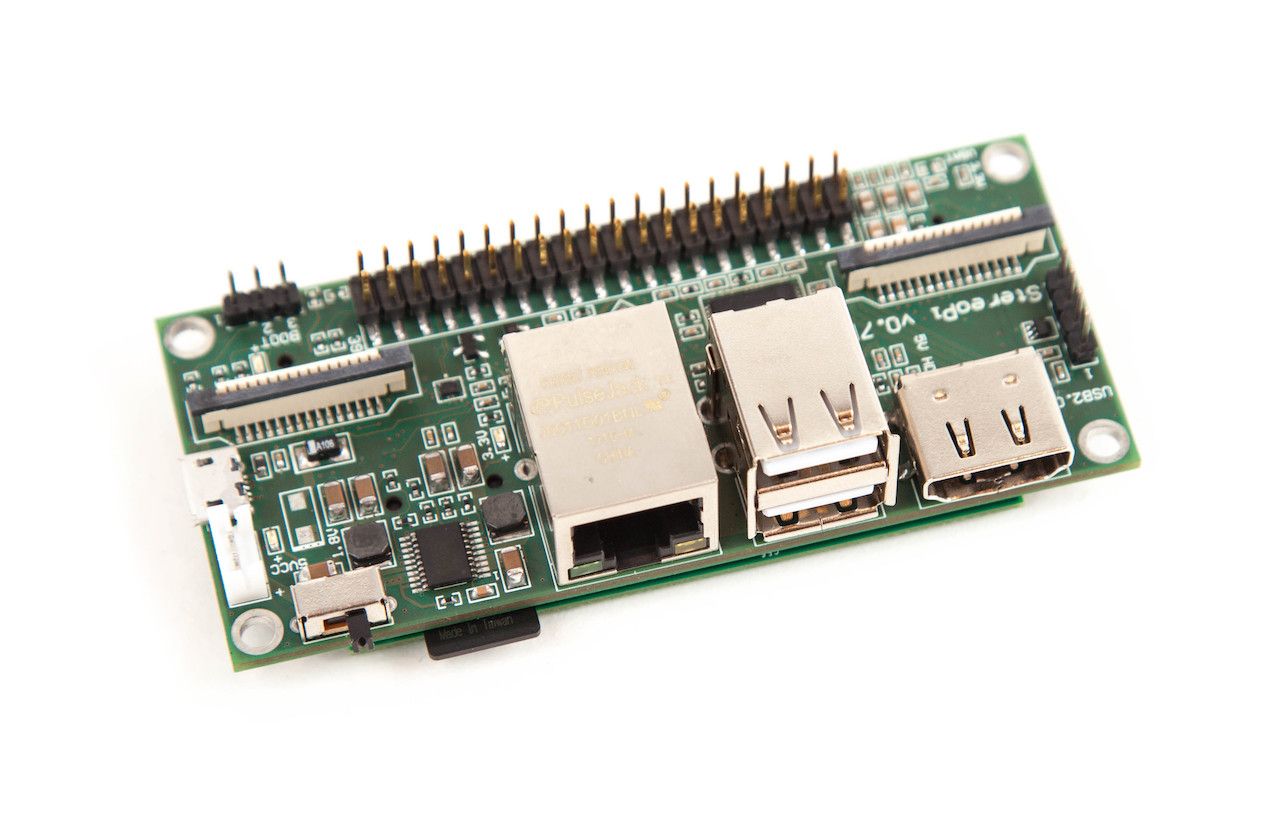
StereoPi is an open source stereoscopic camera based on Raspberry Pi. It can capture, save, livestream, and process real-time stereoscopic video and images. StereoPi opens up countless possibilities in robotics, AR/VR, computer vision, drone instrumentation, panoramic video, and more.
We’ve already made many demos of StereoPi integrating with other tools, including:
The above video was captured by running this simple command from a Raspbian terminal:
raspivid -3d sbs -w 1280 -h 480 -o 1.h264
Taking a stereoscopic image is just as easy using:
raspistill -3d sbs -w 1280 -h 480 -o 1.jpg
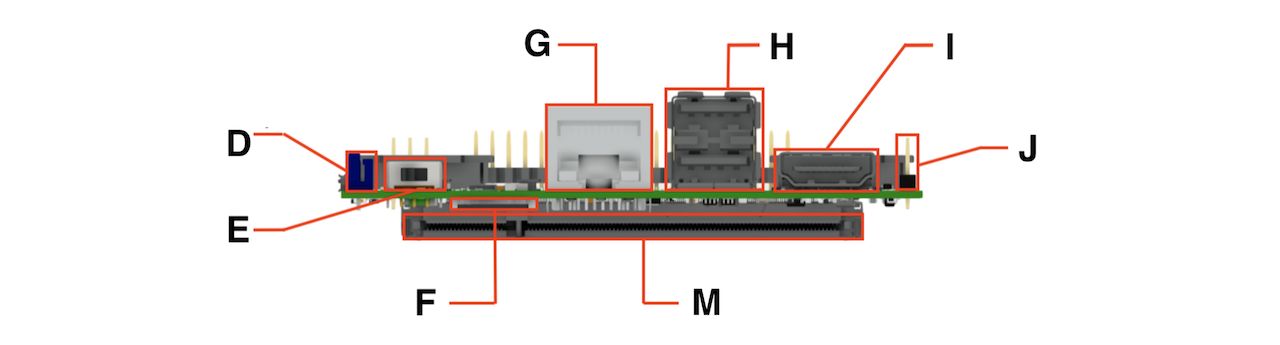
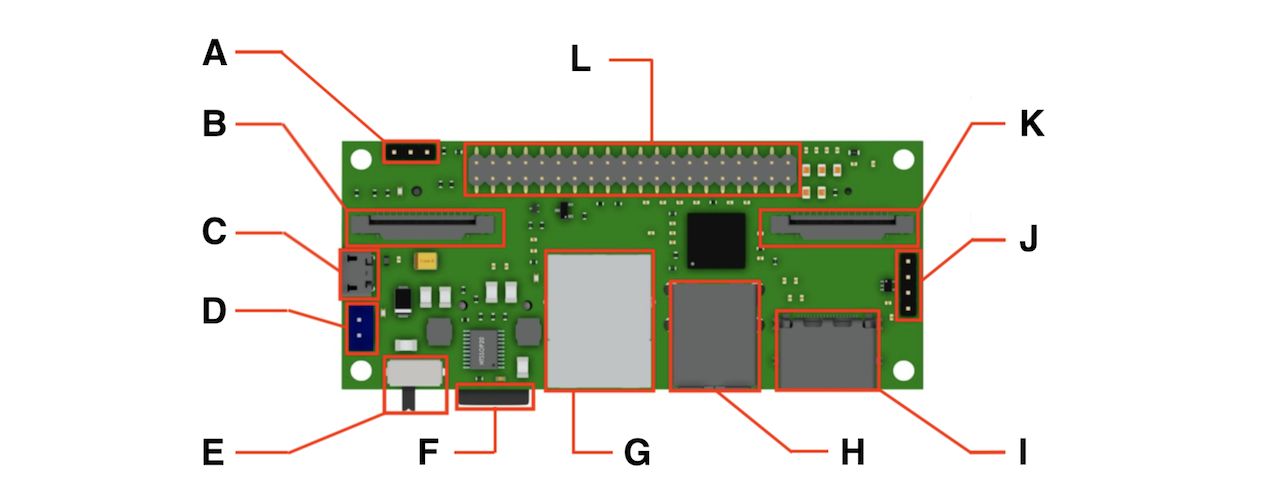
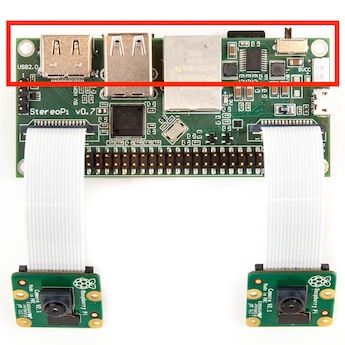
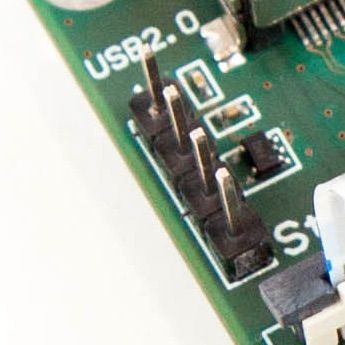
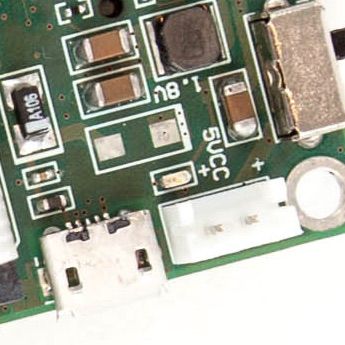
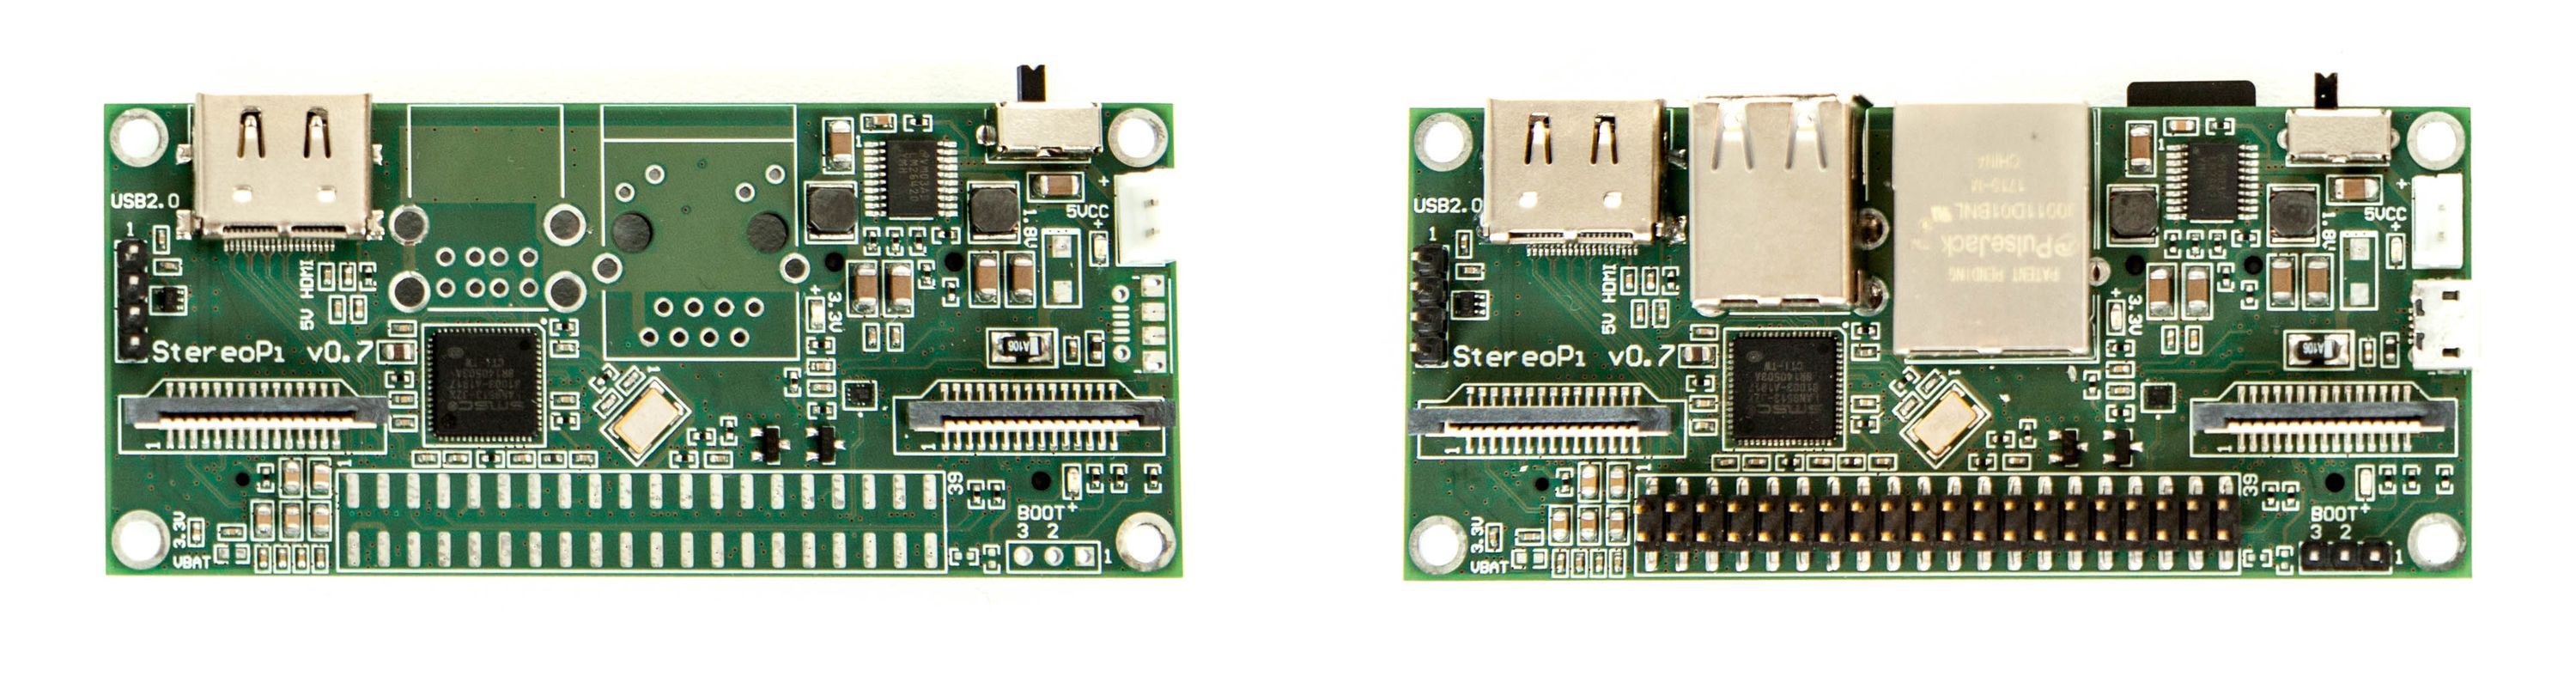
| A. boot mode jumper | H. dual USB Type-A connector |
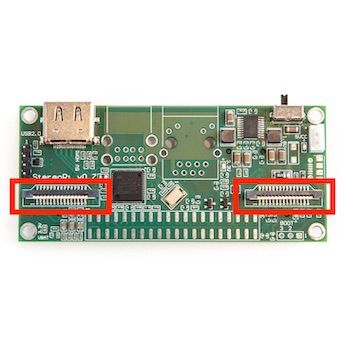
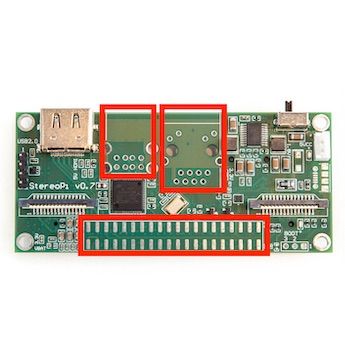
| B. camera 1 CSI-2 connector | I. HDMI out |
| C. micro USB (for firmware upload) | J. USB port pin header |
| D. 5 VDC power connector | K. camera 2 CSI-2 connector |
| E. power switch | L. 40-pin RPi GPIO header |
| F. microSD slot | M. RPi Compute SO-DIMM connector |
| G. RJ45 Ethernet jack |
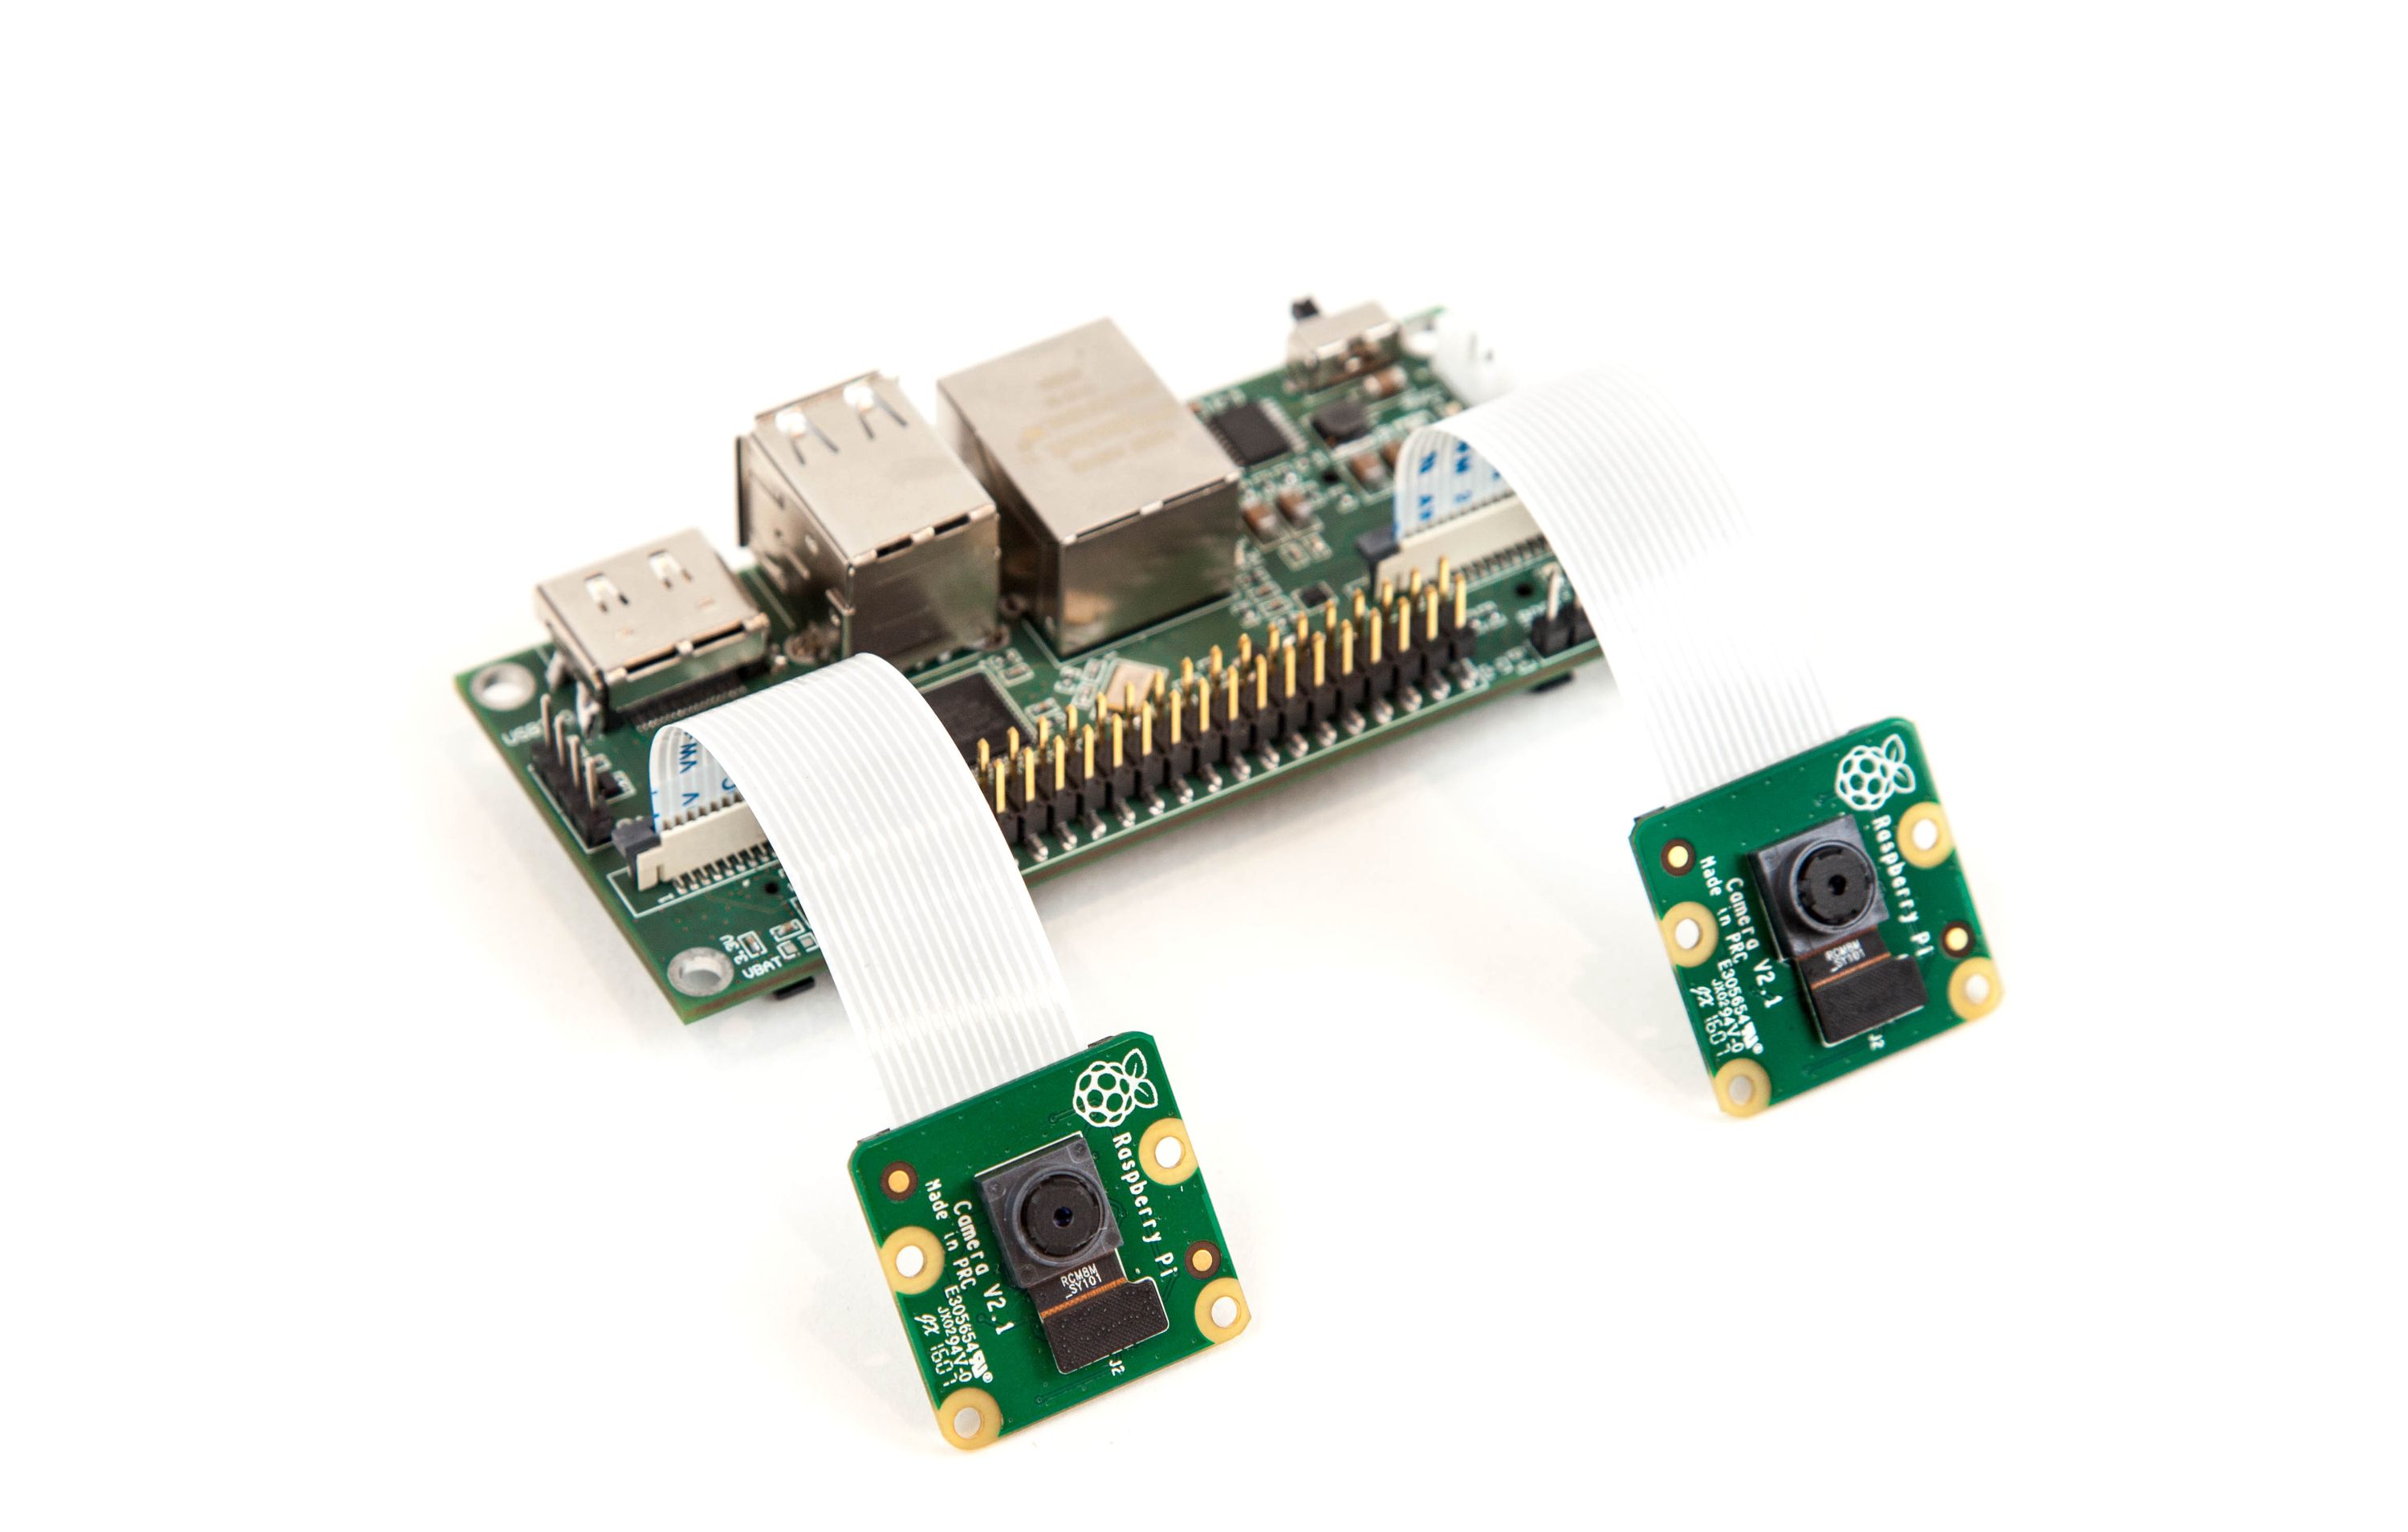
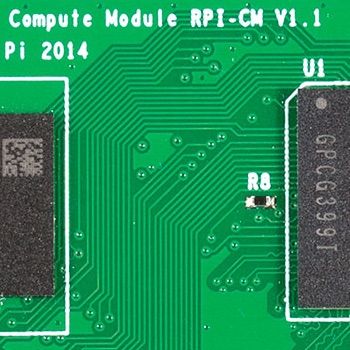
StereoPi is a carrier board for a Raspberry Pi Compute Module and is compatible with all compute module variants: CM1, CM3 (normal and Lite), and CM3+ (normal and Lite):
With Raspberry Pi at its core, StereoPi naturally makes use of standard Raspbian.

Of course, Raspbian comes with Python, which means getting started developing with StereoPi is as easy as installing Picamera, a pure Python interface to the Raspberry Pi camera module that supports stereo capture. For example:
from picamera import PiCamera
camera = PiCamera(stereo_mode='side-by-side', resolution=(1280,720))
camera.capture('foo.jpg')
| StereoPi | RealSense D435+Aaeon | QooCam | ZED Mini | Duo MLX | |
|---|---|---|---|---|---|
| Open hardware | Yes | No | No | No | No |
| 3D livestream | Yes | Yes | Yes | Yes | No |
| Depth map | Yes | Yes | No | Yes | Yes |
| Swappable cameras | Yes | No | No | No | No |
| Adjustable stereobase | Yes | No | No | No | No |
| On-board CPU for user code | Yes | Yes | No | No | No |
| Raspberry Pi inside | Yes | No | No | No | No |
| Price for complete setup | $125 | $259 | $399 | $449 | $695 |
StereoPi is a perfect way to get to know how stereoscopic vision works "under the hood." You’ll immediately see the effects on human perception of changing various camera calibrations and settings, such as stereobase (the distance between cameras).
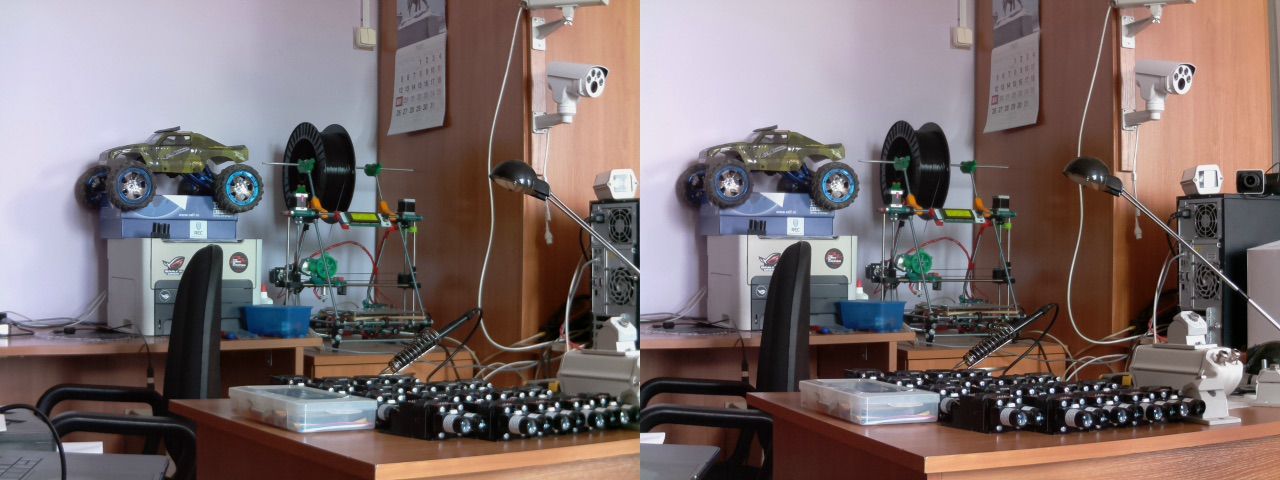
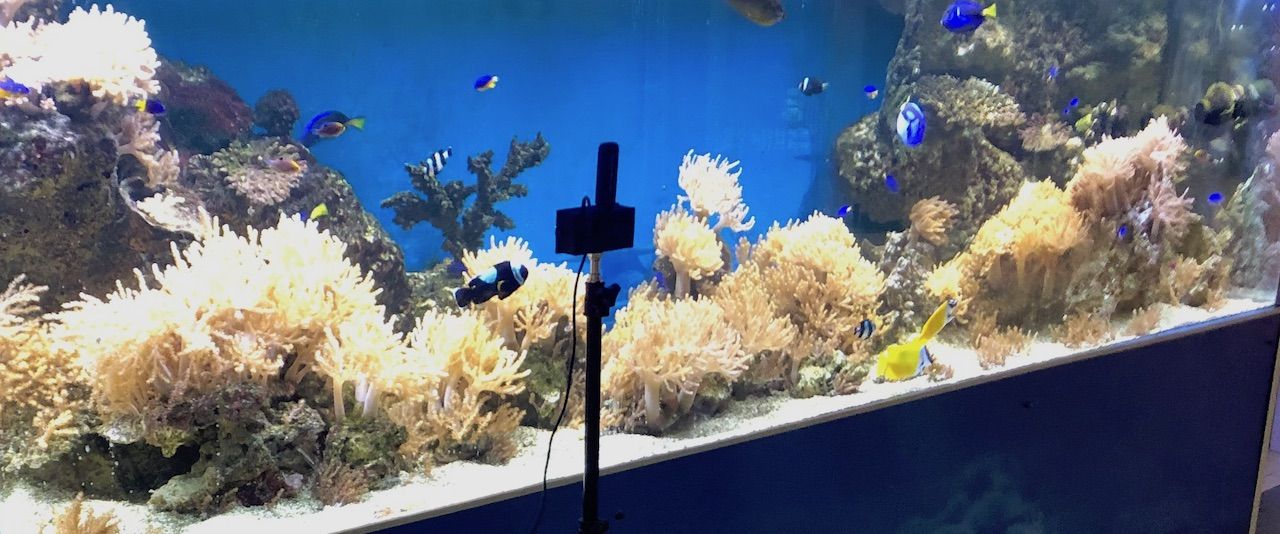
With a StereoPi Starter Kit, a simple 3D-printed case, a 4G modem, and some simple code, we livestreamed this 3D video of an aquarium straight to YouTube:
To view this video in 3D, you can use any phone equipped with a 3D viewer like Google Cardboard. You also can view it with Oculus Go. Below is a photo of the actual set up used to capture the video:
StereoPi is small enough and flexible enough to quickly prototype new augmented and virtual reality (AR/VR) applications. It’s powerful enough for some real-time video processing right on the Raspberry Pi, and fast enough to stream video to a host computer for additional processing. Here’s what we did with Oculus Go:
We assembled this prototype over the course of a few days. The idea is to give the person wearing the Oculus Go a third-person view of themselves, as is often done in video games. Of course, real life is very different than a video game!
Autonomous cars, drones, and robots are coming! With StereoPi, you can seamlessly dive into this oncoming wave. Start with basics like camera undistortion and calibration, and then level-up to building depth maps. Combine this with neural networks and you’ll be ready to fight the imminent SkyNet an expert in unmanned vehicles. Here’s a depth map we made using OpenCV 3.0 running on StereoPi:
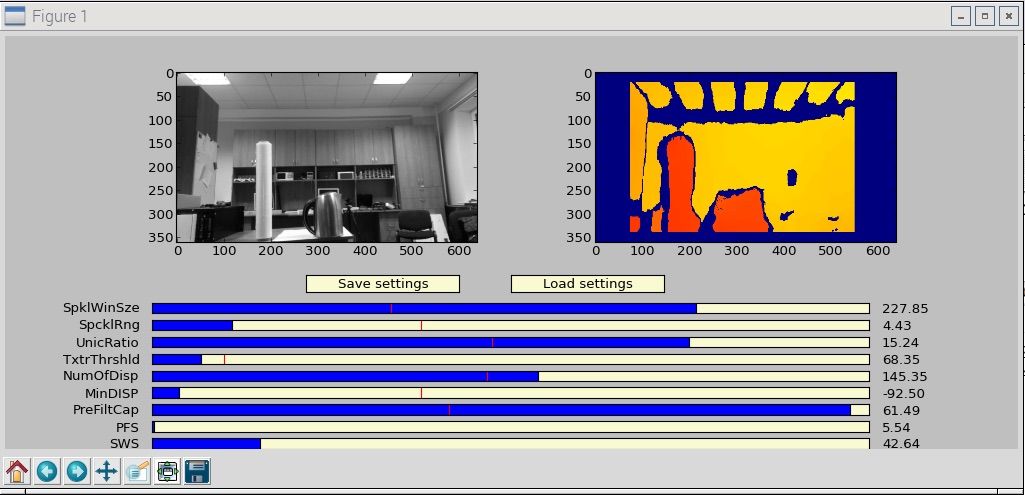
If you have experience running OpenCV on Raspberry Pi, you may know that most paths will lead you to PyImageSearch, where Adrian gives a lot of ready-to-use examples of everything from OpnenCV installation, all the way up to face detection on the Raspberry Pi. We hope Adrian will use StereoPi to make some new tutorials for stereoscopic video!
You can find our brief OpenCV Python depth map tutorial on our blog, and source code in our stereopi-opencv GitHub repository.
A critical task for many robots is understanding their physical environment. But, as a budding roboticist, you might not have thousands of dollars to shell out. StereoPi to the rescue! In this example, we used the Robot Operating System (ROS) image for Raspberry Pi from Ubiquiti Robotics and added some simple code to arrive at this depth map:
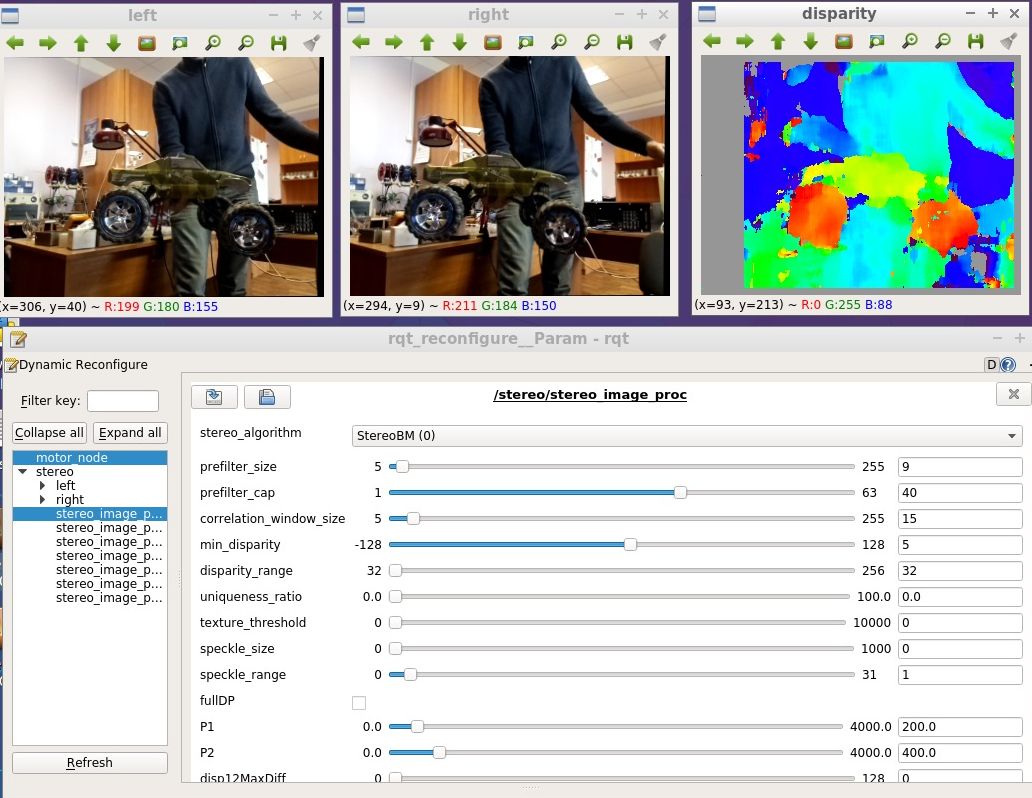
If you’ve experimented with ROS and Raspberry Pi, then you may already know the popular raspicam_node package for working with the Raspberry Pi camera. We asked this package author, Rohan Agrawal (@rohbotics), if it is possible to use it in stereoscopic mode. After a brief GitHub discussion and a few tests, it appears you can capture stereoscopic images out-of-the-box. Thanks to Rohan for adding camera selection support!
So, right now, you can use StereoPi for depth maps and SLAM in ROS. Our plan is to help create an ROS driver optimized for StereoPi with full stereoscopic support, like other ROS-supported stereoscopic cameras.
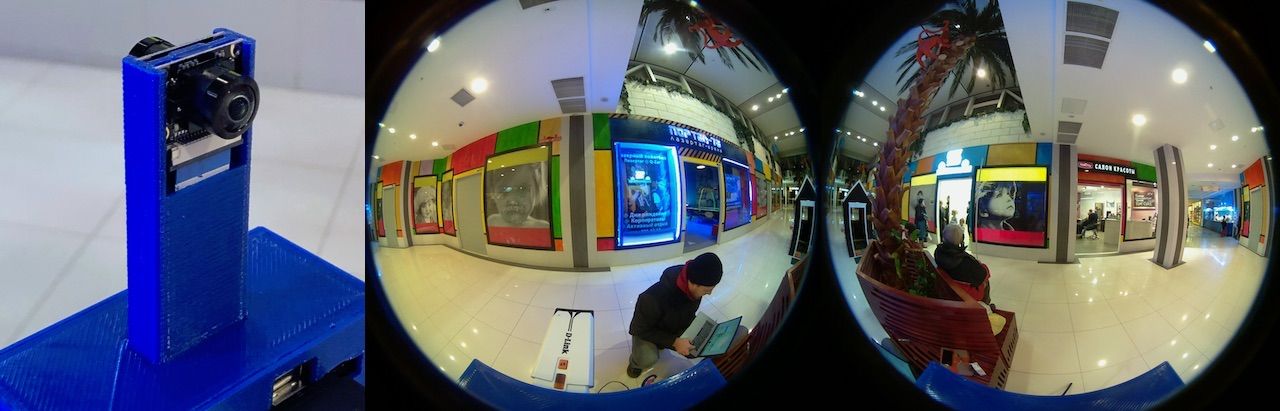
Creating a 360° panoramic camera is as easy as stitching together the images from two wide-angle cameras to create a single spherical image. All you need is a mounting plate for the cameras and either on-board or off-board stitching software. Below is an example of what you can do with StereoPi and a panoramic stitcher like Hugin:
This is the actual setup with two 220° cameras:
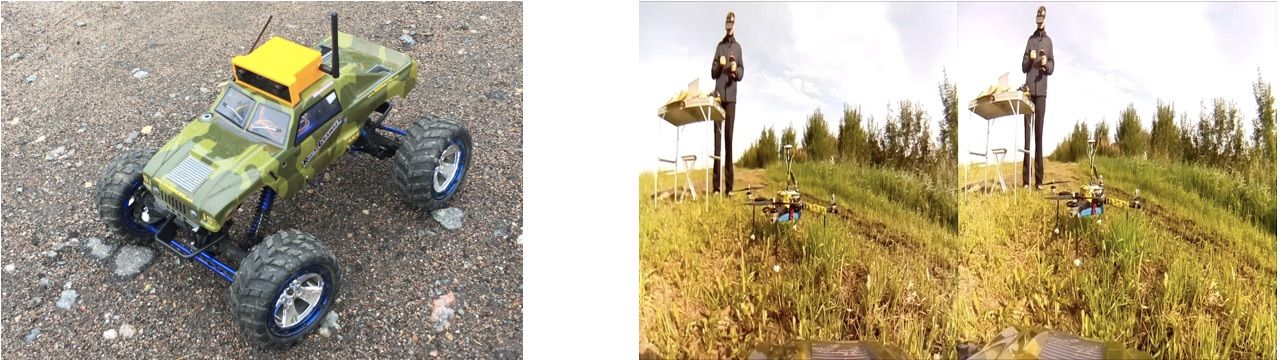
StereoPi works seamlessly with the popular raspivid native Raspberry Pi camera application — just add the -3d sbs option to receive stereoscopic video. This means StereoPi also works with raspivid-based projects, such as Wifibroadcast and EZ-WifiBroadcast, for livestreaming video from drones using a Raspberry Pi.
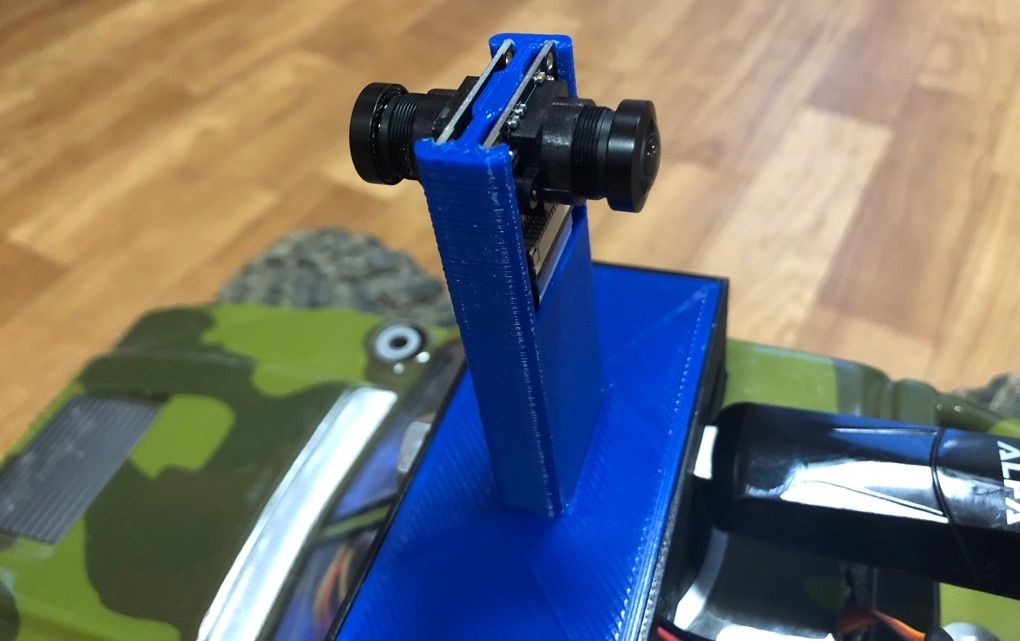
Here’s a setup using Wifibroadcast to livestream video from a StereoPi with wide-angle cameras mounted on top of a rover to a Raspberry Pi-based ground station and then to an iPhone equipped with a Google Cardboard viewer:
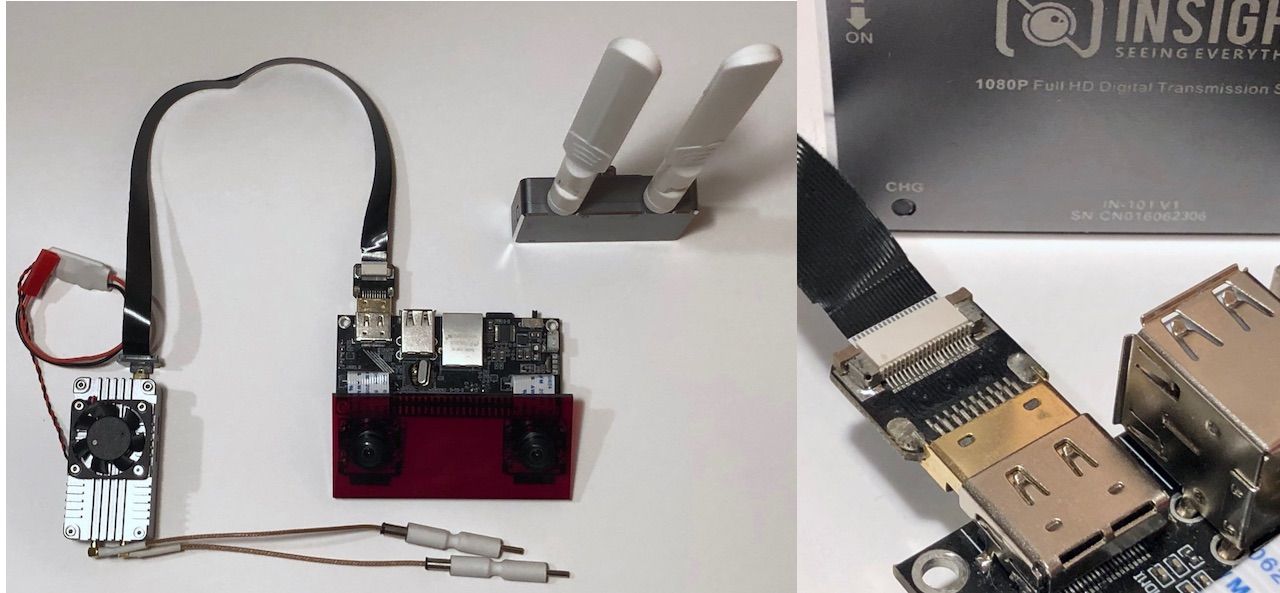
StereoPi can also be used with off-the-shelf video streaming solutions that simply take in HDMI and wirelessly stream it to a base station. In the setup below, we’ve connected the StereoPi’s HDMI output to an Insight SE 5G:
Of course, you can also point the StereoPi’s cameras in opposite directions to get both the front and rear views of your drone:
If you use long-range Wi-Fi solutions like Mikrotik or Ubiquiti, or a COFDM Ethernet bridge (e.g., HN-550TX), you can combine telemetry data with the two StereoPi video streams and transfer it to your ground station.
We know from experience how a seemingly minor inconvenience in a piece of hardware can lead to a massive amount of time lost and frustration. That’s why, when designing StereoPi, we took into account a lot of small, but very important features.
StereoPi comes in two flavors: standard and slim. Most people will want the standard edition. The slim edition is intended for advanced users who plan to integrate StereoPi into another device and don’t need (or don’t have space for) the large connectors. Specifically, the slim edition doesn’t have the USB Type-A connectors, RJ45 Ethernet jack, or GPIO header. Of course, the PCB pads for those connectors are still available in case you want to solder directly to them or install your own connectors.

In all other ways, the slim edition is identical to the standard edition. Both support all variants of Raspberry Pi Compute Module (CM1, CM3/CM3+, and CM3/CM3+ Lite).
In addition to the StereoPi boards themselves, we’re offering a variety of accessories and kits so you can tailor StereoPi to your needs.
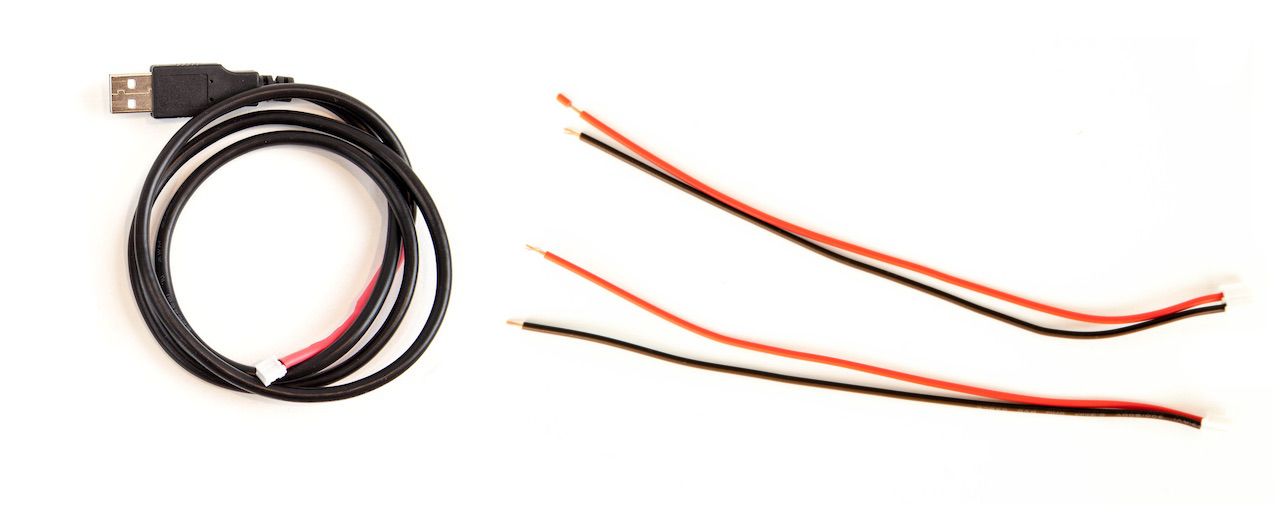
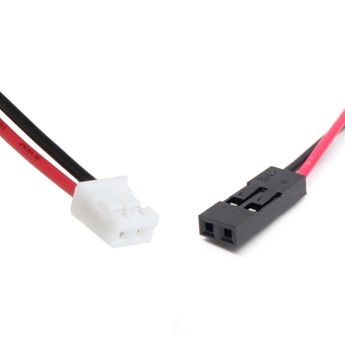
We have two kinds of power cables:
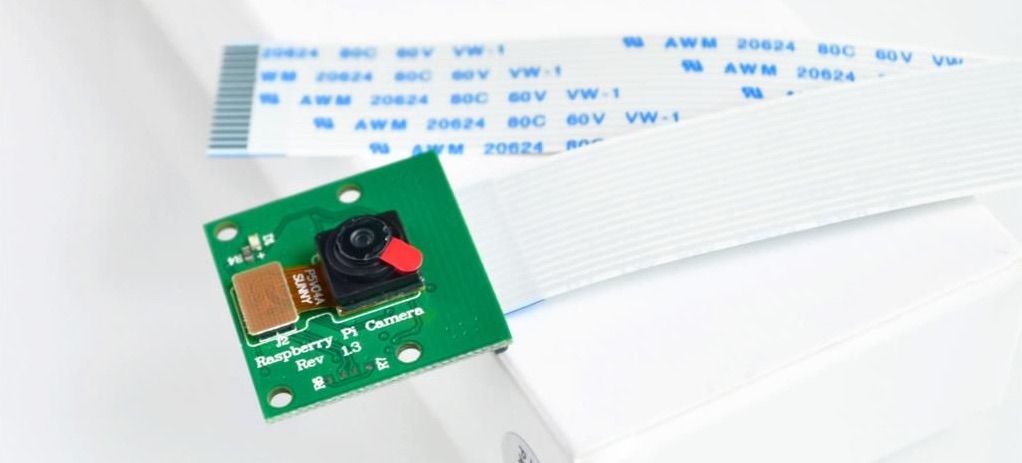
This entry-level camera is great for experimenting with StereoPi. It’s included in the starter kit.
| Sensor type | OmniVision OV5647 (5 MPx) |
| Sensor resolution | 2592 x 1944 px |
| Angle of view | 54° x 41° |
| Video | up to 1920 x 1080p @ 30 FPS |
| Board size | 25 mm x 24 mm |
| Camera ribbon cable | ~20 cm cable included |
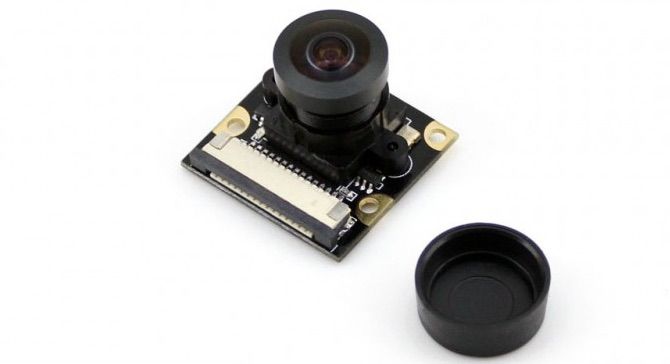
We love this camera and use it in most of our projects! However, it is relatively expensive, so we’re only offering it as part of the deluxe kit.
| Sensor type | OmniVision OV5647 (5 MPx) |
| Sensor resolution | 2592 x 1944 px |
| Angle of view | 160° diagonal |
| Video | up to 1920 x 1080p @ 30 FPS |
| Board size | 25 mm x 24 mm |
| Camera ribbon cable | ~20 cm cable included |

All cameras on the market include a camera ribbon cable approximately 10-20 cm long, which is great for benchtop setups, but unwieldy for compact setups. When space matters, we prefer this short (5 cm) camera ribbon cable.
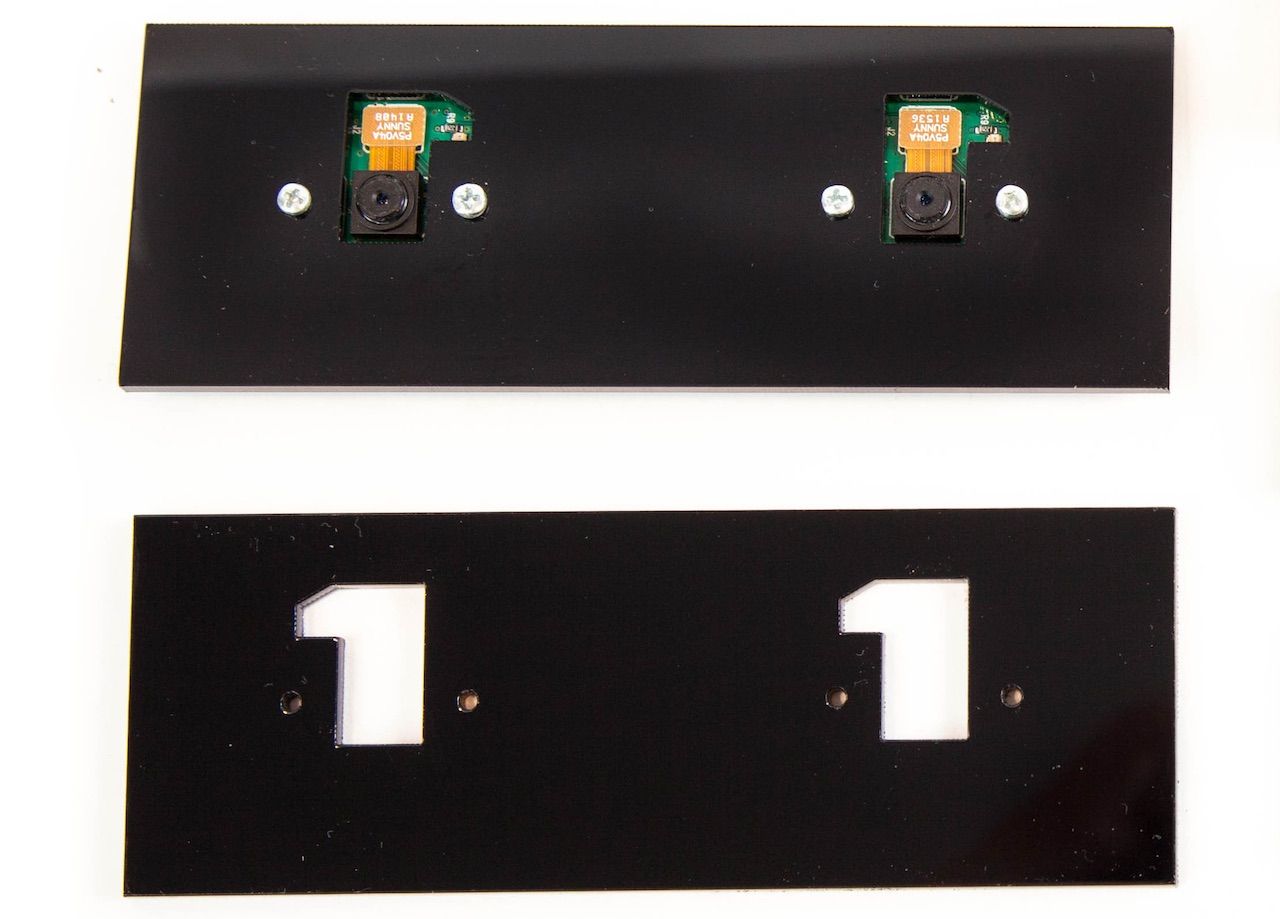
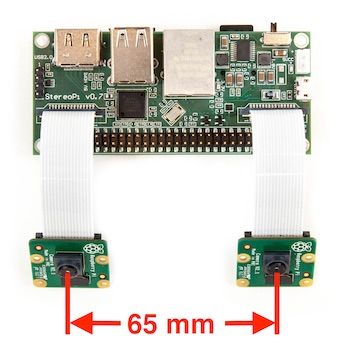
This custom laser-cut acrylic plate makes it easy to mount two V1 or V2 cameras in a stereoscopic setup. The plate has holes for 2 mm screws (not included) to affix camera. It also has cutouts for the camera optics so they will be positioned 65 mm apart.
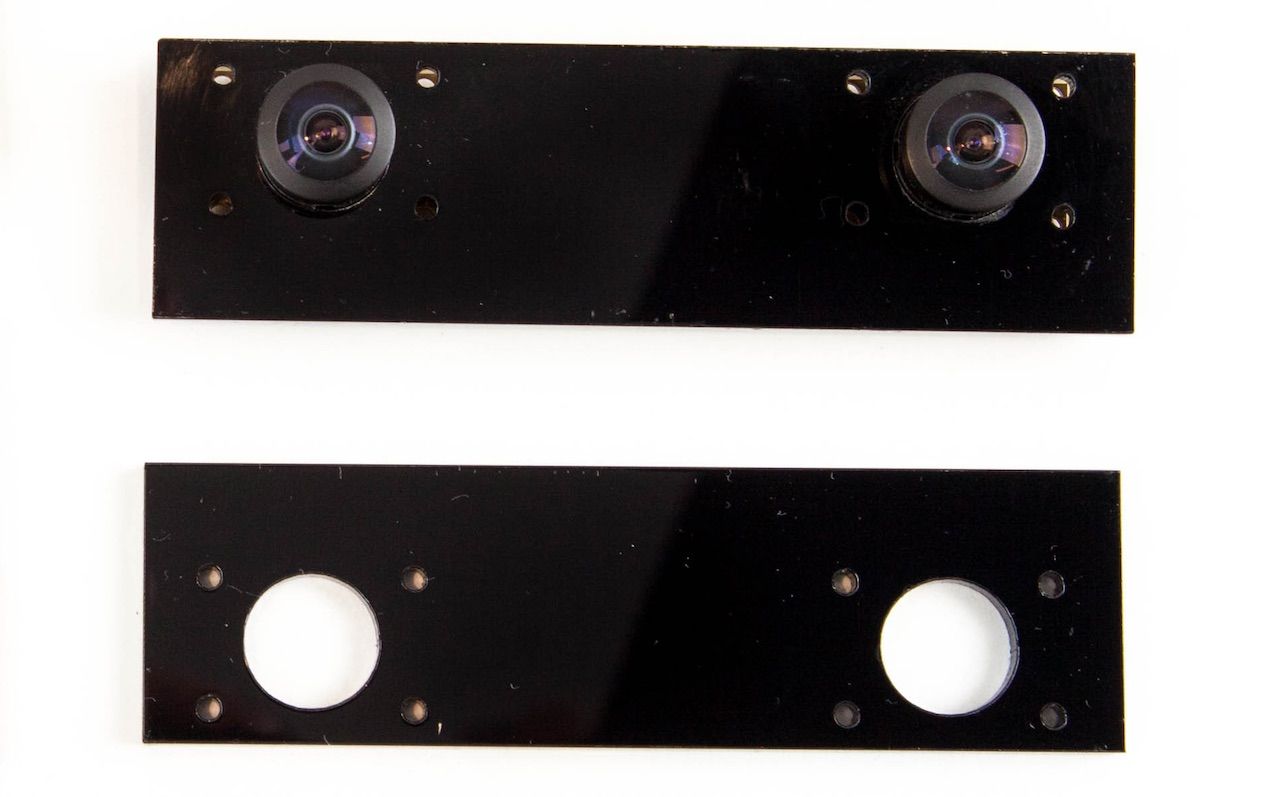
This custom laser-cut acrylic plate makes it easy to mount two wide-angle Waveshare cameras in a stereoscopic setup. The plate has holes for 2 mm screws (not included) to affix camera. It also has cutouts for the camera optics so they will be positioned 65 mm apart.
We’ve been making remote-controlled things with real-time video livestreams since 2010. We’ve made robots, boats, planes, copters, and so on. The smallest of these were four-centimeter-long RC cars used for real-time online racing (hello Q-Steer by Takara Tomy!), and the largest was a four-ton iPad-controlled bulldozer. Somewhere in the middle was an iPad-controlled automobile, which took first place on the Discovery Channel in 2014.
In doing these projects, we were always faced with the problem of finding inexpensive tools. For example, in ancient 2011 (before Raspberry Pi!) we created our own single-board computer with the TI DaVinci DM365 SoC. This ended up being our main tool for projects for a several years. However, by 2015, we understood we needed not only to control our drones and robots, but also add more autonomous features. The age of AI and computer vision had arrived. This informed the key requirements for our new tool:
We searched for existing ready-to-use solutions, but they were all either poor-quality toys or expensive industrial-grade systems. This remains true even today. For example, you can use something like a ZED Stereo series stereo camera ($450), add some "angry" hardware like a Jetson TX2 (~\$300 + \$200 for carrier board) with support for USB 3.0, but that’s about $1,000 right there.
Or you could get USB stereo cameras on Aliexpress, but not have any way to control the video options and spend most of your time fighting horrible (or nonexistent) drivers to manage an uncompressed USB stream to your single-board computer. Worse still, neither of these solutions is really hackable or flexible enough for some really interesting applications.
That’s why we decided to create StereoPi: two fully configurable cameras, a friendly Raspberry Pi ecosystem with a lot of ready-to-use examples, and a total cost well under $150. In the beginning of 2016, we made a first-generation board on Compute Module 1. In 2017, we made a second-generation board with Compute Module 3 that was ten times more powerful. Now, with this campaign, we’ll finally have a tool that lets us focus on our projects instead of fighting the wrong hardware.
For StereoPi production, we’ve chosen a full-service contract manufacturer that does everything from component purchasing to final quality assurance testing. Our plan calls for three stages of production:
In the prototyping stage, we work with the manufacturer to check that everything is okay with our schematics, PCB, and components. For example, we discovered that our original microSD connector choice was end-of-lifed and there was a market shortage, so we had to find a replacement.
This stage comes right before all batch manufacturing and is intended to find hidden bugs and any remaining PCB or component problems. In the worst case, we would have to make all the PCBs over again with fixes, or buy alternative components if we encounter quality issues. In the best case scenario, the manufacturing is successful and we progress to the next stage.
If we gather many more orders than expected, the production time can be lengthened to accommodate additional batches. Delivery will be carried out as units are produced.
We plan to send devices to backers using Crowd Supply fulfillment services, so parcels will be shipped to backers from Portland, Oregon. Delivery within the US is included with the price of StereoPi. Delivery outside the US will incur a surcharge during checkout. For more information, please see Crowd Supply’s guide on ordering, paying, and shipping.
Production: Factory batch production is a difficult challenge and errors can be very costly. Thus, before manufacturing the main batch, we must be sure all aspects of production are double and triple checked. Final PCB drawings, components, assembly procedures, and accessories quality (like cameras) are all tested in close collaboration with our factory before production begins. Our three-stage manufacturing plan is intended to minimize potential errors If we have any problems in stages one or two, we will take action to mitigate them before moving to the next stage. This might take some additional time and money, but it will be worth avoiding a mistake in the main production batch.
Delivery: We have two steps in delivery. First, there is delivery from the factory to Crowd Supply’s warehouse. Second, there is delivery from Crowd Supply’s warehouse to backers. Both steps have potential risks of parcel damage or unexpected delivery delays. For example, Chinese New Year may impact the production schedule and therefore the delivery schedule. We will inform all backers of any delays and what we’re doing to avoid them.
Software support of stereoscopic mode: While developing StereoPi, we were focused on full software compatibility with the original Raspberry Pi, which we managed to achieve. You won’t need to patch a kernel or do some other tricky things to get it to work. Raspbian has had stereoscopic support since 2014, but in all these years, the only mass-produced hardware available for DIY enthusiasts has been the Raspberry Pi Development Board. As such, the stereoscopic feature was used and tested not by tens of thousands of people, but only by hundreds of people. It may be that in some special use cases, you might be faced with some software problems. In our own experience, nearly all stereoscopic features "just work" and in those few cases that don’t work, the Raspberry Pi community helps us quickly solve the problem.

Produced by StereoPi in St. Petersburg/Moscow, Russia.
Sold and shipped by Crowd Supply.

With AnyCase Kit you can get your setup in a 10 minutes, before you go to your 3D printer or laser cut machine! You can assemble any case with 25, 65, 120 or 200 mm stereobase, or for 360 degree video with just a screwdriver! And you have 12 more camera ribbons now, do not afraid to bend you cables in your bold experiments!

Perfect for DIY ninjas and those wanting to embed StereoPi in a tight space. This board is the same as the standard edition, but without all the bulky connectors - the Ethernet RJ45 jack, GPIO header, and dual USB Type-A connector have not been populated. To use this board, you will need your own Raspberry Pi Compute Module, cameras, and camera ribbon cables. Two short power cables already included.

The world of stereoscopic video awaits! This board is the ultimate interface between two cameras and a Raspberry Pi Compute Module. It comes with all the bells and whistles, including Ethernet, dual USB ports, GPIO header, microSD slot, HDMI output, and more. To use this board, you will need your own Raspberry Pi Compute Module, cameras, and camera ribbon cables. Two short power cables already included.

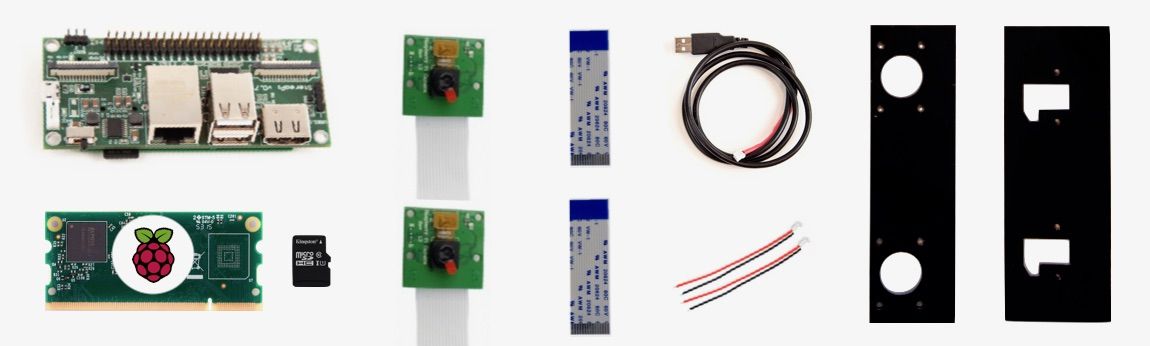
This kit has everything you need to get started right away. The kit includes one StereoPi Standard Edition board, two V1 cameras (w/ ~20 cm ribbon cables), one Raspberry Pi Compute Module 3 + Lite, and everything in the StereoPi Accessories Kit (two short ribbon cables, one USB power cable, two power cables, one V1/V2 dual-camera mounting plate, and one wide-angle dual-camera mounting plate). We've also included a microSD card pre-imaged with Raspbian and all the stereoscopic video and image demos you see on this project page.

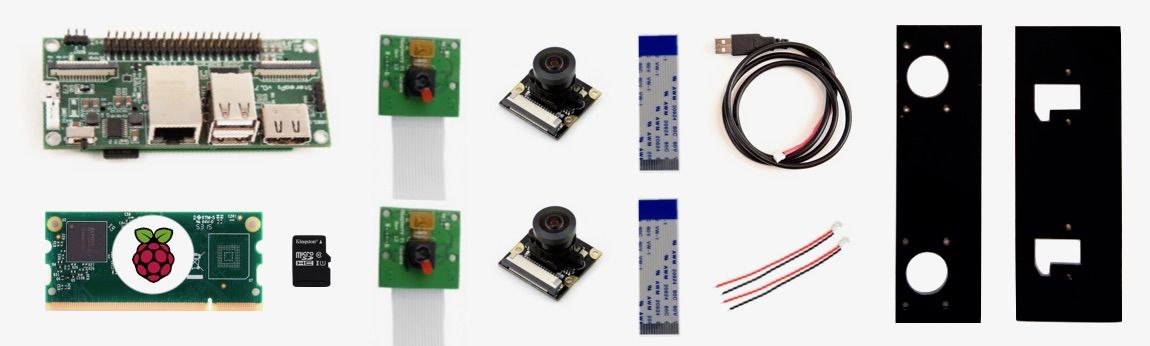
This kit includes everything in the StereoPi Starter Kit and adds two wide-angle (160°) cameras (w/ ~20 cm ribbon cables). With this kit, you'll be able to run all of the demos shown on this project page and start experimenting on your own. You will reign supreme over your stereoscopic domain.

We are a small team of geeks who have been making remote-controlled things with livestreaming video since 2010. We've done everything from boats and planes, to robots, copters, and VR helmets. If we can't find the right tools for our projects, we build them ourselves.